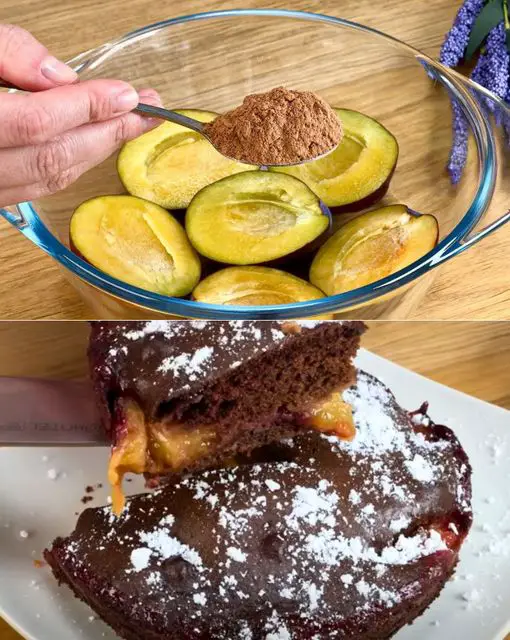
Plum and Cocoa Cake Recipe
Table of Contents
Ingredients
Wet Ingredients:
- 1 large egg
- 50 g sugar (about 1/4 cup)
- 1 tablespoon yogurt
- 30 ml vegetable oil (about 2 tablespoons)
Dry Ingredients:
- 150 g all-purpose flour (about 1 1/4 cups)
- 1 teaspoon baking powder
- 1 tablespoon cocoa powder
Fruit:
- 4 plums, halved and pitted
Optional:
- Powdered sugar, for dusting
Nutrition Information
- Servings: 8 slices
- Calories per serving: Approximately 150 kcal
- Fat: 7g
- Carbohydrates: 20g
- Protein: 3g
Instructions
1. Prepare the Plums
Start by preheating your oven to 180°C (350°F). As the oven warms up, halve and pit the 4 plums, setting them aside once prepared. The plums will serve as the star of the cake, providing both flavor and texture.
2. Mix the Wet Ingredients
In a medium-sized mixing bowl, beat the egg and sugar together until the mixture becomes pale and slightly frothy. This step is crucial as it incorporates air into the mixture, which will help give the cake a light texture. Next, add the yogurt and vegetable oil to the egg mixture, stirring until everything is well combined. The yogurt not only adds moisture but also contributes a slight tang that balances the sweetness of the sugar and richness of the cocoa.
3. Combine the Dry Ingredients
In a separate bowl, sift together the flour, baking powder, and cocoa powder. Sifting ensures that there are no lumps in the dry ingredients and helps to evenly distribute the baking powder, which is key for even rising. Gradually add the dry ingredients to the wet mixture, stirring gently until just combined. It’s important not to overmix the batter; doing so can result in a dense cake. The batter should be smooth and slightly thick.
4. Assemble the Cake
Prepare a 20 cm (8-inch) round cake pan by either greasing it with a bit of vegetable oil or lining it with parchment paper. Pour the cake batter into the prepared pan, spreading it evenly with a spatula. Once the batter is evenly distributed, arrange the plum halves on top, cut side down. The plums will slightly sink into the batter as it bakes, creating a beautiful marbled effect and ensuring each bite has a bit of fruit.
5. Bake the Cake
Place the cake in the preheated oven and bake for 25-30 minutes. To check for doneness, insert a toothpick into the center of the cake; if it comes out clean, the cake is ready. If there’s a bit of batter clinging to the toothpick, give it a few more minutes in the oven. The cake should be set, with a slightly springy top when gently pressed.
6. Cool and Serve
Once baked, remove the cake from the oven and let it cool in the pan for 10 minutes. Afterward, transfer the cake to a wire rack to cool completely. This cooling period allows the flavors to meld and the cake to set, making it easier to slice. If desired, dust the top with a light layer of powdered sugar for an elegant finish.
7. Slice and Enjoy
Once the cake is completely cooled, slice it into portions and serve. The Plum and Cocoa Cake is perfect on its own, but it pairs wonderfully with a dollop of whipped cream or a scoop of vanilla ice cream for an extra indulgent treat. The cake keeps well at room temperature for a couple of days, making it an ideal option for a make-ahead dessert.
Tips for Success
- Plum Variations: Experiment with different types of plums to see which variety you prefer. Red or black plums can offer varying levels of sweetness and tartness.
- Chocolate Boost: If you’re a chocolate lover, consider adding some chocolate chips to the batter for extra richness.
- Storing the Cake: Keep the cake in an airtight container at room temperature for up to three days. If you live in a warmer climate, it’s best to store it in the refrigerator to prevent the plums from spoiling.This Plum and Cocoa Cake is a simple yet sophisticated dessert that showcases the best of seasonal fruits combined with the timeless appeal of cocoa. It’s a perfect recipe to enjoy with family and friends, offering a harmonious blend of flavors and textures in every bite.

Leave a Reply