Category: healthy food

  • ✨ Stuffed Potato Croquettes with Chicken, Mushroom & Cheese Filling

    ✨ Stuffed Potato Croquettes with Chicken, Mushroom & Cheese Filling

    A rustic family recipe — crispy outside, creamy inside, with a hearty and cheesy filling that melts in your mouth.


    Why You’ll Love These

    • Made with simple, accessible ingredients

    • Beginner-friendly — no special tools needed

    • A versatile snack or meal: serve hot with sauces or cold in lunchboxes

    • Great for using leftover mashed potatoes or cooked chicken


    Ingredients

    For the Potato Dough:

    • 1 kg small English potatoes (waxy or all-purpose preferred)

    • 1 grated carrot

    • 2 eggs

    • 2 onions, chopped (divided)

    • 5 tbsp wheat flour

    • 1 tbsp butter

    • Salt and black pepper, to taste

    • Chopped fresh parsley, to taste

    For the Filling:

    • 100–200 g chicken breast fillet, finely chopped or shredded

    • 5 fresh mushrooms, chopped (button or cremini)

    • 100 ml cream (heavy cream or cooking cream)

    • 100 g grated fresh cheese (mozzarella, gouda, or a melty cheese)

    • 1 tbsp butter

    • Salt and pepper, to taste

    For Cooking:

    • Vegetable oil, for shallow frying

    • Optional: extra flour for dusting


    Step-by-Step Instructions


    Step 1: Prepare the Potato Dough

    1. Peel and boil the potatoes in salted water until fork-tender.

    2. Drain and let them cool slightly.

    3. Mash the potatoes with a fork or masher until smooth (do not blend).

    4. In a frying pan, melt 1 tbsp butter, sauté 1 chopped onion until translucent.

    5. Add grated carrot, season with salt and pepper, and cook until softened (about 4 minutes).

    6. Combine sautéed mixture with mashed potatoes in a large bowl.

    7. Add 2 eggs, chopped parsley, and 5 tbsp flour. Mix until fully incorporated.

    8. The dough should be soft but firm enough to shape. Add a little more flour if too sticky.

    Tip: You can refrigerate the dough for 20–30 mins for easier shaping.


    Step 2: Make the Filling

    1. In another pan, melt 1 tbsp butter, sauté the second chopped onion until lightly golden.

    2. Add finely chopped chicken breast and cook until white and cooked through.

    3. Stir in the chopped mushrooms and cook until they release moisture and soften.

    4. Pour in the cream, stir, and let it reduce slightly for 2–3 minutes.

    5. Add grated cheese, mix well, and remove from heat. Adjust salt and pepper to taste.

    Cheese Tip: Use a cheese that melts nicely but still has a little pull, like mozzarella or gouda.


    Step 3: Shape the Croquettes

    1. On a lightly floured surface, take a small portion of potato dough (about the size of a golf ball).

    2. Flatten it in your palm into a disc (about 6–8 cm wide).

    3. Create a small indentation in the center and spoon in 1–2 teaspoons of the filling.

    4. Gently fold and seal the dough over the filling, shaping into a small oval or round dumpling.

    5. Repeat with the remaining dough and filling.

    Optional: Dust lightly with flour before frying for extra crispness.


    Step 4: Frying

    1. Heat vegetable oil in a skillet (enough for shallow frying).

    2. When the oil is hot, carefully place the croquettes into the pan.

    3. Fry over medium heat, turning occasionally until golden brown on all sides.

    4. Remove and drain on paper towels.

    ⚠️ Avoid high heat — the outside will burn before the inside heats through.


    Serving Suggestions

    Serve hot, warm, or at room temperature with any of the following:

    • Garlic yogurt sauce

    • Spicy tomato chutney

    • Sweet chili sauce

    • Sour cream & dill dip

    Great as:

    • Appetizer

    • Party snack

    • Light dinner

    • Side dish with soup or salad


    ❄️ Storage & Reheating

    • Refrigerate leftovers in an airtight container for up to 3 days.

    • Freeze uncooked croquettes on a tray, then transfer to a bag for up to 2 months.

    • To reheat: Bake in oven at 180°C (350°F) until heated through and crispy again.


    Variations

    Variation How to Make
    Vegetarian Replace chicken with sautéed spinach or lentils
    Spicy Add chili flakes or hot sauce to the filling
    Cheesy Add cubes of cheese inside for a melted center
    Herbed Mix rosemary, thyme, or dill into the dough

    Pro Tips

    • Don’t overwork the potato dough; just mix until combined.

    • Taste the potato mix before adding raw egg — this way you can adjust seasoning.

    • Use gloves or lightly oiled hands for easier shaping.


    Final Words

    This heirloom-style recipe combines the humble potato with a rich, creamy filling — a dish that’s nourishing, nostalgic, and deeply satisfying. Whether you call them stuffed croquettes, dumplings, or savory fritters, they’re a tribute to homestyle cooking at its finest
  • Soft Homemade Empanada Dough with Creamy Potato & Cheese Filling

    Soft Homemade Empanada Dough with Creamy Potato & Cheese Filling

    Whether you’re planning a snack, a lunchbox treat, or a cozy dinner, this easy-to-make dough recipe is your go-to solution for empanadas, pies, turnovers, and more. Light, flavorful, and incredibly forgiving, this recipe uses basic pantry ingredients and no scale required!


    ✨ Why You’ll Love It

    • No fancy equipment needed

    • Quick dough — ready in 30 mins

    • Freezer-friendly

    • Customizable fillings

    • Great for empanadas, mini pies, samosas, or baked pockets!


    Ingredients

    For the Dough:

    • 1/2 cup (120 ml) warm milk

    • 1/2 cup (120 ml) vegetable oil

    • 1/2 cup (120 ml) sparkling water (room temperature)

    • 1 tsp dry yeast

    • 1 tbsp sugar

    • 1/2 tbsp salt

    • 3 cups (approx. 450 g) all-purpose flour, or as needed

    For the Filling:

    • 3 medium potatoes, peeled and boiled

    • 100 g (about 1 cup) grated cheese (cheddar, mozzarella, gouda, etc.)

    • 1 handful chopped green onion (spring onion)

    • 1 tbsp butter

    • Salt and black pepper, to taste

    For Brushing (Optional):

    • 1 egg yolk or 2 tbsp milk

    • Optional: sesame or poppy seeds for topping


    Instructions

    Step 1: Prepare the Dough

    1. In a large mixing bowl, combine:

      • Warm milk

      • Vegetable oil

      • Sparkling water

    2. Stir in the dry yeast, sugar, and salt. Let it sit for about 3–5 minutes to slightly activate the yeast (not necessary to foam like in bread, just to dissolve).

    3. Begin adding the flour, 1 cup at a time, mixing with a spoon or spatula.

    4. Once it thickens, knead with your hands for about 3–5 minutes. Add more flour as needed until the dough is smooth, soft, and no longer sticky.

    5. Form into a ball, cover with a clean cloth or plastic wrap, and let it rest in a warm place for 30 minutes.

    TIP: A soft dough will yield a tender crust. Don’t over-flour!


    Step 2: Make the Filling

    1. Boil the potatoes until fork-tender. Drain and mash until smooth.

    2. While still warm, mix in the butter, grated cheese, and chopped green onion.

    3. Season with salt and pepper to taste. Let it cool before using.

    Cheese Tip: Sharp cheddar adds great flavor, but you can mix cheeses like mozzarella for stretchiness or feta for tang.


    Step 3: Assemble the Empanadas or Pies

    1. After the dough has rested, divide it into 12 equal parts and roll each into a ball.

    2. On a lightly floured surface, roll out each ball into a thin disc about 15–20 cm (6–8 inches) wide.

    3. Spoon a generous amount of potato filling into the center (about 2 tablespoons).

    4. Fold the disc in half to form a semi-circle or fold over like a pocket.

    5. Press the edges closed with your fingers or a fork. You can also twist and pinch the edges for a classic empanada look.

    6. Place on a greased or parchment-lined baking tray.

    7. Brush the tops with beaten egg yolk or milk for a golden finish.

    8. Use a knife to make small steam slits on top of each.


    Step 4: Bake

    • Preheat the oven to 180°C (350°F)

    • Bake for 25–30 minutes, or until the empanadas are golden brown and slightly puffed.


    Pro Tips for Success

    • For flakier dough, chill it for 10 minutes before rolling out.

    • No sparkling water? Replace with regular water — the result will still be tasty but slightly less airy.

    • To freeze: Assemble the empanadas and freeze them unbaked on a tray. Once frozen solid, transfer to a zip-lock bag. Bake from frozen, adding 5–10 extra minutes.

    • Reheat in the oven for best texture (avoid microwaving to prevent sogginess).


    Filling Ideas (Creative Variations)

    Filling Type Ingredients
    Mushroom & Cheese Sautéed mushrooms, garlic, thyme, cream cheese
    Spinach Ricotta Cooked spinach, ricotta, nutmeg, Parmesan
    Ground Beef Minced meat, onion, tomato paste, cumin
    Spicy Chickpea Mashed chickpeas, red chili, lemon juice, herbs
    Sweet Potato Black Bean Mashed sweet potato, black beans, cilantro

    Serving Suggestions

    • Serve with a simple salad, yogurt sauce, or chutney.

    • Pack them into lunchboxes — they’re delicious warm or at room temp.

    • Try with a side of spicy tomato dip or mint yogurt sauce.


    ❄️ Storage

    • Fridge: Keep baked empanadas in an airtight container for up to 3 days.

    • Freezer: Freeze baked or unbaked. To reheat, bake at 160°C until hot.


    Final Notes

    This empanada dough is incredibly adaptable and ideal for both beginners and pros. The combination of yeast, sparkling water, and warm milk gives it just enough rise while keeping it tender and flavorful. The cheesy mashed potato filling is creamy, savory, and perfect for all ages.

    Try it once, and it might just become your new favorite dough recipe!

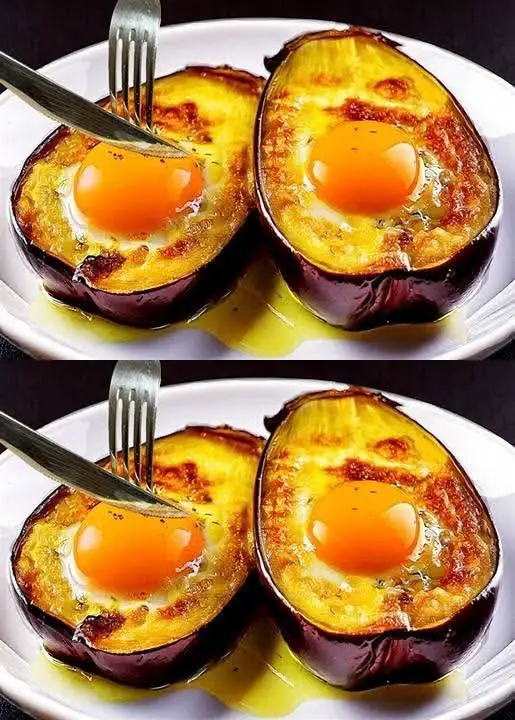
  • ️ Succulent Eggplant Steaks with Potato Purée, Egg, and Wine-Tomato Sauce

    ️ Succulent Eggplant Steaks with Potato Purée, Egg, and Wine-Tomato Sauce

    Succulent Eggplant Steaks with Potato Purée, Egg, and Wine-Tomato Sauce

    A rustic, elegant vegetarian dish packed with flavor and texture — perfect for quick dinners or when you want to impress.


    Why You’ll Love This Recipe

    • Simple ingredients, big flavor

    • Vegetarian yet hearty and satisfying

    • Versatile: serve as a main or side

    • Restaurant-worthy presentation


    Ingredients

    For the Eggplant:

    • 2 large eggplants (firm and shiny)

    • Salt, for purging bitterness

    • Olive oil & butter, for searing

    • Parchment paper, for roasting

    For the Filling:

    • 1 medium onion, chopped

    • 1 ripe tomato, chopped

    • 50 ml tomato sauce (or crushed tomatoes)

    • 3 tbsp chopped olives (black or green)

    • 1/2 tsp Provençal herbs (or oregano, thyme, rosemary blend)

    • 1–2 tbsp chopped fresh chives

    • Salt, to taste

    For the Mashed Potatoes:

    • 3 medium potatoes, peeled and boiled

    • 2 tbsp butter

    • 2–3 tbsp milk (or cream), warm

    • Salt, to taste

    For the Eggs:

    • 2–4 whole eggs (depending on servings)

    • Olive oil or butter (for greasing cupcake mold)

    For the Red Wine Sauce:

    • 3 cloves garlic, thinly sliced

    • 1 tsp wheat flour (or all-purpose flour)

    • 150 ml dry red wine (e.g. Cabernet Sauvignon)

    • 50 g sun-dried tomatoes, chopped


    Step-by-Step Preparation

    1. Prepare the Eggplant Steaks

    1. Wash eggplants and cut each in half lengthwise.

    2. Sprinkle cut sides generously with salt and let sit for 10–15 minutes to draw out bitterness.

    3. After resting, pat dry thoroughly with paper towels.

    4. Heat a skillet with a mix of olive oil and butter. Place eggplants cut-side down and sear until golden brown (about 4–5 minutes).

    5. Transfer to a baking sheet lined with parchment paper, cut side down. Poke a few holes in the skin with a fork or knife.

    6. Roast in a preheated oven at 200°C (390°F) for about 20 minutes or until soft and tender.

    2. Prepare the Mashed Potatoes

    1. Mash the boiled potatoes while still warm.

    2. Add butter and a bit of milk to create a smooth purée.

    3. Season with a pinch of salt. Set aside and keep warm.

    3. Prepare the Filling

    1. In a pan, heat a drizzle of olive oil.

    2. Sauté the chopped onion until translucent.

    3. Add tomato, tomato sauce, olives, Provençal herbs, and salt. Cook for 4–5 minutes until fragrant.

    4. Stir in fresh chives and remove from heat.

    4. Prepare the Baked Eggs

    1. Lightly grease a cupcake mold or muffin tin.

    2. Crack one egg into each mold cavity.

    3. Bake at 180°C (350°F) until the whites are set but the yolk is still runny, or bake longer for firm yolks (about 8–12 minutes, depending on oven).

    Tip: You can also fry or poach the eggs if you prefer.

    5. Assemble the Eggplant Steaks

    1. Once eggplants are roasted, flip them cut side up.

    2. Spoon the sautéed onion-tomato mixture over each.

    3. Carefully place one baked egg over each filled eggplant half.


    Optional: Red Wine & Sun-Dried Tomato Sauce

    A rich, tangy sauce that elevates the dish!

    1. In a small pan, melt a bit of butter and sauté sliced garlic until just golden.

    2. Sprinkle in the flour and cook for 30 seconds, stirring to avoid lumps.

    3. Add chopped sun-dried tomatoes and pour in the red wine.

    4. Let simmer on low heat for 5–8 minutes, stirring occasionally until the sauce thickens slightly and reduces by half.

    Drizzle this sauce around or over the eggplant steaks when serving.


    Serving Suggestions

    • Serve one eggplant steak with a generous dollop of mashed potatoes and a spoonful of wine sauce.

    • Garnish with extra fresh herbs (like parsley or basil), cracked black pepper, and a drizzle of olive oil.

    • Pair with a simple green salad or crusty bread.


    Variations

    • Cheesy version: Add shredded mozzarella or feta on top of the eggplant before placing the egg.

    • Spicy kick: Add a pinch of chili flakes to the filling or sauce.

    • Protein addition: Add chickpeas or lentils to the sautéed tomato mixture.

    • Vegan option: Omit eggs and serve with grilled tofu or vegan béchamel.


    ❄️ Storage Tips

    • Store leftovers in an airtight container in the fridge for up to 2 days.

    • Reheat in the oven or skillet. For best results, store eggs separately and reheat gently.


    Final Thoughts

    This dish may seem fancy, but it’s truly easy and uses everyday ingredients. Whether you’re hosting guests, making a cozy weeknight dinner, or want something new from eggplant, this recipe delivers comfort and flair in every bite.

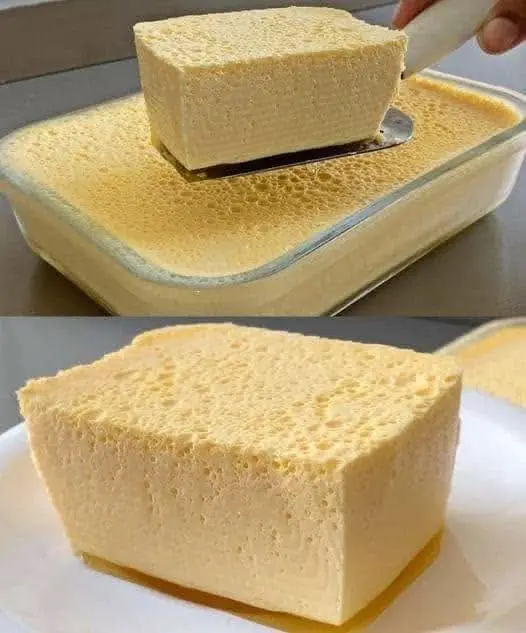
  • Easy & Delicious 3-Ingredient Banana Dessert

    Easy & Delicious 3-Ingredient Banana Dessert

    A light, healthy, oven-baked treat made with just bananas, eggs, and milk — no added sugar or flour!


    Ingredients:

    • 4 ripe bananas (the riper, the sweeter)

    • 4 eggs

    • 400 ml milk (whole, skimmed, or plant-based)


    Step-by-Step Instructions:

    1. Preheat the Oven

    • Set your oven to 180°C (350°F) so it’s hot and ready for baking.

    2. Prepare the Mixture

    Mash the Bananas

    • Peel the bananas and place them in a large mixing bowl.

    • Mash with a fork until smooth, or blend with a hand mixer for an extra creamy texture.

    Add the Eggs

    • Crack in all 4 eggs. Mix until the eggs are fully incorporated with the bananas.

    Incorporate the Milk

    • Gradually pour in the milk while stirring. Mix until smooth and uniform.


    3. Pour into the Pan

    Prepare the Baking Dish

    • Lightly grease a baking dish with butter or oil, or line it with parchment paper.

    Transfer the Mixture

    • Pour the banana-egg-milk mixture into the prepared pan. Tap the dish gently to level the top.


    4. Bake

    • Place the dish in the preheated oven.

    • Bake for 45–50 minutes, or until:

      • The top is set and golden.

      • A toothpick inserted in the center comes out clean.


    5. Cool and Serve

    • Remove from the oven and allow to cool to room temperature.

    • Unmold carefully, slice, and serve!


    Serving Suggestions:

    • Drizzle with honey, maple syrup, or a dusting of cinnamon.

    • Pair with fresh berries, Greek yogurt, or a scoop of vanilla ice cream for a more indulgent touch.

    • Serve warm or chilled — it tastes great either way!


    Tips & Variations:

    • Banana Tip: The darker the banana skin, the sweeter the dessert.

    • Milk Options: Try oat, almond, or coconut milk for a dairy-free version.

    • Flavor Boosters: Add 1 tsp vanilla extract, a pinch of nutmeg, or ½ tsp ground cinnamon before baking.

    • Texture Add-ons: Stir in raisins, shredded coconut, or chopped nuts for added texture and flavor.


    ✅ Why You’ll Love This Dessert:

    • Naturally sweet — no sugar needed!

    • Flourless & gluten-free

    • Dairy-optional

    • Takes only 5 minutes prep

    • Great for kids and adults

    • Can double as a healthy breakfast or guilt-free snack


    Photo: Reproduction (Optional image placeholder if you want to insert a photo)


    Give it a try and see how incredibly simple and delicious a homemade dessert can be — with just 3 ingredients and a bit of love.

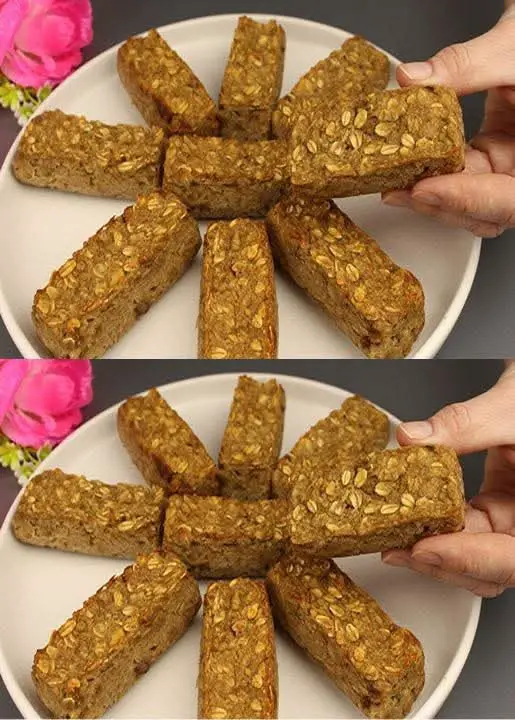
  • Healthy Apple Banana Oat Cookies (No Sugar, No Flour)

    Healthy Apple Banana Oat Cookies (No Sugar, No Flour)

    These naturally sweet, three-fruit cookies are soft, chewy, and made with only a few wholesome ingredients. They’re gluten-free, refined sugar-free, and perfect for kids’ snacks, lunch boxes, or healthy desserts.

    With just oats, apples, and banana, plus a little milk and walnuts for texture, these cookies prove that delicious and nutritious can go hand in hand.


    Why You’ll Love This Recipe

    • ✅ No flour or refined sugar

    • ✅ Naturally sweet with fruit

    • ✅ Family-friendly and toddler-safe

    • ✅ Quick to prepare — no mixer needed

    • ✅ Budget-friendly and customizable


    Ingredients

    Ingredient Quantity
    Rolled oats 1 cup
    Milk (any kind) ½ cup
    Apples 2 medium
    Banana 1 large, ripe
    Chopped walnuts ½ cup (optional)
    Vegetable oil Small amount (for greasing pan)

    ‍ Instructions

    1️⃣ Soak the Oats

    In a bowl, combine 1 cup oats and ½ cup milk. Let sit for about 10 minutes to absorb the liquid and soften slightly.

    2️⃣ Prepare the Fruit Mixture

    • Peel and core the 2 apples, then cut them into chunks.

    • Add them to a blender or food processor along with the ripe banana.

    • Blend until you get a smooth fruit purée.

    3️⃣ Combine Everything

    • Pour the fruit purée over the soaked oats.

    • Mix thoroughly until well combined.

    • Fold in the chopped walnuts (if using) and stir until evenly distributed.

    4️⃣ Shape the Cookies

    • Lightly grease a silicone cookie mold with a bit of oil, or line a baking sheet with parchment paper.

    • Spoon the mixture into the molds or onto the tray, forming small cookie mounds or bars.

    • Flatten slightly and leave space between each one.

    5️⃣ Bake

    • Bake in a preheated oven at 180°C (350°F) for about 25 minutes, or until the tops are lightly golden.

    • Let cool slightly before removing from the pan.


    ️ Serving Suggestions

    • Enjoy warm or chilled

    • Pair with tea, coffee, or yogurt

    • Great for breakfast on-the-go, lunchboxes, or post-workout snacks


    Storage Tips

    • Refrigerate in an airtight container for up to 5 days

    • Freeze for up to 2 months and reheat in the microwave or oven


    Optional Add-Ins & Variations

    Add-In Benefit
    Cinnamon or nutmeg Warm spice flavor
    Raisins or dates Extra natural sweetness
    Chia or flax seeds Boost fiber and omega-3s
    Shredded coconut Adds texture and tropical twist
    Vegan? Use almond, oat, or soy milk

    Nutrition (Approx. Per Cookie – 12 Cookies Total)

    • Calories: ~90

    • Carbohydrates: 13g

    • Protein: 2g

    • Fat: 3g

    • Sugar: 5g (naturally from fruit)

    • Fiber: 2g

    Note: Nutritional values may vary based on ingredients used.


    ✨ Final Thoughts

    These flourless apple oat cookies are a testament to how simple, whole ingredients can come together to make something healthy, affordable, and satisfying. Keep a batch on hand for quick snacks, healthy treats, or clean eating goals.

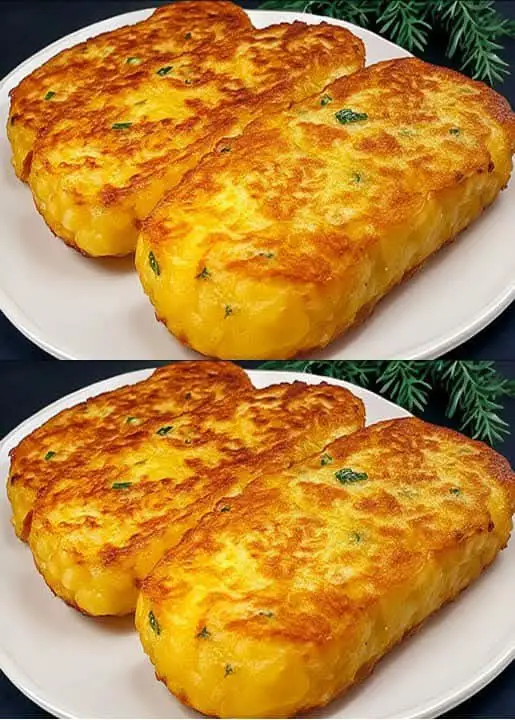
  • Cheesy Potato Patties – Crispy Outside, Melty Inside!

    Cheesy Potato Patties – Crispy Outside, Melty Inside!

    If you have just 3 potatoes and some cheese, you can make these delicious, golden-brown potato patties that are crisp on the outside, soft and cheesy on the inside — and yes, many say they’re even tastier than meat! Perfect for lunch, dinner, or a quick snack.


    Ingredients:

    • 3 medium potatoes, peeled and boiled

    • ½ cup shredded cheese (cheddar, mozzarella, or a mix)

    • 1 egg

    • 2 tablespoons cornstarch or all-purpose flour

    • Salt and black pepper, to taste

    • ½ teaspoon paprika or chili flakes (optional)

    • 1 tablespoon chopped parsley or green onions (optional)

    • Oil, for pan-frying


    ‍ Instructions:

    1️⃣ Mash the Potatoes

    • After boiling the potatoes until fork-tender, mash them in a bowl until smooth.

    • Let cool slightly.

    2️⃣ Mix the Filling

    • Add cheese, egg, flour or cornstarch, salt, pepper, and any optional herbs or spices.

    • Mix well until a soft, slightly sticky dough forms.

    3️⃣ Shape the Patties

    • Wet your hands slightly. Take a small handful of the mixture and flatten into a patty shape.

    • Repeat until all the mixture is used.

    4️⃣ Cook

    • Heat a nonstick skillet with a little oil over medium heat.

    • Cook the patties for about 3–4 minutes per side, or until golden and crispy.

    • Place on paper towels to drain any excess oil.


    ️ Serving Ideas:

    • Serve hot with sour cream, yogurt dip, or ketchup

    • Pair with a side salad for a light meal

    • Use as a veggie burger patty in a bun


    Nutrition (Per Patty – Approximate):

    • Calories: 130

    • Protein: 5g

    • Carbs: 15g

    • Fat: 6g


    ❤️ Why You’ll Love This Recipe:

    • Super budget-friendly

    • Just a few ingredients

    • Great for vegetarian meals

    • Crispy, cheesy, and kid-approved!

  • Recipe for crispy potatoes stuffed with chicken and vegetables

    Recipe for crispy potatoes stuffed with chicken and vegetables

    Crispy on the outside and soft on the inside, these stuffed potatoes will surprise you!

    If you’re looking for an irresistible recipe, full of flavor and incredible texture, these stuffed potatoes are the perfect choice! With a crispy exterior and a juicy filling of chicken and vegetables, they can be served as a starter, side dish or even a main course.

    Ingredients

    For the Potato Dough:

    • 4 medium potatoes, peeled and cooked
    • 1 egg
    • ½ cup breadcrumbs or wheat flour
    • Salt and pepper to taste

      For the Filling:

        • 1 cup cooked, shredded chicken
        • ½ cup mixed vegetables (carrots, peas and corn, finely chopped)
        • 1 small onion, chopped
        • 1 clove of garlic, minced
      • 1 tablespoon olive oil
      • ½ teaspoon paprika
      • ½ teaspoon cumin (optional)
      • Salt and pepper to taste
      • 2 tablespoons chopped parsley

      For Breading and Frying:

        • 1 beaten egg
        • ½ cup breadcrumbs
      • Vegetable oil for frying

      Preparation Method

      1. Preparing the Potato Dough

      1. Cooking the Potatoes : Cook the potatoes until they are very soft. Drain and mash them until they form a smooth puree.
      2. Mix the Ingredients : Add the egg, breadcrumbs, salt and pepper to the mashed potatoes. Mix well until you get a smooth dough and set aside.

      2. Preparing the Filling

        1. Sauté the Aromatics : In a frying pan, heat the olive oil and sauté the onion and garlic until golden and soft.
        2. Add the Vegetables : Add the carrots, peas and corn, stirring for a few minutes until soft.
        3. Add the Chicken and Seasonings : Add the shredded chicken, paprika, cumin, salt and pepper. Cook for 2 more minutes, mixing well.
      1. Finish the Filling : Remove from the heat, add the parsley and let cool a little before filling the potatoes.

      3. Assembling the Stuffed Potatoes

      1. Shape the Potatoes : Take a portion of the potato dough (approximately 2-3 tablespoons) and form into a disk.
      2. Add the Filling : Place a tablespoon of the filling in the center and cover with more puree, shaping into a croquette or burger shape.

      4. Breading and Frying

      1. Coating : Dip each croquette in beaten egg and then in breadcrumbs, ensuring an even coating.
      2. Fry : Heat oil over medium heat and fry potatoes until golden brown and crispy. Remove and place on paper towels to remove excess oil.

        Tips for a Perfect Result

        • Healthier Version : Bake the stuffed potatoes in a preheated oven at 190°C for 20 minutes for a less fatty alternative.
        • Vary the Filling : Add grated cheese, mushrooms or even ground beef for a special touch.
        • Freeze for Later : Shape and bread raw potatoes, then freeze to prepare whenever you want.

        These stuffed potatoes are a perfect combination of crunchiness and creaminess, guaranteeing a delicious dish for any occasion.

  • Creamy CaramelCheesecake Delight

    Creamy CaramelCheesecake Delight

    Ingredients

    For the Crust:

    • 2 cups graham cracker crumbs

    • 1/4 cup granulated sugar

    • 1/2 cup unsalted butter, melted

    For the Cheesecake Filling:

    • 16 oz cream cheese, softened

    • 1 cup granulated sugar

    • 2 large eggs

    • 1 tsp vanilla extract

    • 1/4 cup sour cream

    For the Caramel Layer:

    • 1 cup caramel sauce (store-bought or homemade)

    • 1/4 tsp sea salt (optional, for salted caramel flavor)

    For the Topping:

    • 1 cup whipped cream or whipped topping

    • Extra caramel drizzle

    • Crushed nuts (optional)

    Instructions

    1. Prepare the Crust:

    • Preheat your oven to 325°F (160°C).

    • In a mixing bowl, combine the graham cracker crumbs, sugar, and melted butter. Mix until evenly combined.

    • Press the mixture firmly into the bottom of a 9-inch springform pan. Bake for 10 minutes and set aside to cool.

    2. Make the Cheesecake Filling:

    • In a large mixing bowl, beat the cream cheese and sugar until smooth and creamy.

    • Add the eggs one at a time, mixing well after each addition.

    • Mix in the vanilla extract and sour cream until fully incorporated.

    3. Assemble and Bake:

    • Pour the cheesecake filling over the cooled crust. Smooth the top with a spatula.

    • Bake in the preheated oven for 40–45 minutes, or until the edges are set and the center has a slight jiggle.

    • Let the cheesecake cool to room temperature, then refrigerate for at least 4 hours (preferably overnight).

    4. Add the Caramel Layer:

    • Once the cheesecake is chilled, spread the caramel sauce evenly over the top. Sprinkle with a pinch of sea salt if desired.

    5. Decorate and Serve:

    • Pipe or dollop whipped cream around the edges or center of the cheesecake.

    • Drizzle additional caramel sauce over the whipped cream.

    • Garnish with crushed nuts for added texture.

    Slice and serve this creamy, dreamy caramel cheesecake delight! Perfect for any special occasion.

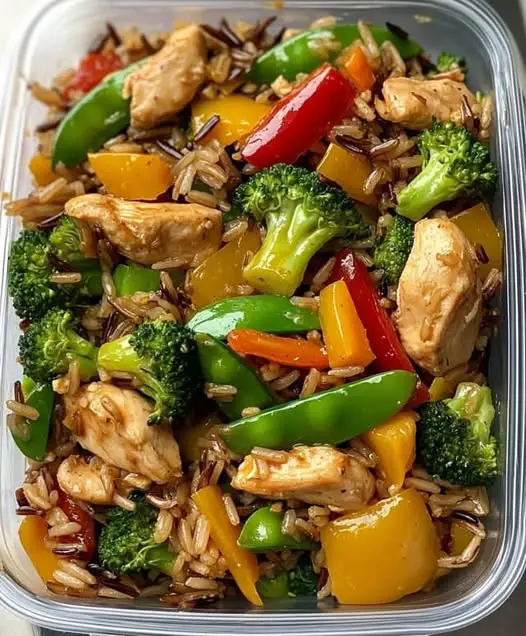
  • Chicken & Veggie Stir-Fry with Wild Rice

    Chicken & Veggie Stir-Fry with Wild Rice

    This Chicken & Veggie Stir-Fry is a colorful, nutrient-packed meal that comes together in just 25 minutes. Served over wild rice, it’s perfect for a wholesome dinner or meal prep lunch that doesn’t skimp on flavor or texture.


    Ingredients

    For the Stir-Fry:

    • 1 cup cooked wild rice (or wild rice blend)

    • 1 boneless, skinless chicken breast, cubed

    • ½ cup broccoli florets

    • ½ cup snap peas

    • ¼ red bell pepper, thinly sliced

    • ¼ yellow bell pepper, thinly sliced

    • ¼ cup carrots, julienned

    • ¼ cup green peas (optional)

    • 1 tbsp olive oil or sesame oil

    For the Sauce:

    • 2 tbsp soy sauce

    • 1 tbsp hoisin sauce or oyster sauce

    • 1 clove garlic, minced

    • 1 tsp fresh ginger, grated

    • 1 tsp honey or maple syrup (optional, for balance)


    Directions

    1️⃣ Cook the Chicken

    • Heat 1 tbsp oil in a large skillet or wok over medium-high heat.

    • Add the cubed chicken, season lightly with salt and pepper, and sauté for 6–8 minutes until golden brown and fully cooked.

    • Remove the chicken from the pan and set aside.

    2️⃣ Stir-Fry the Vegetables

    • In the same pan, add a little more oil if needed.

    • Add the broccoli, snap peas, carrots, and bell peppers.

    • Stir-fry for 4–5 minutes, stirring often, until veggies are crisp-tender.

    3️⃣ Add Sauce & Combine

    • Return the cooked chicken to the pan.

    • Add in the green peas.

    • In a small bowl, mix all sauce ingredients: soy sauce, hoisin (or oyster) sauce, garlic, ginger, and honey/maple syrup.

    • Pour the sauce over the stir-fry and mix well to coat.

    • Cook everything together for 2–3 more minutes, allowing the sauce to reduce slightly and flavors to combine.

    4️⃣ Assemble & Serve

    • Serve the hot chicken and vegetable stir-fry over warm cooked wild rice.

    • Garnish with sesame seeds or green onions if desired.

    • Perfect for an easy dinner or divide into containers for meal prep.


    ⏱️ Time Overview

    Step Time
    Prep Time 10 mins
    Cook Time 15 mins
    Total Time 25 mins

    ️ Servings

    Yields: 2 generous servings
    Calories: ~500 kcal per serving (estimate may vary depending on oil and sauce used)


    Tips & Variations

    • Make it vegetarian: Substitute tofu or tempeh for chicken.

    • Add crunch: Top with roasted cashews or peanuts.

    • Spice it up: Add a dash of chili flakes or sriracha to the sauce.

    • No wild rice? Serve over jasmine, basmati, brown rice, or quinoa.

    • Low-carb? Serve on cauliflower rice or spiralized zucchini noodles.


    Storage & Meal Prep

    • Refrigerator: Store leftovers in an airtight container for up to 3–4 days.

    • Freezer: Not ideal due to veggie texture, but you can freeze the cooked chicken separately.

    • Reheat: Microwave in 1-minute intervals or sauté gently on the stovetop until warm.


    Final Thoughts

    This Chicken & Veggie Stir-Fry with Wild Rice is a go-to recipe for busy weeknights, clean eating plans, or healthy lunches. It’s gluten-friendly, loaded with protein and fiber, and bursting with color and flavor.

  • ☕ Coffee with Ginger & A Secret Twist – Energizing & Delicious!

    ☕ Coffee with Ginger & A Secret Twist – Energizing & Delicious!

    Looking for a refreshing and healthy twist on your morning cup of coffee? This recipe combines the bold richness of coffee with the warmth of ginger, plus a secret ingredient that makes it even more indulgent — and surprisingly beneficial for your body.

    Whether you’re aiming to boost your metabolism, support digestion, or simply want to enjoy a flavorful coffee upgrade, this ginger-coffee blend is exactly what you need.


    Why This Recipe Works

    • Metabolism-boosting

    • Rich, spiced mocha flavor

    • Perfect for digestion and fat-burning

    • No dairy or refined sugar required

    • Takes only 5 minutes to prepare!


    Ingredients

    Ingredient Amount Notes
    Hot brewed coffee 1 cup Use black coffee or espresso
    Ground ginger ½ teaspoon Or 1 teaspoon grated fresh ginger
    Unsweetened cocoa 1 teaspoon Secret ingredient for mocha taste & antioxidants
    Ground cinnamon Pinch (optional) Adds warmth & depth
    Honey or maple syrup 1 teaspoon (optional) Natural sweetener
    Plant-based milk Splash (optional) Oat, almond, or coconut milk

    Instructions

    Step 1: Brew Your Coffee

    Prepare 1 cup of your favorite hot black coffee. You can use espresso, French press, or drip — whatever you prefer.

    Step 2: Mix the Spices

    In a mug or small mixing bowl, add:

    • ½ tsp ground ginger

    • 1 tsp unsweetened cocoa powder

    • A pinch of cinnamon (optional)

    Step 3: Sweeten It

    Stir in:

    • 1 tsp honey or maple syrup (optional, for sweetness)

    Step 4: Combine

    Slowly pour the hot coffee into the spice mixture and stir well until fully dissolved and creamy. For a smoother texture, blend using a milk frother or handheld blender.

    Step 5: Add Milk (Optional)

    Add a splash of oat or almond milk for a creamy touch.


    ️ How to Serve

    • Serve warm in your favorite mug.

    • Top with a dusting of cinnamon or cocoa.

    • Pair with a high-protein breakfast or drink it alone as a detox-friendly morning boost.


    Variations

    Variation Idea
    Iced Ginger Mocha Cool the coffee and serve over ice with almond milk
    Vegan Version Use maple syrup & plant-based milk only
    Supercharged Add a pinch of cayenne for a spicy fat-burning kick
    Creamy Boost Blend with 1 tsp coconut oil or MCT oil for brain fuel

    ⚕️ Health Benefits

    • Ginger: Improves digestion, reduces inflammation, and supports immunity

    • Cocoa powder: Rich in antioxidants and natural mood boosters

    • Cinnamon: Helps regulate blood sugar

    • Coffee: Enhances focus, alertness, and performance


    Nutrition (Per Serving – Approximate)

    • Calories: 45

    • Carbs: 5g

    • Protein: 1g

    • Fat: 2g

    • Sugar: 3g (depending on sweetener used)

    Note: Nutrition values vary based on specific ingredients used.


    ❓ FAQs

    Can I use instant coffee?

    Yes! Just dissolve 1 tsp of instant coffee granules in 1 cup hot water and follow the rest of the recipe.

    Can I skip the sweetener?

    Absolutely. The spices and cocoa alone give it enough flavor, especially for low-carb or keto diets.

    Can I prepare this in advance?

    You can mix the dry spice blend ahead and just add it to hot coffee when ready.

    What is the “secret” ingredient?

    Unsweetened cocoa powder! It adds rich mocha flavor and brings antioxidants without any sugar.


    Final Thoughts

    This Coffee + Ginger + Cocoa recipe is a game-changer for your morning routine. It’s not just energizing — it’s nourishing and deeply flavorful. Once you try it, you may never go back to plain black coffee again!

    Give it a try and let us know how you like it in the comments!

  • Quick Egg & Bread Breakfast Pancakes

    Quick Egg & Bread Breakfast Pancakes

    No flour. No sugar. Just oats, sweet potato, eggs & bread – healthy and delicious!

    Start your day with this wholesome breakfast that’s as nourishing as it is easy. Perfect for busy mornings, it uses simple ingredients you already have at home. Plus, it’s protein-packed and totally satisfying!


    Ingredients:

    • 3 slices of bread (any kind — whole wheat or multigrain preferred)

    • 150 ml milk (dairy or plant-based)

    • 2 large eggs (separate whites and yolks)

    • ½ sweet potato, finely grated (orange-fleshed is best)

    • Salt, to taste

    • Black pepper, to taste

    • Chopped green onion, to taste

    • Oil, for frying


    Instructions:

    1. Prepare the Bread Base

    • Tear the bread slices into pieces and place in a mixing bowl.

    • Add the milk and let it soak for a few minutes.

    • Mash the mixture with a fork until it forms a soft, mushy dough.

    2. Add Egg Whites & Seasoning

    • Mix in the egg whites to the dough.

    • Add black pepper and a small pinch of salt.

    • Stir until you have a smooth, thick paste.

    3. Add Vegetables

    • Grate the sweet potato using the fine side of your grater.

    • Add the grated sweet potato and chopped green onion to the batter.

    • Mix well to combine everything evenly.

    4. Fry the Pancakes

    • Heat a little oil in a non-stick pan over medium heat.

    • Scoop a spoonful of batter into the pan and spread into a small pancake shape.

    • Fry each portion one at a time, about 2–3 minutes per side, or until golden brown and crispy.

    5. Top with Egg Yolk

    • Once flipped and cooked on both sides, make a small dent in the center.

    • Gently place 1 egg yolk on top of each cooked pancake.

    • Sprinkle a pinch of salt on the yolk.

    • Cover the pan and cook for another 2 to 3 minutes, or until the yolk is done to your liking (soft or fully set).


    ️ Serving Suggestions:

    • Serve immediately, while warm, with a drizzle of yogurt or hot sauce.

    • Pair with a side of fruit, avocado slices, or a small salad for a balanced meal.


    Tips & Variations:

    • No sweet potato? Try grated zucchini or carrot instead.

    • Add herbs like parsley or cilantro for extra flavor.

    • Make mini versions and pack them for lunch or snacks.

    • Use oat milk or almond milk for a dairy-free option.


    Nutrition (Per Serving – Approximate):

    • Calories: 180

    • Protein: 9g

    • Carbohydrates: 18g

    • Fat: 8g

    • Fiber: 3g

    • Sugar: 2g

    Note: Nutrition values will vary depending on ingredients used.


    Why You’ll Love It

    • Takes under 15 minutes to prepare

    • No flour, no sugar – great for light eating

    • Kid-friendly and customizable

    • Uses basic kitchen staples

    • Perfect for meal prep or quick breakfasts

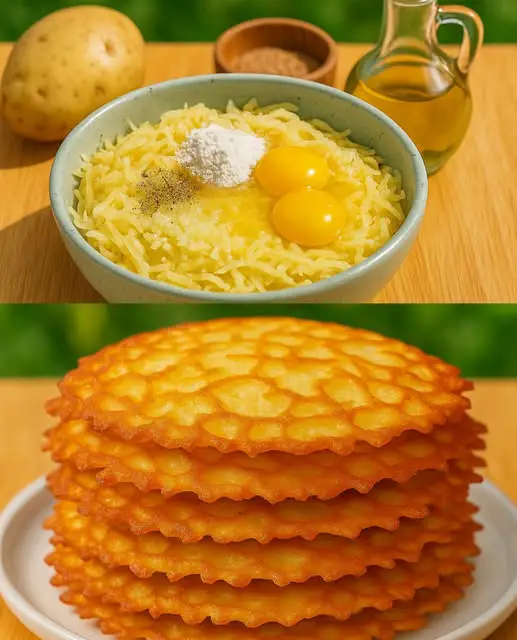
  • ✨ Crispy Polish Potato Pancakes – Golden and Irresistible!

    ✨ Crispy Polish Potato Pancakes – Golden and Irresistible!

    ✨ Crispy Polish Potato Pancakes – Golden and Irresistible!

    These traditional Polish potato pancakes (known as placki ziemniaczane) are delightfully crispy on the outside and soft on the inside. Made from simple pantry ingredients, they’re perfect as a side dish, appetizer, or main course. Serve them with a dollop of sour cream or applesauce for a true comfort food experience.


    Ingredients:

    • 4 medium potatoes, peeled and grated

    • 1 small onion, grated

    • 2 large eggs

    • 3 tablespoons all-purpose flour

    • ½ teaspoon salt

    • ¼ teaspoon ground black pepper

    • Vegetable oil, for frying


    Instructions:

    Step 1: Prepare the Potatoes

    1. Peel and grate the potatoes using a box grater or food processor.

    2. Place the grated potatoes in a clean kitchen towel or cheesecloth and squeeze out as much moisture as possible. This is key for crispiness!

    3. Transfer the dry potato shreds to a large mixing bowl.

    Step 2: Add Onion and Mix

    1. Grate the onion and add it to the potatoes.

    2. Add in the eggs, flour, salt, and pepper.

    3. Stir everything together until well combined. The mixture should be thick but spoonable.

    Step 3: Fry the Pancakes

    1. In a large skillet or frying pan, heat about ¼ inch of oil over medium-high heat until shimmering.

    2. Scoop about 2 tablespoons of the potato mixture into the hot oil, flattening it into a pancake with the back of the spoon.

    3. Fry for 2–3 minutes per side, or until golden brown and crispy.

    4. Transfer the pancakes to a paper towel-lined plate to drain excess oil.

    Repeat until all the batter is used, adjusting the heat as needed to prevent burning.


    ️ Serving Suggestions

    • Serve immediately, while hot and crispy.

    • Traditional toppings include:

      • Sour cream

      • Applesauce

      • Chive yogurt

      • Grated cheese or smoked salmon for a modern twist


    Tips for Success

    • Remove as much water as possible from the grated potatoes for ultra-crispy edges.

    • Don’t overcrowd the pan – fry in batches for even browning.

    • Keep cooked pancakes warm in a 200°F (90°C) oven while you finish the rest.

    • For a slightly lighter version, use less oil and flatten pancakes thinner.


    Storage & Reheating

    • Refrigerate: Leftover pancakes can be stored in an airtight container in the fridge for up to 3 days.

    • Reheat: Reheat in a skillet or air fryer to regain crispiness. Avoid microwaving – it makes them soggy!

    • Freeze: Freeze cooked pancakes with parchment paper between layers for up to 2 months. Reheat directly from frozen in a hot oven or pan.


    ❓ FAQ

    Can I make these gluten-free?

    Yes! Substitute the all-purpose flour with potato starch, rice flour, or a gluten-free flour blend.

    Can I add spices or herbs?

    Absolutely. Try garlic powder, dill, parsley, or paprika for extra flavor.

    Can I use a food processor?

    Yes – use the shredding attachment for potatoes and onions to save time.


    Nutrition (Per Pancake, Approximate)

    • Calories: 110

    • Fat: 6g

    • Carbohydrates: 12g

    • Protein: 2g

    • Fiber: 1g

    • Sugar: 1g

    Note: Values are approximate and vary based on oil absorption and portion size.


    Enjoy these golden, crispy Polish potato pancakes fresh out of the pan – they’re a nostalgic, crowd-pleasing treat that never goes out of style! ✨

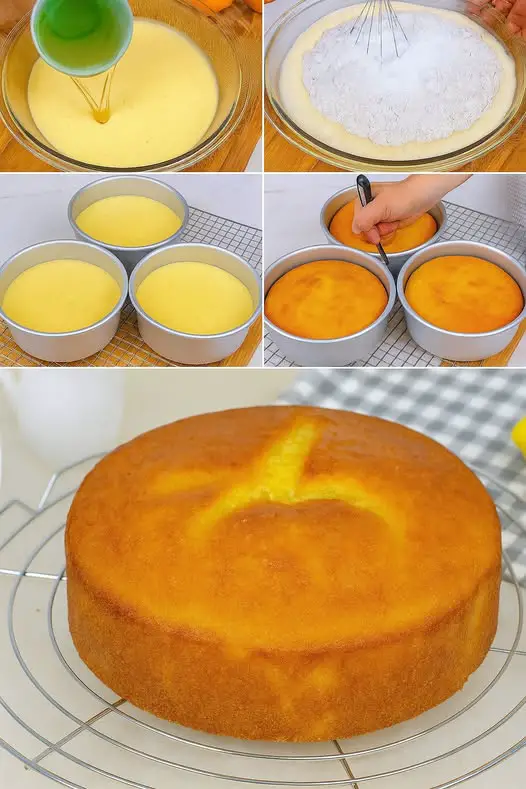
  • Lemon Drizzle Cake Recipe (Full Version)

    Lemon Drizzle Cake Recipe (Full Version)

    Bright, moist, and packed with citrus flavor, this lemon drizzle cake is the perfect balance of sweet and tangy. Whether you’re baking for a family treat, afternoon tea, or a spring gathering, this classic cake is guaranteed to please.


    Ingredients

    For the Cake:

    • 1¾ cups (150 grams) all-purpose flour

    • 1 teaspoon baking powder

    • ½ cup (113 grams) unsalted butter, softened

    • 1 cup (200 grams) granulated sugar

    • 4 large eggs

    • 1 teaspoon vanilla extract

    • Zest of 1 lemon

    For the Lemon Drizzle:

    • 1 cup (130 grams) confectioners’ sugar (powdered sugar)

    • Juice from 1½ lemons


    Instructions

    Step 1: Prepare the Oven and Pan

    • Preheat your oven to 350°F (180°C).

    • Grease a loaf pan or an 8-inch square baking pan. Line the bottom with parchment paper for easy removal.

    Step 2: Mix the Dry Ingredients

    • In a medium bowl, whisk together all-purpose flour and baking powder until well combined. Set aside.

    Step 3: Cream the Butter and Sugar

    • In a large mixing bowl, beat the softened butter and granulated sugar using an electric mixer until the mixture is light and fluffy (about 2–3 minutes).

    Step 4: Add Eggs and Flavorings

    • Add the eggs one at a time, beating well after each addition so the mixture stays smooth and doesn’t curdle.

    • Stir in the vanilla extract and lemon zest until evenly distributed.

    Step 5: Add the Dry Ingredients

    • Gradually add the flour mixture into the wet ingredients in two batches, mixing just until everything is combined.

    • Do not overmix—the batter should be smooth, but overbeating can make the cake dense.

    Step 6: Bake

    • Pour the batter into your prepared pan and smooth the top with a spatula.

    • Bake in the preheated oven for 25 to 30 minutes, or until a toothpick inserted in the center comes out clean.

    • Let the cake cool in the pan for 15 minutes before applying the drizzle.


    Make the Lemon Drizzle

    While the cake is still warm:

    1. In a small bowl, combine lemon juice and confectioners’ sugar. Stir until smooth and slightly thickened.

    2. Use a skewer, toothpick, or fork to poke holes all over the top of the cake. This helps the drizzle soak in.

    3. Pour the lemon glaze slowly over the cake, allowing it to seep into the holes and run down the sides.

    4. Let the cake sit until the drizzle sets and the cake is completely cooled.


    ️ Serving Suggestions

    • Slice and serve with a cup of tea or coffee for a perfect afternoon break.

    • For a fancier presentation, top with thin lemon slices or a dusting of powdered sugar once fully cooled.

    • Add a dollop of whipped cream or vanilla ice cream to make it a dessert-style treat.


    Tips & Variations

    • Extra Moist Cake: Add 1–2 tablespoons of lemon juice directly into the cake batter for added citrus punch.

    • Poppy Seed Version: Stir in 1 tablespoon of poppy seeds before baking for a fun texture.

    • Thicker Drizzle: Use a little less lemon juice if you want a thicker, icing-like topping.

    • Storage: Store in an airtight container at room temperature for up to 3 days, or refrigerate for 5 days.

    • Freezing: Freeze slices individually, wrapped in plastic, for up to 2 months.


    ❓ Frequently Asked Questions (FAQs)

    Can I use self-raising flour instead of all-purpose flour?

    Yes, if using self-raising flour, skip the baking powder in the recipe.

    Can I make this into cupcakes?

    Absolutely! Pour the batter into lined muffin tins and bake at 350°F for 15–18 minutes.

    Can I double the recipe?

    Yes, simply double the ingredients and bake in a 9×13 inch pan. Add an extra 5–10 minutes to the baking time.

    Can I use bottled lemon juice?

    Fresh lemon juice is highly recommended for the best flavor, but bottled will work in a pinch.


    Nutritional Information (Approx. per slice, based on 10 servings)

    • Calories: 290

    • Carbohydrates: 38g

    • Protein: 4g

    • Fat: 14g

    • Sugar: 24g

    • Fiber: 1g

    Note: Nutrition will vary based on exact ingredients and portion sizes.


    Final Thoughts

    This Lemon Drizzle Cake is soft, buttery, and bursting with fresh lemon flavor. Whether you’re baking for a crowd or just want a simple cake that delivers big on taste, this is the recipe you’ll come back to again and again.

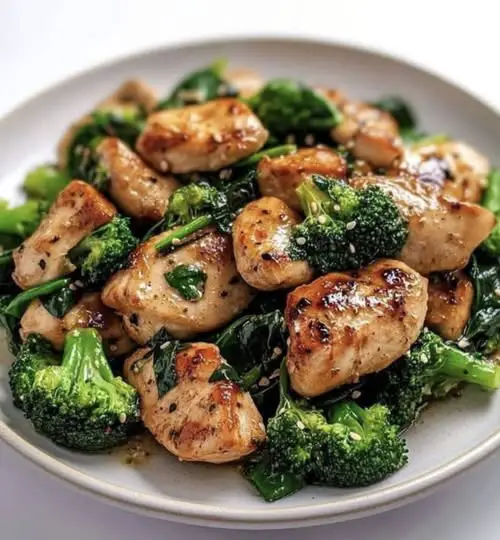
  • Garlic Chicken with Broccoli and Spinach

    Garlic Chicken with Broccoli and Spinach

    This Garlic Chicken with Broccoli and Spinach is a delicious one-pan dish that’s healthy, quick, and full of flavor. Tender chunks of chicken breast are cooked in garlic and lemon, tossed with bright green broccoli and wilted spinach, then finished with a sprinkle of Parmesan. It’s ready in under 30 minutes and perfect for meal prep, weeknight dinners, or whenever you’re craving something both hearty and nutritious.

    Ingredients
    For the Chicken:
    1.5 lbs (about 3 medium) boneless, skinless chicken breasts, cut into bite-sized pieces

    Salt and black pepper, to taste

    1 tsp garlic powder

    1 tbsp olive oil or unsalted butter

    For the Veggies and Sauce:
    4 cloves garlic, minced

    1 tbsp olive oil or butter (for sautéing vegetables)

    2 cups broccoli florets (fresh or frozen)

    3 cups fresh spinach

    ¼ cup chicken broth (or water)

    ¼ cup grated Parmesan cheese (optional but recommended)

    Juice of ½ lemon (for brightness)

    Crushed red pepper flakes, to taste (optional, for heat)

    Instructions
    1. Prepare the Chicken:
    Season the chicken pieces generously with salt, black pepper, and garlic powder.

    Heat 1 tbsp of oil or butter in a large skillet over medium-high heat.

    Add the seasoned chicken to the hot pan and cook for 6–8 minutes, turning occasionally, until the pieces are golden brown and fully cooked through (internal temp should reach 165°F / 74°C).

    Remove the chicken from the pan and set aside on a plate.

    2. Sauté Garlic and Broccoli:
    In the same skillet, add 1 tbsp more oil or butter.

    Stir in the minced garlic and sauté for about 30 seconds until aromatic, being careful not to burn it.

    Add the broccoli florets and toss to coat in the garlic oil. Cook for 2 minutes, stirring occasionally.

    3. Steam the Broccoli:
    Pour in ¼ cup chicken broth (or water) to help steam and soften the broccoli.

    Cover the pan with a lid and steam for 3–4 minutes, or until broccoli is tender but still bright green and crisp.

    4. Add Spinach and Return Chicken:
    Remove the lid and stir in the fresh spinach. Cook for 1–2 minutes, stirring until spinach is wilted.

    Return the cooked chicken to the skillet. Toss everything together to combine and heat through.

    5. Finish the Dish:
    Sprinkle in the Parmesan cheese (if using) and squeeze lemon juice over the dish for a fresh kick.

    Season with additional salt, pepper, and red pepper flakes to taste.

    Serve hot and enjoy!

    ️ Serving Suggestions
    This garlic chicken and veggie skillet is incredibly versatile. Here’s how to enjoy it:

    Over Grains: Serve over cooked brown rice, quinoa, couscous, or orzo for a filling meal.

    With Pasta: Toss it with penne, spaghetti, or even a garlic butter pasta base.

    Low-Carb Option: Serve with cauliflower rice, zucchini noodles (zoodles), or enjoy it as is.

    Mashed Potatoes: Creamy mashed potatoes pair well with the garlicky, lemony flavors.

    Wrap It Up: Use it as a filling in whole-wheat wraps, tortillas, or pita pockets for lunch.

    Tips & Variations
    Add more vegetables: Try adding mushrooms, bell peppers, or zucchini.

    Creamy version: Add a splash of heavy cream or a spoonful of cream cheese at the end for a rich twist.

    Use rotisserie chicken: Save time by using pre-cooked chicken; just skip the initial sauté step.

    Cheese swaps: Use shredded mozzarella, Asiago, or even a bit of crumbled feta for a different flavor profile.

    Spice it up: Add ½ tsp of smoked paprika or Italian seasoning for extra flavor.

    Make-Ahead & Storage
    Refrigerate: Store leftovers in an airtight container for up to 4 days.

    Reheat: Warm in a skillet over medium heat or microwave in 30-second intervals, stirring in between.

    Freeze: It’s best fresh, but you can freeze portions for up to 2 months. Thaw in the fridge overnight and reheat before serving.

    ❓ Frequently Asked Questions
    Can I use chicken thighs instead of breasts?
    Yes! Boneless skinless chicken thighs are juicier and add great flavor. Just adjust the cooking time slightly (about 8–10 minutes).

    What if I only have frozen vegetables?
    No problem! You can use frozen broccoli or even frozen spinach. Just thaw and drain spinach well before adding to avoid excess moisture.

    Is Parmesan necessary?
    No, but it adds depth and saltiness. You can leave it out or replace with nutritional yeast for a dairy-free version.

    Can this be made vegetarian?
    Yes. Omit the chicken and use canned chickpeas or tofu instead. Use vegetable broth instead of chicken broth.

    Nutrition Information (Approx. per serving)
    (Based on 4 servings, without Parmesan cheese and served alone)

    Calories: 285

    Protein: 38g

    Carbohydrates: 6g

    Fat: 12g

    Fiber: 3g

    Sugars: 2g

    Note: Serving with grains or potatoes will increase carbs and calories.

    Final Thoughts
    This Garlic Chicken with Broccoli and Spinach is your go-to for a quick, wholesome, and flavorful dinner. With only one pan and simple ingredients, it’s a meal you can whip up any night of the week without sacrificing taste or nutrition. Perfect for busy families, fitness-friendly lifestyles, or anyone who wants something fresh and satisfying!