Ingredients
Directions
Prepare the Dough:
Sift 500 g of plain flour into a large mixing bowl.
Add 1 tablespoon of sugar, 6 g of dry yeast, and 1 teaspoon of salt. Mix well.
Make a well in the center of the flour mixture and pour in 350 ml of kefir.
Mix until the ingredients are well combined and the dough is smooth.
Add 30 ml of vegetable oil and knead the dough until it reaches a medium-soft consistency.
First Rise:
Grease a large bowl with vegetable oil.
Place the dough in the bowl, cover with food-grade film, and then with a towel.
Set aside in a warm place for 40 minutes to rise.
Shape the Dough:
Once the dough has risen, grease the table with a little oil.
Knead the dough gently and form it into a ball.
Divide the dough into 8 equal parts.
Dust a cutting board with flour and roll each piece into a ball.
Cover with a towel and let rest for 20 minutes.
Roll and Shape:
Grease a pan with butter.
Sprinkle the table with flour.
Roll out each ball of dough to the desired size.
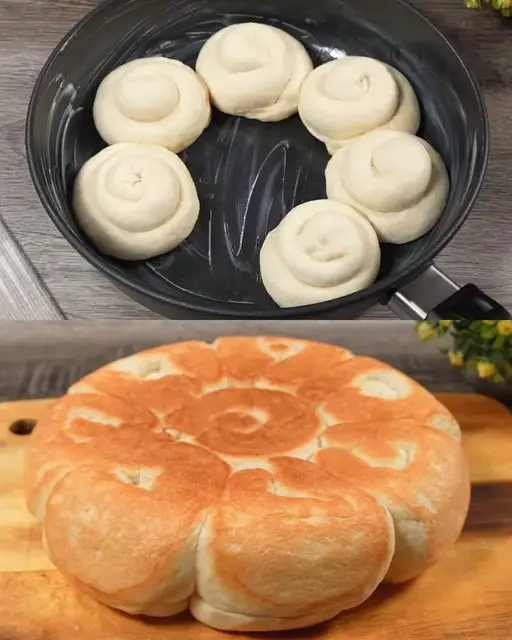
Roll up the dough and secure the edges to form a loaf.
Place each loaf in the greased pan.
Cover with a towel and let rest for another 20 minutes.
Cook the Bread:
After 20 minutes, cover the pan and bake the bread over medium heat for 20 minutes.
After 20 minutes, cover the bread with baking paper and turn over using a plate of appropriate size.
Cover with a lid and bake for another 10-12 minutes over medium heat.
Cool and Serve:
Once the bread is cooked, remove from the pan and let cool completely on a wire rack.
Enjoy your delicious, homemade oven-free bread!
Serving Suggestions
This bread is perfect for sandwiches, toasts, or as a side to soups and stews. It can also be enjoyed with butter, jam, or any spread of your choice.
Cooking Tips
Ensure the dough is well-kneaded to develop the gluten, which gives the bread its structure.
If you don’t have kefir, you can substitute it with buttermilk or a mixture of yogurt and milk.
Make sure the heat is medium to avoid burning the bread while it cooks.
Nutritional Benefits
This bread provides a good source of carbohydrates and can be enriched with additional nutrients depending on the type of flour and kefir used. It’s a wholesome and filling addition to any meal.
Dietary Information
Vegetarian
Storage Tips
Store the bread in an airtight container at room temperature for up to 3 days. For longer storage, wrap in plastic wrap and freeze for up to a month. Thaw at room temperature before serving.
Why You’ll Love This Recipe
This oven-free bread is not only easy to make but also incredibly versatile. It requires no special equipment and can be made on the stovetop, making it perfect for those who don’t have an oven. The kefir adds a unique flavor and softness to the bread, making it a delightful addition to any meal.
Conclusion
I hope you enjoy baking and eating this delicious oven-free bread. It’s a simple yet rewarding recipe that brings the joy of homemade bread to your kitchen. Don’t forget to write your reviews in the comments and share this recipe with your friends. Thank you for watching, liking, and subscribing! Happy baking! Enjoy your meal!


Leave a Reply