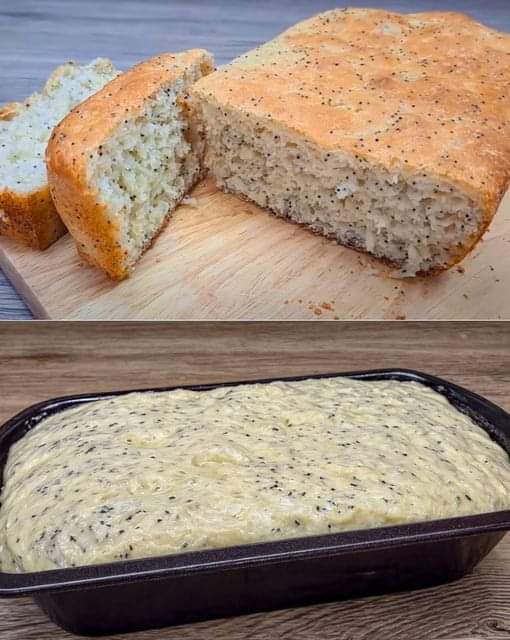
Ingredients
Warm Water: 350 ml (12 fl oz)
Dry Yeast: 5 g (0.18 oz)
Sugar: 1 tablespoon (12 g)
Wheat Flour: 350 g (12.3 oz)
Salt: 1 teaspoon (5 g)
Poppy Seeds: 1 tablespoon (10 g)
See also Super Tasty Sponge Cake
Instructions
1. Prepare the Dough
Begin by preparing the yeast mixture, which is the foundation of this no-knead bread. In a large mixing bowl, combine 350 ml of warm water (make sure it’s warm, not hot, to avoid killing the yeast) and 1 tablespoon of sugar. Stir the mixture until the sugar is fully dissolved. The sugar acts as food for the yeast, helping it activate more effectively.
Next, sprinkle 5 grams of dry yeast over the water and sugar mixture. Let it sit undisturbed for 5-10 minutes. You’ll know the yeast is activated when it becomes frothy and bubbly on the surface of the water. This step is crucial for ensuring that your bread rises properly.
Once the yeast is activated, add 350 grams of wheat flour, 1 teaspoon of salt, and 1 tablespoon of poppy seeds to the bowl. Use a sturdy spoon or spatula to stir the mixture until all the ingredients are fully combined. The dough will be sticky and shaggy—this is exactly what you want. There’s no need to knead the dough; simply mix until there are no dry spots of flour.
2. First Rise
Cover the bowl with a clean kitchen towel or plastic wrap. This helps to keep the dough moist as it rises. Place the bowl in a warm, draft-free area of your kitchen. Allow the dough to rise for about 1 hour, or until it has doubled in size. The rise time may vary depending on the temperature of your kitchen, so keep an eye on the dough.
3. Prepare the Baking Pan
While the dough is rising, prepare your baking pan. You can use a standard loaf pan, a cast-iron skillet, or even a Dutch oven. Grease the pan lightly with butter or oil to prevent the bread from sticking. If you prefer, you can also line the pan with parchment paper, which makes it easier to remove the bread after baking.
4. Transfer the Dough
Once the dough has risen, it’s time to transfer it to the prepared baking pan. The dough will be quite sticky, so use a spatula or lightly floured hands to handle it. Gently spread the dough evenly in the pan. There’s no need to be perfect; the rustic appearance is part of the bread’s charm.
5. Second Rise
Cover the dough again with a towel or plastic wrap and let it rise for another 20-30 minutes. During this second rise, the dough should expand to nearly fill the pan, reaching close to the top.
6. Preheat the Oven
While the dough is undergoing its second rise, preheat your oven to 230°C (450°F). A hot oven is key to achieving a good rise and a crisp crust on the bread.
7. Baking the Bread
Place the pan in the preheated oven and bake for 15 minutes at 230°C (450°F). After 15 minutes, carefully open the oven door and quickly sprinkle a small amount of water over the top of the dough. This step helps to create a crispy, crackly crust that isAfter adding the water, reduce the oven temperature to 190°C (370°F). Continue baking the bread for another 20-25 minutes, or until the loaf is golden brown and sounds hollow when tapped on the bottom.
8. Cool and Serve
Once the bread is baked to perfection, remove it from the oven and let it cool in the pan for a few minutes. This brief rest allows the bread to set, making it easier to handle.
Transfer the bread to a wire rack to cool completely before slicing. Cooling the bread ensures that it finishes cooking inside and maintains its structure, so resist the temptation to slice it too soon.
Enjoy your homemade no-knead bread as is, or use it as the base for sandwiches, toast, or dipping into soups and stews. The simplicity of this recipe, combined with the rich, homemade flavor, will make this bread a staple in your kitchen.
Nutrition Information
Servings: 8 slices
Calories: Approximately 160 kcal per slice
Protein: 4g
Fat: 1g
Carbohydrates: 32g
Fiber: 2g
Sugar: 2g
This no-knead bread recipe is not only easy and cost-effective but also delivers a nutritious option for your daily bread needs. The use of poppy seeds adds a subtle nutty flavor, while the minimal ingredients ensure that this bread is both wholesome and versatile. characteristic of good artisan bread.

Leave a Reply