Table of Contents
hide
Quick 3-Ingredient Date and Peanut Treats (No Baking, No Sugar)
Table of Contents
Ingredients You’ll Need
- Dates: 1 1/4 cups (200 g)
- Peanuts: 1 1/3 cups (190 g)
- White Chocolate (or dark chocolate if preferred): 3.5 oz (100 g)
Optional Garnish:
- Sesame Seeds: To taste
- Dark Chocolate: To taste
Step-by-Step Guide:
Step 1: Prepare the Peanuts
- Place 1 1/3 cups of peanuts in a food processor.
- Grind the peanuts until they form a crumbly texture. Be careful not to over-process, as you don’t want to turn them into peanut butter.
Step 2: Prepare the Dates
- Wash 1 1/4 cups of dates, remove the pits, and add them to the food processor along with the ground peanuts.
- Grind the mixture until it forms a sticky, cohesive mass. The dates act as the binder, creating a naturally sweet and chewy base.
Step 3: Form the Mixture
- Transfer the sticky mixture into a bowl.
- Using your hands, squeeze the mixture together to form one solid block of dough. The texture should be firm and sticky enough to hold its shape.
Step 4: Roll and Coat
- Take a portion of the mixture and place it on a flat surface.
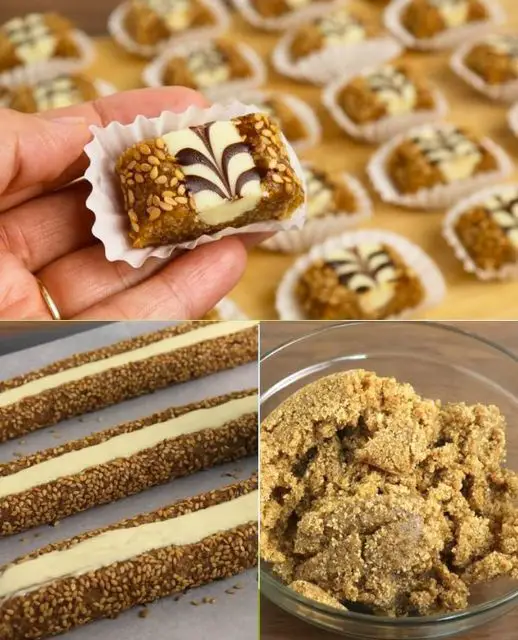
- Roll the portion into a log shape. If desired, sprinkle sesame seeds onto the surface and gently roll the log to coat it with the seeds.
- Repeat the process with the remaining mixture.
- Place the logs on a baking tray lined with parchment paper.
See also I Don’t Buy Pizza Anymore! Discover a Healthier and Tastier Alternative
Step 5: Create Wells
- Using the end of a wooden spoon or your finger, make a small well in the center of each roll. This well will later be filled with melted chocolate, adding a creamy, indulgent center.
Step 6: Melt the Chocolate
- Place the white chocolate (or dark chocolate) in a heatproof bowl.
- Melt the chocolate by setting the bowl over a pot of boiling water, stirring until smooth. Alternatively, melt it in the microwave in 20-second intervals, stirring between each until fully melted.
Step 7: Fill and Decorate
- Once the chocolate is melted and slightly cooled, transfer it to a piping bag (or use a spoon).
- Fill the wells in the rolled logs with the melted white chocolate.
- If desired, melt dark chocolate for an extra decorative touch and drizzle it over the filled logs using another piping bag.
Step 8: Chill and Cut
- Let the filled and decorated rolls chill for about 5 minutes to allow the chocolate to set.
- Once set, heat a knife in hot water, dry it, and cut the logs into bite-sized pieces. The warm knife will make slicing through the sticky date mixture much easier and create clean cuts.
Serving
- These date and peanut treats are best served chilled.
- Enjoy them as a healthy snack or a quick, no-sugar-added dessert! They are naturally sweet, making them a great alternative to sugary treats.
Notes
- Chocolate: You can use either white chocolate for a creamy, sweet finish or dark chocolate for a more intense flavor. Both work beautifully with the natural sweetness of dates and the nuttiness of peanuts.
- Garnish: Optional garnishes like sesame seeds and dark chocolate drizzle add extra flavor and visual appeal. You can also experiment with shredded coconut or chopped nuts.
- Cutting: Heating the knife in hot water before slicing the rolls will prevent the sticky mixture from sticking to the blade, ensuring cleaner cuts.
See also Tastier than Snickers! Sugar-Free Healthy Dessert!
Why This Recipe Is Perfect for You
- No Baking Required: With no need for an oven, these treats come together quickly and easily.
- Healthy and Sugar-Free: Sweetened naturally with dates, these treats are free of added sugar and perfect for a guilt-free snack.
- Minimal Ingredients: You only need three simple ingredients to make these delicious bites.
- Customizable: Whether you prefer white or dark chocolate, or want to add sesame seeds or other toppings, this recipe is easily adaptable to suit your preferences.

