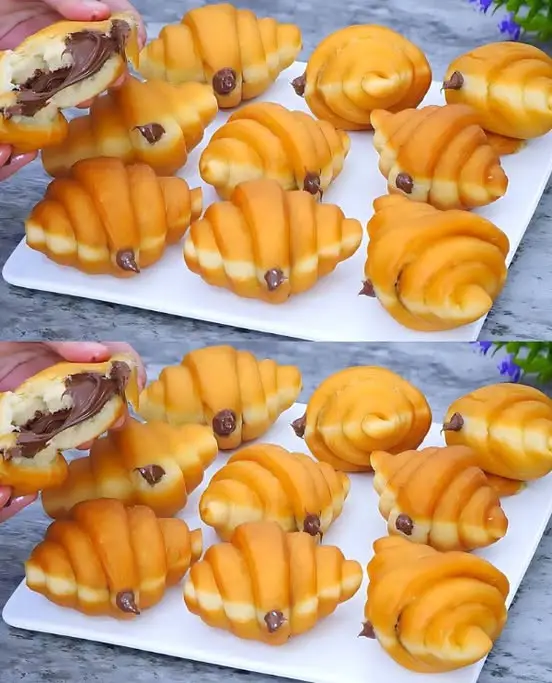
Nutella-Filled Skillet Buns (No Oven Needed)
These fluffy, pan-cooked buns are soft, golden, and deliciously filled with gooey Nutella. Perfect as a breakfast treat, an afternoon snack, or even a sweet ending to your day. Plus, no oven needed—just a simple non-stick pan!
Ingredients
For the Dough:
-
100ml lukewarm water (around 38°C/100°F – warm to the touch but not hot)
-
20g white granulated sugar (1 ½ tbsp)
-
4g instant dry yeast (about 1 tsp)
-
1 large egg (around 60g with shell, ~50g without)
-
280g bread flour (about 2 ¼ cups, spooned and leveled)
-
¼ tsp salt
-
30g unsalted butter, softened (2 tbsp)
For the Filling:
-
Nutella (or any chocolate hazelnut spread) – about 1 tsp per bun
Optional (for serving):
-
Powdered sugar (for dusting)
-
Extra Nutella for dipping
Step-by-Step Instructions
1. Activate the Yeast
In a large mixing bowl, combine:
-
100ml warm water
-
20g sugar
-
4g instant yeast
Stir gently to dissolve the sugar and yeast. Let the mixture sit for about 10 minutes, or until it turns foamy and bubbly on the surface. This is a sign that the yeast is active and ready to work its magic.
Troubleshooting Tip: If the mixture doesn’t foam after 10–15 minutes, your yeast may be expired or the water was too hot/cold. Try again with fresh yeast and warm—not hot—water.
2. Add Egg, Flour, and Salt
Once the yeast is foamy, add:
-
1 beaten egg
-
280g bread flour
-
¼ tsp salt
Mix everything together with a spoon or spatula until a rough dough forms. Then, transfer it to a clean work surface or knead right in the bowl.
Begin kneading the dough for 5–7 minutes until it becomes cohesive and slightly smooth. It may be a little sticky at this point—don’t worry.
3. Incorporate the Butter
Now add:
-
30g softened butter, a little at a time
Keep kneading, gradually working in the butter. The dough will seem greasy and messy at first, but after another 10 minutes of kneading, it will become smooth, soft, and elastic.
✋ Tip: Use the “windowpane test” to check readiness. Stretch a piece of dough gently—if it can stretch thin without tearing, it’s ready.
4. First Rise (Proofing)
Place the kneaded dough into a lightly greased bowl and cover it with a clean towel or plastic wrap. Let it rise in a warm, draft-free spot for 1 hour, or until it doubles in size.
️ Ideal proofing temperature: 24–28°C (75–82°F)
5. Divide and Shape
Once risen, punch down the dough to release the gas. Transfer it to a lightly floured surface.
Divide the dough into equal portions—around 10–12 pieces, depending on the size you prefer. (Each piece should weigh roughly 40–45g.)
Roll each piece into a smooth ball, then flatten it into a disc using your hands.
6. Fill with Nutella
Place about 1 teaspoon of Nutella in the center of each flattened dough disc.
Fold the edges over the filling and pinch them together to seal completely. Roll the sealed ball gently between your hands to smooth out the shape.
❗ Important: Make sure the seam is well sealed to prevent the filling from leaking during cooking.
7. Final Rest
Place the shaped buns seam-side down on a tray or plate. Cover them loosely and let them rest for 15–20 minutes while you preheat your pan.
This short rest helps the dough relax, making the buns fluffier during cooking.
8. Cook the Buns (No Oven Needed!)
Heat a non-stick pan with a lid over low heat. No oil needed—just dry cook.
Place a few buns into the pan, leaving space for them to expand. Cover with a lid and cook for 6–8 minutes on the first side.
Once the bottoms are golden brown, flip the buns and cover again. Cook the second side for another 4–6 minutes, until also golden and cooked through.
Tips for success:
Keep the heat low to avoid burning.
If your pan is large enough, you can cook 4–5 buns at once.
If you don’t have a lid, use a baking sheet or foil to trap steam.
Repeat with the remaining buns.
9. Serve and Enjoy!
Let the buns cool slightly before serving. The Nutella inside will be molten and delicious.
Dust with powdered sugar if desired, or serve with an extra spoon of Nutella on the side for dipping.
These buns are best enjoyed warm, but you can also reheat them gently in a pan or microwave.
Storage and Reheating
-
To Store: Keep leftover buns in an airtight container at room temperature for up to 2 days.
-
To Reheat: Warm in a skillet over low heat or microwave for 10–15 seconds. Don’t overheat or the filling may leak.
Notes and Variations
-
Flour Type: Bread flour gives a chewy, structured bun. All-purpose flour can be used in a pinch but may yield a softer, less chewy texture.
-
Filling Options: Try peanut butter, jam, cream cheese, or a square of chocolate for variety.
-
Sweet Glaze: Brush with melted butter and sprinkle with cinnamon sugar for a donut-like twist.
❤️ Why You’ll Love This Recipe
-
No oven required—perfect for dorms, small kitchens, or summer days.
-
Simple pantry ingredients.
-
Kid-friendly and great for sharing.
-
Customizable with your favorite fillings.

