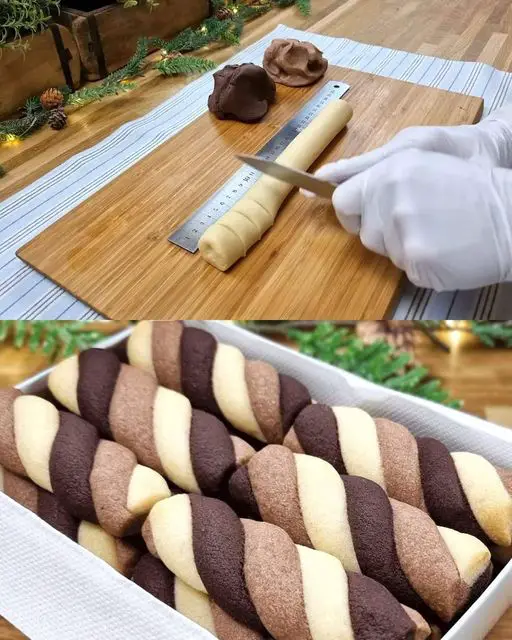
Christmas Twisted Cookies
Table of Contents
Ingredients
For the Dough:
200 g Butter (softened)
100 g Powdered sugar (icing sugar)
1 tsp Vanilla extract
1/4 tsp Salt
260 g All-purpose flour
For the Cocoa-Flavored Dough:
6 tsp Cocoa powder
1 tsp Ground cinnamon
Step-by-Step Instructions
Step 1: Preparing the Cookie Dough
Cream the Butter and Sugar:
Start by placing the softened butter and powdered sugar in a large mixing bowl. Use a hand mixer or a whisk to beat them together until the mixture becomes light, fluffy, and smooth. This step is important because it incorporates air into the dough, which will give your cookies a soft texture.
Add the Vanilla and Salt:
Stir in the vanilla extract and a pinch of salt. The vanilla will give the dough a warm, aromatic flavor that complements the sweetness of the sugar, while the salt helps balance the flavors and brings out the richness of the butter.
Incorporate the Flour:
Gradually add the flour to the butter mixture. It’s best to sift the flour beforehand to avoid clumps. Mix the ingredients together with a spatula or your hands until the dough comes together and is smooth. The dough should be soft and slightly sticky but firm enough to hold its shape.
Step 2: Dividing the Dough
Divide the Dough:
Once the dough is combined, divide it into three equal parts. Place one part of the dough back in the bowl and set the other two aside. You will add different flavors to these portions to create the distinct twisted effect in the final cookies.
Flavor the Dough:
To one part of the dough, add 6 teaspoons of cocoa powder and 1 teaspoon of ground cinnamon. Knead the dough with your hands until the cocoa and cinnamon are evenly mixed in, giving the dough a rich brown color and a wonderful spiced aroma. For the other two portions, leave them plain (these will remain the original buttery flavor).
Step 3: Chilling the Dough
Refrigerate the Dough:
Now that you have three portions of dough, it’s important to let them rest. This will make the dough firmer and easier to work with. Place each portion in a separate bowl or wrap them individually in plastic wrap and refrigerate them for at least 30 minutes. Chilling the dough helps prevent it from spreading too much while baking and ensures that the cookies keep their shape.
Step 4: Shaping the Cookies
Roll the Dough:
After the dough has chilled, remove it from the fridge. Take out one piece at a time, as working with too much dough at once can make it difficult to shape. Roll each dough portion into small pieces—about 12 pieces per dough color. Roll each piece of dough into a small ball to start with, then gently roll them out into 21 cm long strips.
Twisting the Dough:
Take one piece of the plain dough and one piece of the cocoa dough. Place them side by side and gently press them together. Twist the two strips of dough together in opposite directions, ensuring that the dough remains intact and doesn’t break. You want a loose, but not too tight, twist.
Cutting and Shaping:
Cut the twisted dough into 7 cm long pieces. The twisted shape will give your cookies a delightful, whimsical look. Be sure to wipe your hands and utensils after each twist to prevent the cocoa powder from mixing into the white dough. This keeps the beautiful contrast between the two dough colors.
Chill Again:
Place the twisted dough pieces onto a baking sheet lined with parchment paper. Once all the cookies are shaped, return the baking sheet to the fridge for 10-15 minutes before baking. This helps the cookies hold their shape and prevents them from spreading too much during baking.
Step 5: Baking the Cookies
Preheat the Oven:
Preheat your oven to 160°C (320°F) for a fan-assisted oven or 170°C (340°F) for a conventional oven. The temperature is important to ensure the cookies bake evenly and get that nice golden edge without burning.
Bake the Cookies:
Once the oven is preheated, place the baking sheet with the chilled twisted dough in the oven. Bake for 14-16 minutes, or until the cookies are lightly golden at the edges. Keep an eye on them toward the end of the baking time to avoid over-baking, as oven temperatures can vary.
Cooling:
When the cookies are done baking, remove them from the oven and let them cool on a wire rack. This cooling process is important, as it helps the cookies set and become firm enough to handle.
Step 6: Finishing Touches
Decoration (Optional):
Once the cookies have cooled, you can decorate them with a dusting of powdered sugar, sprinkles, or even a drizzle of melted chocolate. This is optional, but it can add a festive touch to make them even more Christmas-worthy.

