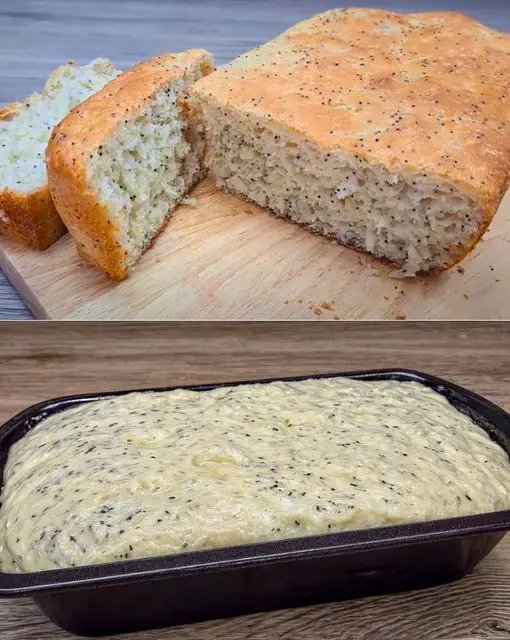
No-Knead Bread with Just Water and Flour

Table of Contents hide
3 3. Prepare the Baking Pan

No-Knead Bread with Just Water and Flour

Table of Contents

Ingredients

  • Warm Water: 350 ml (12 fl oz)
  • Dry Yeast: 5 g (0.18 oz)
  • Sugar: 1 tablespoon (12 g)
  • Wheat Flour: 350 g (12.3 oz)
  • Salt: 1 teaspoon (5 g)
  • Poppy Seeds: 1 tablespoon (10 g)
See also  Dessert Cookies Recipe

Instructions

1. Prepare the Dough

Begin by preparing the yeast mixture, which is the foundation of this no-knead bread. In a large mixing bowl, combine 350 ml of warm water (make sure it’s warm, not hot, to avoid killing the yeast) and 1 tablespoon of sugar. Stir the mixture until the sugar is fully dissolved. The sugar acts as food for the yeast, helping it activate more effectively.
Next, sprinkle 5 grams of dry yeast over the water and sugar mixture. Let it sit undisturbed for 5-10 minutes. You’ll know the yeast is activated when it becomes frothy and bubbly on the surface of the water. This step is crucial for ensuring that your bread rises properly.
Once the yeast is activated, add 350 grams of wheat flour1 teaspoon of salt, and 1 tablespoon of poppy seeds to the bowl. Use a sturdy spoon or spatula to stir the mixture until all the ingredients are fully combined. The dough will be sticky and shaggy—this is exactly what you want. There’s no need to knead the dough; simply mix until there are no dry spots of flour.

2. First Rise

Cover the bowl with a clean kitchen towel or plastic wrap. This helps to keep the dough moist as it rises. Place the bowl in a warm, draft-free area of your kitchen. Allow the dough to rise for about 1 hour, or until it has doubled in size. The rise time may vary depending on the temperature of your kitchen, so keep an eye on the dough.

3. Prepare the Baking Pan

While the dough is rising, prepare your baking pan. You can use a standard loaf pan, a cast-iron skillet, or even a Dutch oven. Grease the pan lightly with butter or oil to prevent the bread from sticking. If you prefer, you can also line the pan with parchment paper, which makes it easier to remove the bread after baking.

4. Transfer the Dough

Once the dough has risen, it’s time to transfer it to the prepared baking pan. The dough will be quite sticky, so use a spatula or lightly floured hands to handle it. Gently spread the dough evenly in the pan. There’s no need to be perfect; the rustic appearance is part of the bread’s charm.

5. Second Rise

Cover the dough again with a towel or plastic wrap and let it rise for another 20-30 minutes. During this second rise, the dough should expand to nearly fill the pan, reaching close to the top.

6. Preheat the Oven

While the dough is undergoing its second rise, preheat your oven to 230°C (450°F). A hot oven is key to achieving a good rise and a crisp crust on the bread.

7. Baking the Bread

Place the pan in the preheated oven and bake for 15 minutes at 230°C (450°F). After 15 minutes, carefully open the oven door and quickly sprinkle a small amount of water over the top of the dough. This step helps to create a crispy, crackly crust that is characteristic of good artisan bread.

See also  Irresistible Summer Peach Cake

After adding the water, reduce the oven temperature to 190°C (370°F). Continue baking the bread for another 20-25 minutes, or until the loaf is golden brown and sounds hollow when tapped on the bottom.

» MORE:  Recipe Tin Project: Kentucky Pecan Pie A classic pie from an old recipe card. Kristy Norrell by1 Kristy Norrell hearts When you share or print a 12 Tomatoes recipe, you're making mealtime meaningful. 100% of the Share to Care sponsor fees fund meals for families in need. Learn More Pecan Pie is as classic as pie gets, so when I saw this old recipe card I knew I had to make it. And besides, this wasn’t just any Pecan Pie, this was Kentucky Pecan Pie, which seemed even more enticing. As far as I’m concerned, pie is at its best when it’s nostalgic and that’s just what this pie is. And only seven ingredients? Count me in. This recipe card came to me through the Recipe Tin Project, a project where I cook my way through an old recipe tin full of vintage recipes. But you might have already guessed that. It’s chock full of old recipe cards, most of which seem to be from the ’60s and ’70s. I love food history, and the idea is to breathe new life into these recipes from the past and maybe learn a technique or two from them along the way. The recipes come from different people with different handwriting; some have sweet illustrations while others are on plain (often smudged and stained) index cards. This card has a sweet little illustration in the top left corner with a steaming kettle and a few veggies in primary colors. It doesn’t say who the recipe is from but it’s written in blue ink in a cursive that’s straight up and down and easy to read. The ingredients are listed on the right, the directions on the left, which is also very easy to read. (Not all these cards are.) There’s no pastry crust recipe, so you can use your favorite, or a storebought shell if you’re looking to save some time. (I was and so I did.) The card tells you quite simply to just combine the first ingredients and mix well, which is the corn syrup, dark brown sugar, salt, butter (or margarine), vanilla, and eggs (beaten). I used butter and after consulting some other pecan pie recipes, I figured that it was meant to be melted. After all, even softened butter wouldn’t mix well into the rest of the liquidy list. You pour that into an unbaked pie crust… And then you top it with a heaping cup of pecans. It tells you to sprinkle them over the top, but I got a little neater with it. And then you bake. The card says forty-five minutes but I probably could’ve gone a little bit longer, to be honest. This was ooey-gooey stuff. Pecan Pie is nearly always sticky and ooey-gooey, I guess, but this could’ve set a little bit more. I don’t know what’s Kentuckian about this pie, but I will say that I liked it better than a lot of other pecan pies out there. While I often find them cloying, this one had a simple straightforward flavor that let the nuttiness of the pecans shine more than the sugar. This is one to keep coming back to! Recipe Tin Project: Kentucky Pecan Pie Yield(s): Yield 1 pie 15m prep time 45m cook time 4.8 Rated by 11 reviewers hearts When you share or print a 12 Tomatoes recipe, you're making mealtime meaningful. 100% of the Share to Care sponsor fees fund meals for families in need. Learn More Ingredients 1 cup white corn syrup 1 cup dark brown sugar 1/3 teaspoon salt 1/3 cup butter or margarine 1 teaspoon vanilla 3 whole eggs 1 heaping cup pecans 1 unbaked 9-inch pie shell Preparation Preheat oven to 350°F. Stir together corn syrup, brown sugar, salt, and melted butter, and vanilla, and mix well. Add slightly beaten eggs and mix once more. Pour into unbaked pie shell. Sprinkle pecans over the top. Bake 45 minutes. Once cool top with whipped cream. Around the Web How Long Should I Keep My Car? How Long Should I Keep My Car? Why Google Workspace for Business is Worth the Upgrade Why Google Workspace for Business is Worth the Upgrade The Close Relationship Between Stress and Sleep The Close Relationship Between Stress and Sleep Four Ways Food Banks Are Feeding Kids Right Now Four Ways Food Banks Are Feeding Kids Right Now Get Dog Food Designed for Your Dog's Health & Happiness Get Dog Food Designed for Your Dog's Health & Happiness Five Destinations to Explore During Hispanic Heritage Month Five Destinations to Explore During Hispanic Heritage Month Got Plant Milk? Add These 16 Plant Milks to Your Mug for Health, Flavor, and Fro Got Plant Milk? Add These 16 Plant Milks to Your Mug for Health, Flavor, and Fro Take on a Challenge: Make Pasta Al Limone at Home Take on a Challenge: Make Pasta Al Limone at Home The Best Places to Buy College Apparel Make Showing College Pride Too Easy The Best Places to Buy College Apparel Make Showing College Pride Too Easy Cookie Salad Hori-07Classic Cookie Salad 3-Cheese Meatloaf3-Cheese Meatloaf Kentucky Hot Brown SlidersKentucky Hot Brown Sliders Braised Broccoli and BeansBraised Broccoli and Beans Strawberry Avocado SaladStrawberry Avocado Salad Copycat Pillsbury Cinnamon Roll Icing Korean Honey Butter Potatoes Colonial Vegetable Pottage Cauliflower Paneer FrittersCauliflower Paneer Fritters Iowa Party Bites Hori-09Iowa Party Bites Pumpkin Oreo Pie Icelandic Pylsa Tomato Soup

8. Cool and Serve

  • Once the bread is baked to perfection, remove it from the oven and let it cool in the pan for a few minutes. This brief rest allows the bread to set, making it easier to handle.
  • Transfer the bread to a wire rack to cool completely before slicing. Cooling the bread ensures that it finishes cooking inside and maintains its structure, so resist the temptation to slice it too soon.
  • Enjoy your homemade no-knead bread as is, or use it as the base for sandwiches, toast, or dipping into soups and stews. The simplicity of this recipe, combined with the rich, homemade flavor, will make this bread a staple in your kitchen.

Nutrition Information

  • Servings: 8 slices
  • Calories: Approximately 160 kcal per slice
  • Protein: 4g
  • Fat: 1g
  • Carbohydrates: 32g
  • Fiber: 2g
  • Sugar: 2g
This no-knead bread recipe is not only easy and cost-effective but also delivers a nutritious option for your daily bread needs. The use of poppy seeds adds a subtle nutty flavor, while the minimal ingredients ensure that this bread is both wholesome and versatile.

Leave a Comment