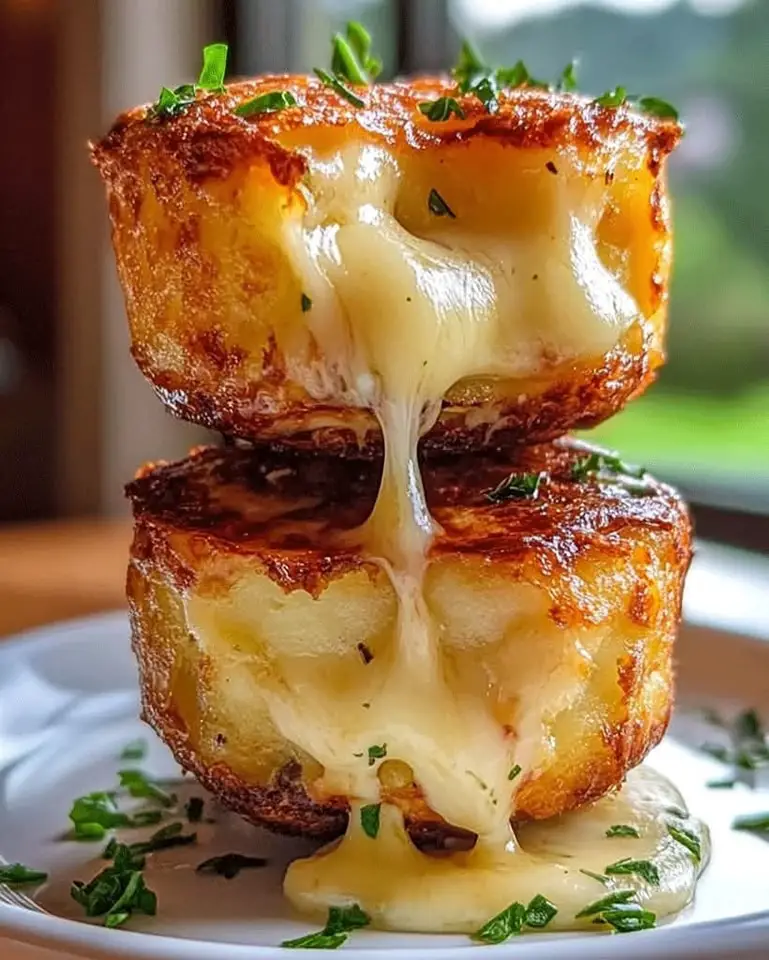
Welcome, food lovers! If you’re someone who enjoys delicious, versatile, and budget-friendly meals, you’re in for a treat today. This Leftover Mashed Potato Cheese Puffs recipe is not just an innovative way to repurpose leftover mashed potatoes, but it’s also a perfect option for a savory snack or side dish. Plus, they taste even better the next day, making them an ideal meal to prepare ahead of time. Ready to dig into some cheesy, crispy goodness?
Introduction
The origins of Leftover Mashed Potato Cheese Puffs come from the idea of making the most out of what you already have in the kitchen. This dish combines the smooth, comforting texture of mashed potatoes with the savory, melted joy of cheese. It’s a simple yet indulgent recipe that adds a gourmet twist to a household staple. Whether you’re looking to serve them as an appetizer or a side dish, these potato puffs are a must-try for fans of both mashed potatoes and cheesy bites. What makes them truly special is their crisp exterior and fluffy, flavorful center, making them an irresistible addition to any meal.
Ingredients for Leftover Mashed Potato Cheese Puffs
Here’s what you’ll need to make these delicious Leftover Mashed Potato Cheese Puffs:
- 3 cups mashed potatoes (best if chilled)
- 1 cup shredded cheese (cheddar, mozzarella, or your favorite melting cheese)
- 1/4 cup all-purpose flour
- 2 tablespoons Parmesan cheese (optional, for added flavor)
- 2 tablespoons fresh chives, finely chopped
- 1/3 cup sour cream
- Salt to taste
- 2 eggs, beaten
Optional Substitutions:
- For a gluten-free option, substitute all-purpose flour with gluten-free flour.
- If you’re lactose intolerant, use lactose-free cheese and sour cream.
How to Make Leftover Mashed Potato Cheese Puffs – Step by Step
Let’s walk through the step-by-step process for making these Leftover Mashed Potato Cheese Puffs.
- Preheat your oven to 400°F (200°C) and lightly grease a muffin tin to prevent sticking.
- Mix the wet ingredients: In a large bowl, whisk the eggs and sour cream together until smooth. This ensures the mashed potato mixture has a light, creamy consistency.
- Add the cheeses: Stir in the shredded cheese, Parmesan cheese, and chopped chives. Make sure everything is evenly distributed before moving to the next step.
- Season and mix the potatoes: Gently fold the mashed potatoes into the egg mixture. Mix everything thoroughly but carefully to avoid breaking down the potatoes too much.
- Prepare to bake: Spoon the mixture into the muffin tin, filling each cup about three-quarters full. This will allow the puffs to rise slightly during baking.
- Bake until golden: Place the tin in the oven and bake for about 20–25 minutes, or until the tops are golden brown and puffed up.
- Cool and serve: Allow the puffs to cool slightly before removing them from the muffin tin.
Enjoy your crispy and cheesy Mashed Potato Puffs with your favorite dip or as a side for your main course!
Helpful Tips for Leftover Mashed Potato Cheese Puffs
For the best results, here are some helpful tips:
- Use cold mashed potatoes: Cold potatoes hold their shape better, making the mixture easier to form and bake.
- Customize with herbs: For extra flavor, you can add herbs like rosemary or thyme.
- Add crunch: Sprinkle breadcrumbs on top before baking for an extra crispy texture.
- Cheese substitutions: You can use different types of cheese like Gouda, Gruyère, or even blue cheese for a more complex flavor profile.
Cooking Tips for the Best Leftover Mashed Potato Cheese Puffs
- Cooking techniques: For the crispiest puffs, make sure to preheat the oven and bake them on the middle rack. This ensures even cooking and browning.
- Best hacks: You can use a mini muffin tin to make bite-sized puffs perfect for snacking or appetizers.
Serving Suggestions for Leftover Mashed Potato Cheese Puffs
Pair these puffs with:
- Grilled chicken or steak: The crispy texture of the puffs complements the juiciness of grilled meats.
- Fresh salad: A light green salad with a zesty vinaigrette cuts through the richness of the cheese puffs, balancing the meal.
- Sauces: Serve with a dollop of sour cream, a tangy marinara sauce, or a homemade aioli for dipping.
Nutritional Information
These Leftover Mashed Potato Cheese Puffs offer a nutritious way to enjoy potatoes. They are rich in protein from the cheese and eggs, while the potatoes provide a good source of carbohydrates.
Nutritional Information (per serving)
Calories: 180
Fat: 9g
Carbohydrates: 20g
Protein: 6g
Sodium: 240mg
Fiber: 2g
Storage and Leftovers for Leftover Mashed Potato Cheese Puffs
- Storing: Place any leftover puffs in an airtight container and refrigerate for up to 4 days.
- Freezing: These puffs freeze well! Simply place them in a freezer-safe bag and store for up to 3 months.
- Reheating: To reheat, place the puffs in a preheated oven at 350°F (175°C) for 10–15 minutes, or until heated through and crispy.
Frequently Asked Questions (FAQs)
- Can I freeze the puffs before baking? Yes, you can freeze them in the muffin tin before baking. Just pop them in the oven straight from the freezer, adding a few minutes to the baking time.
- Can I use sweet potatoes instead? Absolutely! Sweet potatoes will add a hint of sweetness, and the puffs will still be delicious.
- What kind of cheese works best? Cheddar and mozzarella are great melting cheeses, but you can experiment with other types for different flavors.
- How can I make this dish dairy-free? You can substitute dairy cheese with plant-based alternatives and use a dairy-free sour cream.
Conclusion
These Leftover Mashed Potato Cheese Puffs are the perfect way to turn simple leftovers into a gourmet dish. Give them a try, and you’ll see just how easy and delicious they are! Don’t forget to share your own variations in the comments – we’d love to hear how you make this recipe your own!

