Category: quick and easy recipe

  • Classic Strawberry Swirl Cheesecake

    Classic Strawberry Swirl Cheesecake

    Classic Strawberry Swirl Cheesecake

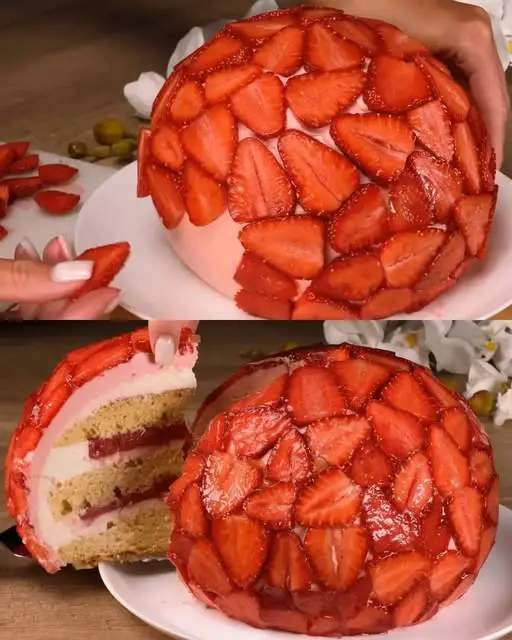
    Experience a decadent slice of cheesecake heaven with this Classic Strawberry Swirl Cheesecake. It layers a soft, sponge-like base with rich strawberry compote and a light cream cheese filling—topped with fresh berries in a glossy gelée finish. Elegant and refreshing, it’s ideal for special occasions or a sophisticated everyday treat. Despite its luxurious finish, this cake is surprisingly approachable with step-by-step guidance to ensure success.

    Cooking Time
    Prep Time: 45 minutes
    Bake Time: 35 minutes
    Chill Time: 3 hours
    Total Time: 4 hours 20 minutes

    Ingredients
    For the Base Sponge:

    4 large eggs

    Pinch of salt

    100 g granulated sugar

    10 g vanilla sugar

    100 g all-purpose flour

    20 g cornstarch

    5 g baking powder

    For the Strawberry Compote:

    200 g strawberries, hulled and chopped

    30 g granulated sugar

    10 g cornstarch

    For the Cream Cheese Filling:

    200 ml heavy cream (33%)

    5 g vanilla sugar

    70 g icing sugar

    400 g cream cheese, softened

    50 g milk

    For the Butter Layer:

    Chocolate Chip Vanilla Mousse
    Chocolate Chip Vanilla Mousse
    100 g unsalted butter, softened

    5 g vanilla sugar

    70 g icing sugar

    300 g cream cheese, softened

    Food coloring (optional)

    For the Strawberry Glaze:

    400–500 g fresh strawberries for decoration

    10 g gelatin powder

    70 g water

    70 g granulated sugar

    1 tbsp honey

    Step-by-Step Cooking Directions
    1. Make the Base:
    Preheat oven to 170 °C. In a large bowl, beat 4 eggs with a pinch of salt. Gradually add 100 g sugar with sifting—stop halfway to add 10 g vanilla sugar, then whisk in the remaining sugar. Fold in 100 g flour, 20 g cornstarch, and 5 g baking powder gently to form a light batter. Pour into a greased 16 cm cake dish and bake for 35 minutes. Let cool, then refrigerate for 1–2 hours.

    2. Prepare the Strawberry Swirl:
    Combine chopped strawberries with 30 g sugar and 10 g cornstarch in a saucepan. Heat on low, stirring until thick. Let it cool completely before swirling into the cream cheese filling.

    3. Whip the Cream Cheese Filling:
    Whip 200 ml heavy cream with 5 g vanilla sugar and 70 g icing sugar until soft peaks form. In another bowl, beat 400 g cream cheese with 50 g milk until smooth. Gently fold whipped cream into cream cheese mixture.

    4. Enhance with Butter Layer:
    Beat together 100 g butter, 5 g vanilla sugar, and 70 g icing sugar until creamy. Add 300 g cream cheese and optional food coloring. Fold into the cream cheese layer for added richness.

    5. Assemble the Cake:
    Place cooled sponge at the bottom of the dish. Spread half the cream filling evenly, swirl in cooled strawberry compote. Top with remaining filling and smooth out. Tap to remove air pockets.

    6. Chill to Set:
    Refrigerate the cake for at least 30 minutes.

    7. Add Strawberry Glaze and Topping:
    Soak 10 g gelatin in half of the 70 g water for 5 minutes. Meanwhile, cook the remaining 70 g sugar with the other 35 g water until dissolved. Add bloomed gelatin, cook 1 minute more, and stir in 1 tbsp honey. Let cool to lukewarm. Place fresh strawberries atop the cake, pour glaze over gently, and refrigerate for 2–3 hours until fully set.

    Nutritional Information (per 1/8 slice)
    Calories: ~420 kcal | Total Fat: 30 g (Sat 18 g) | Protein: 5 g | Carbs: 36 g | Sugars: 28 g | Calcium: ~80 mg

    The Origins and Popularity of the Recipe
    Cheesecake has ancient roots dating to Greece, refined into a sweet dessert by European bakers. Strawberry swirl versions infuse the classic with fruity freshness, common in American and European bakeries. Combining sponge base and cream cheese creates a lighter take on dense cheesecakes—perfect for modern tastes.

    Reasons Why You’ll Love the Recipe
    Elegant layered visual with delicate flavors

    Lightened version compared to New York cheesecake

    5-Day Morning Drink to Burn Belly Fat and Cleanse the Body”
    5-Day Morning Drink to Burn Belly Fat and Cleanse the Body”
    Balanced sweetness with natural strawberry tang

    Can be prepped in stages—great for entertaining

    Impressively rich without feeling heavy

    Health Benefits
    While indulgent, this dessert includes elements with nutritional value. Strawberries offer antioxidants and vitamin C; dairy adds calcium and protein. You can reduce sugar or use low-fat options to lighten it.

    Serving Suggestions
    Garnish with mint leaves for freshness

    Pair with a small scoop of lemon sorbet

    Serve with espresso or dessert wine

    Present in clear rings for clean slices

    Common Mistakes to Avoid
    Overbaking the sponge—keep an eye after 30 minutes

    Failing to cool layer components completely—can cause melting

    Not blooming gelatin properly—leads to runny glaze

    Whipping cream too long—can result in grainy texture

    Pairing Recommendations
    Beverages: Sparkling rosé, sweet Muscat, or herbal tea

    Sides: Fresh mixed berries or sliced peaches

    Sauces: Drizzle with berry coulis or milk chocolate sauce

    Cooking Tips
    Use room-temperature eggs for a fluffier sponge

    Texture test strawberry compote with a chilled spoon

    Food coloring is optional; natural color from compote is sufficient

    Chill cake at least 2 hours for clean glaze slicing

    Similar Recipes to Try
    Raspberry swirl cheesecake bars

    Lemon cream sponge cake

    Blueberry layered mousse cake

    A homemade dessert in 5 minutes that I never get tired of! No need for cooking
    A homemade dessert in 5 minutes that I never get tired of! No need for cooking
    Classic New York cheesecake

    Variations to Try
    Chocolate base: Add cocoa powder to sponge

    Citrus zing: Add lemon zest to cream layer

    Nutty crunch: Fold in ground almonds

    Berry swap: Use raspberries or mixed berries

    Diet-friendly: Substitute sugar with erythritol and use low-fat cheese

    Ingredient Spotlight: Strawberries
    Strawberries are sweet, colorful, and packed with nutrients. Their natural pectin helps set compote without extra gelatin. Low in calories, rich in antioxidants and vitamin C, they enhance both flavor and visual appeal in desserts.

    Conclusion
    This Classic Strawberry Swirl Cheesecake is a gorgeous, crowd-pleasing dessert that strikes the perfect balance between airy sponge, velvety cream cheese, and bright strawberry brightness. Though it involves multiple steps, each stage is intuitive. The result is an impressive treat that delights the senses and looks picture-perfect.

    Frequently Asked Questions
    1. Can I use a larger pan?
    Yes—expect a thinner cake. Increase bake time by 5–10 minutes.

    2. What gelatine can I use?
    Use powdered gelatin (30 g) or 4–5 sheets. Bloom before use.

    3. Can I make it gluten-free?
    Substitute the sponge with GF flour mix (1:1 replacement) tested for baking.

    4. How long does it keep?
    Keeps in fridge up to 4 days; do not freeze (glaze texture changes).

    5. Can I reduce sugar?
    Yes—reduce both granulated and icing sugars to 80–90 g each to cut sweetness.

    6. Can I freeze it?
    Not recommended; frosting texture may separate.

    7. Can I skip the butter/cream mixture?
    Yes—the basic skippable mix add richness but can be omitted.

    8. Why swirl the strawberry compote?
    Creates a marbled visual and delicious flavor pockets—beautiful and tasty.

    9. What if glaze doesn’t set?
    Your gelatin may be old or insufficiently bloomed; bloom and stir thoroughly, then reheat and re-chill.

    10. Can I make it dairy-free?
    Yes—use vegan cream cheese (e.g., soy or nut-based), coconut cream, and non-dairy milk.
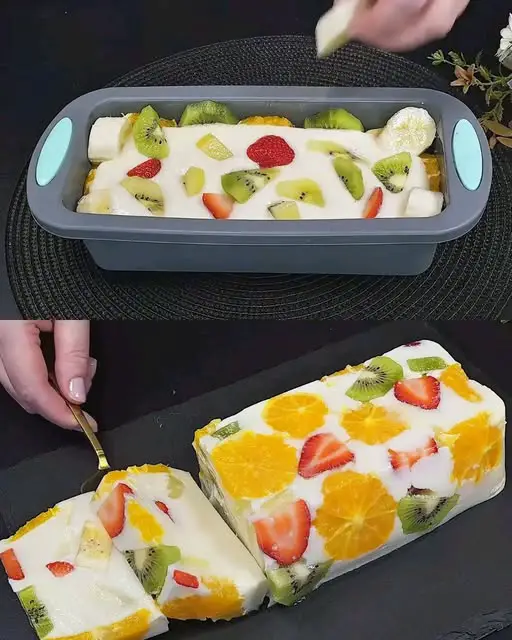
  • Refreshing Fruit and Milk Jelly Delight

    Refreshing Fruit and Milk Jelly Delight

    Refreshing Fruit and Milk Jelly Delight

    This Refreshing Fruit and Milk Jelly Delight is a beautiful, light, and luscious chilled dessert that layers vibrant fresh fruits with a delicate, creamy milk jelly. It’s a no-bake treat that’s perfect for summer gatherings, special occasions, or when you want to serve something elegant yet easy to prepare. Made with gelatin, milk, condensed milk, and a colorful medley of fruits like kiwi, banana, strawberries, and oranges, this dessert is both stunning to look at and refreshing to eat.

    The final presentation is enhanced with a fruity glaze made from lemon juice, strawberry syrup, and fresh mint, giving the dish a glossy finish and an extra layer of flavor. Whether you’re entertaining guests or simply treating your family, this dessert is sure to impress with its delicate texture and sweet, fruity taste.

    Preparation and Chilling Time
    Prep Time: 25 minutes

    Chilling Time: 3 hours

    Total Time: 3 hours 25 minutes

    Ingredients
    For the Milk Jelly Base:

    60g gelatin

    100ml water (for blooming gelatin)

    400ml milk

    200ml sweetened condensed milk

    2 oranges (peeled and segmented)

    3 strawberries (sliced)

    2 kiwis (peeled and sliced)

    1 banana (sliced)

    For the Glaze Topping:

    3 strawberries (blended or crushed)

    Juice of ½ lemon

    Water (to loosen the glaze)

    Sugar (to taste)

    Fresh mint leaves

    Creamy dessert with just 2 ingredients: you will be delighted with the result
    Strawberry syrup (optional, for added flavor and color)

    Ice cubes (for serving or chilling quickly)

    Lemon juice (extra, for flavor balance)

    Step-by-Step Cooking Directions
    1. Bloom the Gelatin
    In a small bowl, mix the 60g gelatin with 100ml cold water. Stir well and let it sit for 10–15 minutes until fully bloomed and spongy.

    2. Prepare the Milk Mixture
    In a saucepan, combine 400ml milk and 200ml condensed milk. Heat gently over medium heat, stirring constantly until warm but not boiling. Once the milk is heated, add the bloomed gelatin and stir until fully dissolved and smooth. Set aside to cool slightly.

    3. Prepare the Fruits
    While the milk jelly mixture is cooling, peel and slice the fruits:

    Peel and segment the 2 oranges, removing seeds and membranes.

    Slice the 3 strawberries, 2 kiwis, and 1 banana into bite-sized pieces.

    4. Layer the Dessert
    In a mold or glass dish (silicone molds work best for unmolding), begin layering the fruits:
    Start with a layer of orange slices, followed by strawberries, kiwi, and banana.
    Pour the slightly cooled milk gelatin mixture over the fruits, making sure all pieces are covered and suspended in the liquid.
    Tap the mold gently on the counter to remove air bubbles.

    5. Chill the Jelly
    Place the mold in the refrigerator and chill for at least 3 hours, or until the jelly is completely set and firm.

    6. Prepare the Glaze Topping
    In a blender or small pan, combine 3 strawberries, juice of half a lemon, a bit of water, and sugar to taste. Add a few fresh mint leaves for fragrance. Optionally, mix in strawberry syrup to intensify the color. Blend or heat gently until combined. Chill until ready to use.

    7. Serve
    Unmold the fruit milk jelly carefully onto a serving plate. Spoon the strawberry glaze over the top, or serve it on the side. Add ice cubes or serve chilled for extra refreshment.

    Nutritional Information (Per Serving, Based on 8 servings)
    Calories: ~180

    Fat: 3g

    Protein: 6g

    Carbohydrates: 35g

    Sugars: 27g

    Fiber: 2g

    Calcium: 15% DV

    Vitamin C: 40% DV

    Origins and Popularity of the Recipe
    This type of fruit jelly dessert has roots in many global cuisines, particularly in Eastern European and Middle Eastern kitchens, where gelatin-based fruit desserts are common. Similar versions are found in Japanese “raindrop cakes,” Russian “zhele,” and even Latin American gelatinas. The use of milk with fruit in gelatin creates a soft, pudding-like dessert that’s light, refreshing, and endlessly customizable. Its popularity continues to rise thanks to social media, where vibrant layers and fruit-studded domes catch the eye and make a striking impression.

    Keep Your Liver & Intestines Young and Healthy with this Daily Habit
    Keep Your Liver & Intestines Young and Healthy with this Daily Habit
    Reasons Why You’ll Love This Recipe
    No baking required

    Easy to customize with seasonal fruits

    Beautiful presentation for events and parties

    Kid-friendly and nutritious

    Light and refreshing, perfect for hot weather

    Can be made ahead of time

    Health Benefits
    Rich in calcium and vitamin D from the milk and condensed milk

    Natural fiber and antioxidants from the fruits

    Gelatin supports gut health and skin elasticity

    Low in fat and cholesterol compared to creamy desserts

    Hydrating thanks to the high water content in fruit

    Serving Suggestions
    Serve cold with a few mint leaves for color and aroma

    Garnish with extra fresh fruit or edible flowers

    Add a whipped cream dollop for extra indulgence

    Present in individual glasses for elegant single servings

    Pair with fruit coulis for a restaurant-style finish

    Common Mistakes to Avoid
    Not allowing gelatin to fully bloom—this causes clumps and uneven texture

    Pouring hot liquid onto fruit—this can cook or discolor the fruit

    Using very juicy fruits like watermelon that release too much water

    Skipping the chilling time—the jelly won’t set properly

    Using too much acid in the fruit layer—it can prevent gelatin from setting

    How to drink water properly to take care of your health?
    How to drink water properly to take care of your health?
    Pairing Recommendations
    Beverages: Try a chilled herbal tea (like hibiscus), fresh lemonade, or sparkling water with mint

    Snacks: Pair with light tea biscuits or almond cookies

    Other desserts: Great alongside panna cotta or sorbet for a refreshing trio

    Cooking Tips
    Use a non-stick silicone mold for easy unmolding

    Strain the milk mixture before pouring for ultra-smooth texture

    Add zest of lemon or orange to the milk base for extra aroma

    Use a spoon to slow the milk pour over fruits to keep layers clean

    If using canned fruits, drain well to prevent soggy jelly

    Similar Recipes to Try
    Creamy Mango Coconut Jelly

    Strawberry Yogurt Panna Cotta

    Layered Rainbow Gelatin Cubes

    Lemon Curd Gelatin Slice

    Japanese Milk Raindrop Cake with Berries

    Variations to Try
    Use coconut milk instead of dairy for a tropical, dairy-free version

    Replace some milk with fruit juice (like mango or berry)

    Try flavored gelatin packets for fun color and taste

    Make mini versions in cups or ramekins for parties

    Add chopped nuts or chocolate chips to the milk layer for texture

    Ingredient Spotlight: Gelatin
    Gelatin is the unsung hero of this recipe. It’s a collagen-based thickening agent derived from animal sources, giving jelly its signature wobble and silky mouthfeel. In addition to structure, gelatin offers health benefits, including improved joint health, better digestion, and stronger hair and nails. It’s essential to bloom gelatin in cold water first, then dissolve it in warm liquid to activate its setting properties.

    Conclusion
    This Refreshing Fruit and Milk Jelly Delight is more than just a dessert—it’s an experience. Light yet satisfying, visually stunning yet easy to make, this dish offers a perfect balance of nutrition, indulgence, and creativity. Whether you’re a beginner in the kitchen or an experienced host looking to impress, this recipe delivers every time. Try it once, and it might just become your go-to chilled dessert for every warm-weather occasion.

  • Fluffy Zucchini and Potato Pancakes

    Fluffy Zucchini and Potato Pancakes

    Some recipes are born from convenience and end up becoming your most repeated meal. That’s exactly what happened with this zucchini and potato pancake recipe. I threw it together one morning with leftover vegetables and pantry staples eggs, milk, and flour and what came out of the pan was so fluffy, crispy, and full of flavor, I knew it had to be shared. These savory veggie pancakes are simple, filling, and wildly adaptable.

    “If breakfast, lunch, and dinner had a perfect middle child, it’d be this pancake.” – @SimplePanChef

    Why This Recipe Fills Every Plate
    I make this dish when I want to use up produce and avoid the oven. It’s fast, fuss free, and everyone from picky toddlers to hungry adults loves it. The grated veggies create a moist base, while the flour and eggs hold it all together. Once pan fried in plant oil, you get these golden, crispy edged pancakes that are savory, fluffy, and deeply satisfying.

    Vegetable packed: Uses zucchini, potato, spring onion, and parsley
    Quick and easy: From prep to pan in under 20 minutes
    Flexible flavor: Works with extra herbs, spices, or even cheese
    No fancy gear needed: Just a bowl, a pan, and a grater
    It’s a close cousin to our crispy potato onion pancakes and complements dishes like spinach quiche or breakfast egg muffins when you’re feeding a crowd.

    Ezoic
    Ingredients You’ll Need
    3 eggs
    300 ml milk
    140 g flour
    1 tsp baking powder
    1 zucchini
    1 potato
    Salt to taste
    Spring onions, chopped
    Fresh parsley, chopped
    Plant oil for frying
    How I Make These Pancakes
    1. Prep the Veggies
    I start by grating the zucchini and potato using the coarse side of the grater. Then comes the most important step squeezing out the liquid. I wrap the grated veg in a clean kitchen towel and twist hard. If you skip this, the pancakes will turn soggy and heavy. Once dry, they go into a big mixing bowl.

    2. Make the Batter
    In another bowl, I whisk together the eggs and milk until frothy. Then I slowly add the flour and baking powder, whisking just until smooth no lumps. I fold the egg mixture into the grated vegetables, followed by the spring onions, parsley, and salt. The result is a thick, spoonable batter that smells like Sunday brunch.

    Ezoic
    3. Cook in Batches
    Heat 1-2 tablespoons of oil in a non stick skillet over medium heat.
    Spoon the batter into the pan, forming small rounds (about 3-4 inches wide).
    Cook for 2-3 minutes on each side, or until golden brown and crispy on the outside.
    Transfer to a paper towel lined plate while you cook the next batch.
    I always test the first one for seasoning sometimes the salt needs adjusting. Once they’re cooked, they’re ready to serve hot or warm. I usually whip up a quick dipping sauce (Greek yogurt + garlic + lemon) or pair them with our fresh cucumber salad for a refreshing side.

    “Crispy on the outside, fluffy in the center no one believes they’re made from scraps.” – @PanFlipChef

    Golden zucchini and potato pancakes stacked on a plate with fresh herbs
    Crispy edged, tender zucchini and potato pancakes pan fried to golden perfection
    Chef Tips for Success
    Squeeze veggies dry: This one step ensures a crisp, firm pancake.
    Medium heat is key: Too hot and the outside burns before the inside sets.
    Use non stick or cast iron: You’ll need minimal oil and get a beautiful golden crust.
    Rest the batter: Let it sit for 5 minutes before frying to help bind everything.
    This recipe reminds me of our healthy oat and egg breakfast just as nourishing and even easier to make ahead. I often double the batch and refrigerate extras for the next day.

    Ezoic
    Variations I’ve Tried
    Ways to Customize
    Cheesy version: Add ½ cup grated cheddar or parmesan to the batter
    Spiced up: Mix in ½ tsp cumin or smoked paprika for extra flavor
    Low carb: Replace half the flour with chickpea flour for a protein boost
    Extra greens: Add chopped spinach or kale for even more veggie power
    These pancakes can also be made into mini rounds for appetizers or lunchbox snacks. I sometimes shape them into sticks and bake them, similar to our crispy veggie sticks they come out equally crisp and crowd pleasing.

    Pairing Suggestions
    Yogurt garlic dip
    Sweet chili sauce
    Fried eggs and salad
    Simple tomato salsa
    This dish is as flexible as our homemade crepes savory, sweet, solo or with sides and perfect for using what you already have.

    “It’s the ‘use what you have’ kind of recipe that never lets me down.” – @FridgeRaidChef

    How I Serve These Pancakes to Please Everyone
    From Solo Snack to Full Family Meal
    What I love most about these savory zucchini and potato pancakes is their range. I’ve served them as a hearty breakfast, a satisfying lunch, and even a fun dinner side dish. When I’m making them for kids, I keep the seasoning mild and cut them into fun shapes using cookie cutters. For adults, I turn them into sliders with toppings like smoked salmon, crème fraîche, or herbed yogurt sauce. They’re just as home on a brunch board as they are in a dinner spread.

    Ezoic
    Kid friendly: Serve with a side of ketchup or yogurt dip and sliced fruit
    Brunch ready: Stack with avocado and a fried egg on top
    Dinner side: Pair with savory quiche muffins or rustic potato bake
    Party platter: Make mini versions and serve with assorted dips
    Making a Big Batch and Storing Leftovers
    These pancakes are excellent for meal prep. I often double the batch and refrigerate the extras. They stay soft and flavorful for up to three days, and they reheat beautifully in a skillet or the oven. I’ve even frozen them layer them with parchment in a container or zip bag, then reheat straight from frozen in a pan with a little oil.

    Fridge: Store in an airtight container for 3-4 days
    Freezer: Freeze for up to 1 month. Reheat in a pan or air fryer
    To reheat: Pan fry for 2 minutes per side over medium heat for crispiness
    This trick works as well as it does with our shortbread biscuits or frozen donuts convenient, consistent, and always appreciated.

    Seasonal Variations I Use Throughout the Year
    Depending on what’s in season or sitting in my fridge, I often adjust the vegetables. In winter, I swap in carrots or parsnips for earthier flavor. In spring, chopped spinach or leeks blend in beautifully. The base batter stays the same eggs, milk, flour which makes it reliable and easy to memorize.

    Ezoic
    Spring: Zucchini + spinach + dill
    Summer: Zucchini + corn + basil
    Autumn: Grated sweet potato + sage
    Winter: Carrot + parsnip + cumin
    This flexibility reminds me of our crazy dough recipe one base, endless results. I’ve even made versions using leftover roasted vegetables, blending them into the batter and pan frying for a quick and waste free meal.

    Make It Your Own with These Creative Twists
    Spice and Herb Ideas
    If you want to take this recipe up a notch, experiment with bold seasonings. For a Mediterranean spin, I add oregano and feta. For something spicy, a touch of cayenne or harissa paste in the batter works wonders. Here are a few combos I love:

    Feta + dill + lemon zest: For a Greek inspired flavor
    Garlic powder + smoked paprika: Adds a savory kick
    Curry powder + cilantro: For an Indian twist
    Parmesan + thyme: Classic and rich
    High Protein Upgrades
    For days when I need these to fuel me post workout or during long shifts, I boost the protein content. Adding a couple tablespoons of oat flour or protein powder works great, and mixing in shredded cheese or finely chopped turkey adds bulk without changing the cooking method.

    Ezoic
    Egg whites: Replace one whole egg with two whites for lean protein
    Chickpea flour: Replace half the flour to increase fiber and protein
    Cheddar + turkey: Mix into batter for a complete meal pancake
    It’s the same idea behind our high protein oatmeal work with your goals, not against them, and always keep the flavor strong.

    Frequently Asked Questions
    Can I make these gluten free?
    Yes! Substitute the flour with a 1:1 gluten free baking blend or chickpea flour. The texture stays fluffy and satisfying.

    Do I have to use both zucchini and potato?
    No, but the combination gives the best result. You can use all zucchini or all potato, but you may need to adjust the flour slightly.

    Ezoic
    Can I bake them instead of frying?
    Yes. Spoon the batter onto a parchment lined baking tray and bake at 375°F (190°C) for 20-25 minutes, flipping halfway for even browning.

    How do I make them extra crispy?
    Use less batter per pancake, spread it thinner, and cook on medium high heat. Also, don’t overcrowd the pan.

    Can I serve these cold?
    They’re best warm, but they also make a great lunchbox addition cold or at room temperature.

  • Chicken Bacon Ranch Tater Tot Casserole (Serves 6–8)

    Chicken Bacon Ranch Tater Tot Casserole (Serves 6–8)


    Chicken Bacon Ranch Tater Tot Casserole (Serves 6–8)

    Description:

    This comforting casserole combines crispy tater tots, creamy ranch-seasoned chicken, smoky bacon, and melted cheddar cheese into a hearty, crowd-pleasing dish that’s perfect for weeknight dinners or potlucks.


    Ingredients:

    • 2 cups cooked chicken, shredded (rotisserie or leftover chicken works great)

    • 1 cup cooked bacon, crumbled (about 8 slices)

    • 1 (32 oz) bag frozen tater tots (do not thaw)

    • 1 packet ranch seasoning mix (about 1 oz or 2 tablespoons)

    • 1 cup sour cream (full-fat preferred for creaminess)

    • 1/2 cup milk (whole milk or 2%)

    • 1 cup shredded cheddar cheese, divided (sharp cheddar recommended)

    • Optional Garnish: chopped green onions or parsley


    Preparation Steps:

    1. Preheat the oven to 375°F (190°C). Grease a 9×13-inch baking dish with nonstick spray or a thin layer of butter.

    2. In a large mixing bowl, combine:

      • Shredded chicken

      • Crumbled cooked bacon

      • Ranch seasoning mix

      • Sour cream

      • Milk

      • ½ cup of the shredded cheddar cheese

      Stir until the mixture is evenly combined and creamy.

    3. Spread the chicken mixture evenly in the bottom of the prepared baking dish, smoothing the top with a spatula.

    4. Arrange the frozen tater tots in a single layer over the top. You can lay them out neatly for even crisping or pour them over in a rustic layer.

    5. Sprinkle the remaining ½ cup cheddar cheese evenly over the tater tots.

    6. Bake uncovered for 25–30 minutes, or until the tater tots are golden and crispy, and the cheese is melted and bubbly.

    7. Optional: For extra crispiness, turn the oven to broil for the last 2–3 minutes. Watch carefully to avoid burning.

    8. Let rest for 5–10 minutes before serving. Garnish with chopped green onions or parsley, if desired.


    Serving Suggestions:

    • Pair with a crisp green salad or roasted vegetables.

    • Serve with a drizzle of hot sauce or extra ranch dressing.

    • Excellent for brunch, dinner, or a game day crowd.


    Variations & Tips:

    • Add veggies: Mix in ½ cup frozen peas, corn, or sautéed onions before baking.

    • Spicy version: Use pepper jack cheese or add a few dashes of hot sauce to the chicken mixture.

    • Make it extra cheesy: Increase the cheese to 1½ or 2 cups total.

    • Use cream cheese: Substitute half the sour cream with 4 oz of softened cream cheese for a tangier, thicker base.

    • Make ahead: Assemble up to 24 hours ahead and refrigerate. Bake uncovered as directed (may need 5 extra minutes if cold).


    Storage & Reheating:

    • Refrigerator: Store leftovers in an airtight container for up to 4 days.

    • Freezer: Freeze baked and cooled casserole in individual portions for up to 2 months. Reheat from frozen at 350°F for 30–35 minutes or until hot throughout.

    • Reheating: Reheat in microwave (2–3 minutes) or oven (350°F for 15–20 minutes) until warmed through.


    FAQs:

    Can I use ranch dressing instead of the seasoning mix?
    Not recommended. Ranch dressing is too liquidy and can make the casserole soggy. Use the dry seasoning packet for flavor without excess moisture.

    Can I use turkey bacon or vegetarian bacon?
    Yes! Turkey bacon works well and cuts down on fat. Veggie bacon is fine if crisped well before adding.

    Can I double this recipe?
    Yes, simply double all ingredients and bake in two 9×13 pans or a large foil tray. Add 5–10 minutes to the baking time if needed.

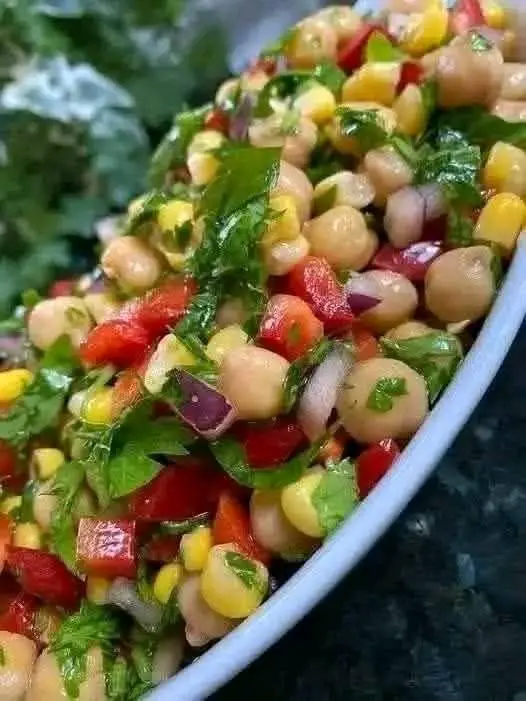
  • Chickpea Salad: A Fresh, Protein-Packed, and Flavorful Dish!

    Chickpea Salad: A Fresh, Protein-Packed, and Flavorful Dish!

     Chickpea Salad: A Fresh, Protein-Packed, and Flavorful Dish! 

     Description

    This vibrant Chickpea Salad is a refreshing, wholesome, and super satisfying dish packed with colorful vegetables, zesty lemon, and a touch of creaminess from feta or avocado. Perfect for a quick lunch, light dinner, or a potluck hit, it’s full of protein, fiber, and fresh flavors!


     Ingredients

    •  2 cans (15 oz each) chickpeas, drained and rinsed (or 3 cups cooked chickpeas)
    •  ½ small red onion, finely chopped
    •  1 red bell pepper, diced
    •  1 cucumber, diced
    •  1 cup cherry tomatoes, halved
    •  1 clove garlic, minced
    •  Juice of 1 lemon
    •  2 tbsp olive oil
    •  Salt and pepper, to taste
    •  1 tbsp fresh parsley, chopped (or cilantro if preferred)
    •  Optional: ¼ cup crumbled feta cheese or avocado slices for creaminess

    ‍ Step-by-Step Instructions

    1. Prep Ingredients:
      Rinse and drain the chickpeas well. Finely chop the red onion, dice the bell pepper and cucumber, and halve the cherry tomatoes.
    2. Mix Vegetables:
      In a large bowl, combine chickpeas, red onion, bell pepper, cucumber, tomatoes, and garlic.
    3. Dress Salad:
      Drizzle with olive oil and freshly squeezed lemon juice. Season with salt and pepper to taste.
    4. Add Fresh Herbs:
      Sprinkle chopped parsley (or cilantro) over the top and toss gently to combine.
    5. Optional Toppings:
      Top with crumbled feta cheese or slices of ripe avocado for extra creaminess.
    6. Chill (Optional):
      Refrigerate for 15–30 minutes for the flavors to meld beautifully before serving.

    ✏️ Notes

    • Chickpeas: Canned or home-cooked both work great—just be sure they are well-drained.
    • Flavor Tip: Soak chopped onions in lemon juice for 5 minutes to mellow the sharpness.
    • Customize: Add extras like olives, corn, or spinach for different textures and flavors.

     Tips

    • Meal Prep: This salad holds up well in the fridge for up to 3 days, making it perfect for meal prepping.
    • No Lemon? Substitute with lime juice or a splash of vinegar.
    • Make it a Meal: Add grilled chicken, shrimp, or quinoa for a more filling main dish.

    ️ Servings

    • Makes 4 generous servings
      (or 6 smaller side-dish servings)

     Nutritional Info** (per serving, approx.)

    • Calories: 280
    • Protein: 11 g
    • Fat: 11 g
    • Carbohydrates: 34 g
    • Fiber: 9 g
    • Sugar: 5 g
    • Sodium: 400 mg

    (Values will vary slightly with optional toppings like feta or avocado.)


     Benefits

    • High in Plant Protein: Chickpeas are excellent for muscle building and repair.
    • Fiber-Rich: Supports digestion and long-lasting satiety.
    • Heart-Healthy: Olive oil and veggies contribute to good cholesterol levels.
    • Quick & Easy: Minimal prep, no cooking, and ready in under 15 minutes!

    ❓ Q&A

    Q: Can I make this salad ahead of time?
    A: Absolutely! In fact, it tastes even better after a few hours in the fridge as the flavors meld.

    Q: How long does it last in the fridge?
    A: Store it in an airtight container for up to 3 days. If using avocado, add it fresh before serving.

    Q: Can I make this salad vegan?
    A: It already is vegan if you skip the feta cheese!

    Q: What’s a good protein boost?
    A: Add grilled tofu, cooked quinoa, or an extra can of chickpeas for a bigger protein hit.


    Would you also like a flavor variation guide (like Mediterranean-style or spicy Southwest versions)? ️✨
    Let me know!

  • Cabbage Soup

    Cabbage Soup


    Cabbage Soup


    **Ingredients:**


    3 tablespoons olive oil
    1/2 a medium yellow onion, finely chopped
    2 garlic cloves, minced
    8 cups of low-sodium chicken broth (you can also use vegetable broth)
    1 teaspoon kosher salt
    1/2 teaspoon dried thyme
    1/2 teaspoon black pepper (adjust to your liking)
    1/2 of a cabbage, chopped into roughly 1 1/2″ pieces
    4 carrots, peeled and diced
    2 celery stalks, thinly sliced
    One 14.5-ounce can of stewed tomatoes


    **Instructions:**


    In a sizable pot, warm the olive oil over a medium flame. Stir in the onions and garlic and sauté until the onions turn translucent, typically taking around 3-5 minutes.
    Introduce the chicken broth, season with salt and pepper, then toss in the cabbage, carrots, celery, and stewed tomatoes. Allow the mixture to simmer gently for about 30 minutes

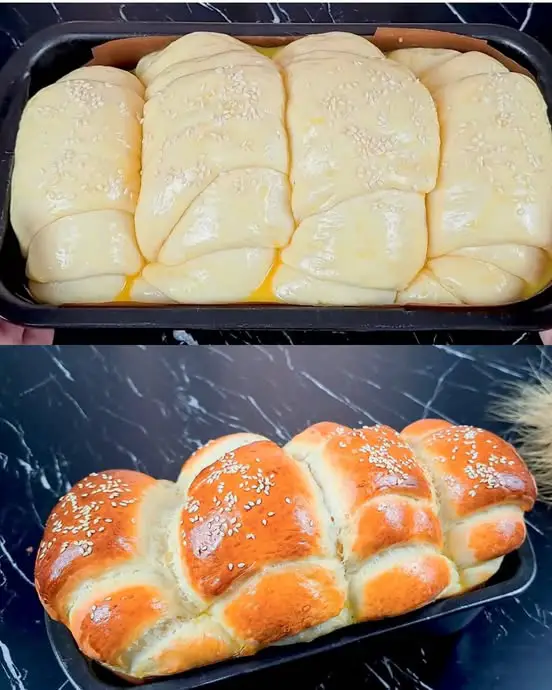
  • Cloud-Soft Milk Bread Rolls

    Cloud-Soft Milk Bread Rolls

    Cloud-Soft Milk Bread Rolls

    Cloud-Soft Milk Bread Rolls

    Pillowy, feather-light, and lightly sweetened, these Cloud-Soft Milk Bread Rolls are everything we crave in classic white bread: cotton-soft crumb, tender golden crust, and an aroma that instantly teleports you to a neighborhood bakery. The secret is a rich but balanced dough built on warm milk, melted butter, and a single egg, then shaped into generous rolls that bake up high and airy in just over half an hour. No stand mixer is required—only a bowl, a spatula, and your hands. Whether you spread them with jam at breakfast, stuff them with pulled pork at lunch, or pair them with soup at supper, each roll is a sweet reminder that the simplest ingredients often yield the greatest comfort.

    Cooking Time
    Active prep: 25 minutes
    First rise: 40 minutes
    Bench rest & shaping: 20 minutes
    Second rise: 10 minutes
    Baking: 35–40 minutes
    Total: about 2 hours
    Yield: 4 large sandwich rolls or 8 smaller buns

    Ingredients
    320 ml warm milk (about 100 °F / 38 °C)

    1 large egg

    30 g granulated sugar (2 Tbsp)

    5 g instant dry yeast (½ Tbsp)

    490 g all-purpose or bread flour (3½ cups)

    5 g fine sea salt (1 tsp)

    30 g melted butter (2 Tbsp)

    1 Tbsp neutral oil for greasing

    Egg wash: 1 egg yolk + 1 Tbsp milk

    Finishing: 1 Tbsp sesame seeds (optional)

    Step-by-Step Cooking Directions
    1 Activate wet ingredients Combine warm milk, whole egg, sugar, and yeast in a large bowl. Whisk until sugar dissolves.

    2 Build the dough Add flour and salt. Stir with a spatula until a shaggy dough forms. Pour in melted butter; knead in the bowl until butter is absorbed and dough is soft but not sticky, about 5 minutes.

    Cabbage Soup
    Cabbage Soup
    3 First rise Shape dough into a ball. Oil the bowl lightly; replace dough, turning once to coat. Cover and let rise in a warm spot for 40 minutes until doubled and “cloud-like” when poked.

    4 Pre-shape & bench rest Oil your work surface. Gently deflate dough and divide into 4 equal portions (about 220 g each). Cup each piece under your palm to form smooth balls. Cover with a towel; rest 10 minutes so gluten relaxes.

    5 Shape rolls Flatten each ball into an oval, then roll it up like a jelly roll, pinching the seam. Place seam-side down on a parchment-lined sheet, spacing evenly. Repeat with remaining dough.

    6 Second rise Cover tray loosely and let rolls puff for 10 minutes—they should expand by about one-third.

    7 Egg wash & toppings Whisk egg yolk with 1 Tbsp milk. Brush rolls all over; sprinkle with sesame seeds if desired.

    8 Bake Transfer to a pre-heated 180 °C / 350 °F oven. Bake 35–40 minutes until deep golden and an instant-read thermometer inserted in the center reads 93 °C / 200 °F.

    9 Cool & serve Cool rolls 15 minutes on a rack before slicing. Enjoy warm or at room temperature.

    Nutritional Information (per large roll)
    Calories 350 Protein 10 g Fat 10 g Carbohydrates 55 g Fiber 2 g Sugar 6 g Sodium 280 mg

    The Origins and Popularity of the Recipe
    Enriched white breads—milk, egg, and sweetened—emerged across Europe and Asia in the 19th century as sugar became affordable. Japan’s shokupan and France’s pain au lait are siblings to these rolls. The viral rise of “cloud bread” and Korean milk buns on social media has renewed interest worldwide, making ultra-soft loaves a trending home-bake.

    Reasons Why You’ll Love the Recipe
    Ease: one bowl, hand-kneadable, beginner friendly.

    Versatility: form burger buns, hot-dog rolls, or dinner knots.

    Stays tender: milk and butter keep crumb soft for days.

    Customizable: accept sweet or savory fillings, seeds, herbs.

    Minimal equipment: no mixer, special pans, or thermometer required (though helpful).

    Health Benefits
    Compared with store-bought white bread laden with conditioners, these rolls feature whole ingredients you control. Milk contributes calcium; eggs add choline and protein; no preservatives or hydrogenated fats.

    Guaranteed Success: Growing a Mango Tree from Leaves
    Guaranteed Success: Growing a Mango Tree from Leaves
    Serving Suggestions
    Breakfast: toast with butter and honey.

    Lunch: ham-and-cheese sandwich.

    Dinner: mop up stew or curry sauce.

    Entertaining: mini-slider buns split and filled with pulled pork.

    Snack: spread with Nutella and sliced banana.

    Common Mistakes to Avoid
    Too-hot milk kills yeast—stay under 110 °F.

    Adding all flour at once without gauging moisture—hold back 1 Tbsp if humidity is low.

    Under-kneading creates dense crumb—dough should pass window-pane test.

    Over-proofing causes collapse—stop when rolls have grown 30 % and jiggle.

    Cutting hot releases steam, drys crumb—cool at least 15 minutes.

    Pairing Recommendations
    Beverage: café au lait, masala chai, or pale lager with savory fillings.

    Cheese: aged Cheddar or Brie for contrast with the mildly sweet bread.

    Spread: orange marmalade or garlic-herb butter to complement the soft interior.

    Cooking Tips
    Create a warm proof box by placing dough in a microwave alongside a mug of hot water.

    For extra sheen, brush rolls again with melted butter immediately after baking.

    Coconut water kefir can help heal the gut, improve immune function, and prevent cancer. Here’s how to make it!
    Coconut water kefir can help heal the gut, improve immune function, and prevent cancer. Here’s how to make it!
    Rolls freeze beautifully—thaw overnight and refresh 5 minutes in a 180 °C oven.

    Similar Recipes to Try
    Japanese Milk Bread Loaf (shokupan)

    Honey Butter Dinner Rolls

    Portuguese Sweet Bread (pão doce)

    Italian Panini Rolls (panini all’olio)

    Tangzhong Cinnamon Swirl Bread

    Variations to Try
    Whole-grain: swap 25 % flour for white whole-wheat; add 1 Tbsp milk.

    Sweet raisin rolls: knead ½ cup raisins with last minute of kneading.

    Herb-garlic knots: add 1 tsp dried herbs to dough; tie ropes into knots.

    Cheese-topped buns: sprinkle grated Parmesan after egg wash.

    Cinnamon swirl loaf: roll dough flat, sprinkle cinnamon sugar, roll up and bake in loaf pan.

    Ingredient Spotlight – Instant Yeast
    Instant yeast is finely milled and conditioned to awaken fast without proofing. It disperses evenly in dry flour, tolerates sugar, and thrives at 95–100 °F. Store unopened packs in the freezer for maximum shelf life and reliability.

    Conclusion
    Few kitchen aromas rival that of rising milk bread, and few bites feel as nostalgic. These Cloud-Soft Milk Bread Rolls offer bakery texture with homestyle simplicity. Once you master the basic dough, the variations are endless. Bake, share, and watch a humble handful of pantry staples bring people together—one soft bite at a time.

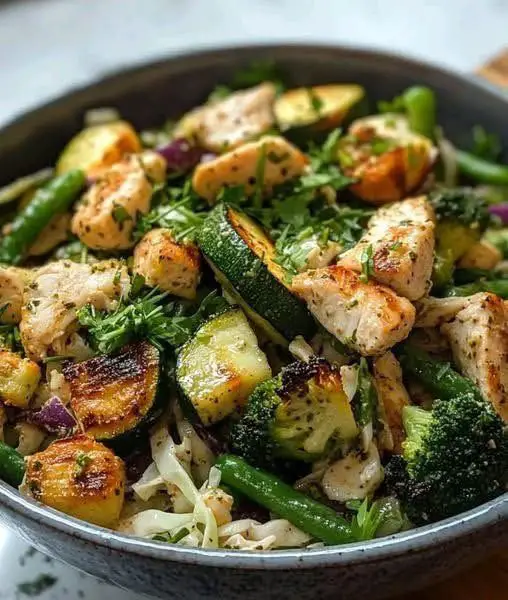
  • Grilled Chicken and Veggie Bowl

    Grilled Chicken and Veggie Bowl

    ️ Grilled Chicken and Veggie Bowl

     Description

    This Grilled Chicken and Veggie Bowl is a vibrant, nutrient-rich meal packed with lean protein and fiber-rich veggies. It’s a perfect balance of flavor, texture, and health benefits—ideal for meal prep, quick dinners, or lunch on the go. Customize it with your favorite grains and sauces for a satisfying, clean-eating bowl.

     Ingredients

    • 2 chicken breasts, cubed
    • 1 zucchini, sliced
    • 1 cup broccoli florets
    • 1 cup green beans, trimmed
    • ½ red onion, chopped
    • 1 cup cabbage, shredded
    • 2 tbsp olive oil
    • 2 garlic cloves, minced
    • Juice of 1 lemon (2 tbsp)
    • 1 tsp paprika
    • 1 tsp dried thyme or Italian seasoning
    • Salt and pepper, to taste
    • Optional: cooked quinoa, brown rice, tahini or hummus for serving

     Servings

    • Serves: 4
    • Serving Size: 1 bowl (includes a portion of grilled chicken and mixed veggies)

     Instructions

    1. Marinate Chicken: In a bowl, combine cubed chicken, 1 tbsp olive oil, garlic, lemon juice, paprika, thyme, salt, and pepper. Toss well and let marinate for at least 20 minutes (or up to 2 hours in the fridge).
    2. Prep Veggies: Toss zucchini, broccoli, green beans, red onion, and cabbage with 1 tbsp olive oil, salt, and pepper.
    3. Grill Chicken: Preheat a grill pan or outdoor grill over medium heat. Cook chicken for 5–7 minutes on each side until golden and fully cooked (internal temp 165°F / 74°C). Remove and set aside.
    4. Grill or Sauté Veggies: Grill veggies in batches until slightly charred and tender-crisp (about 6–8 minutes), or sauté them in a large skillet over medium-high heat.
    5. Assemble Bowl: Add cooked grains (optional) to bowls, top with grilled chicken and veggies. Drizzle with tahini or a squeeze of lemon. Garnish with fresh herbs if desired.

     Notes & Tips

    • Meal prep friendly: Stores well in fridge for up to 4 days. Keep sauce separate if using.
    • Add crunch: Top with toasted nuts or seeds for texture.
    • Swap it out: Use bell peppers, carrots, or mushrooms if you’re out of any listed veggies.
    • Add spice: A dash of chili flakes or hot sauce can give the bowl a spicy kick.

     Nutritional Info (Per Serving, without grains or sauce)

    Nutrient Amount
    Calories ~280 kcal
    Protein ~28g
    Carbohydrates ~10g
    Fat ~15g
    Fiber ~4g
    Sugar ~5g
    Sodium ~200mg

    Estimates will vary depending on portions, sauces, and optional grains.

     Health Benefits

    • Chicken breast: Lean source of high-quality protein, supports muscle repair and satiety.
    • Broccoli & cabbage: Cruciferous veggies rich in vitamins C & K, fiber, and antioxidants.
    • Green beans & zucchini: Low in calories, high in water and fiber, support digestion.
    • Olive oil: Adds heart-healthy fats and helps absorb fat-soluble nutrients.
    • Balanced meal: High protein + fiber + good fats = stable energy and satiety.

    ❓ Q & A

    Q: Can I bake instead of grill?
    A: Yes! Bake chicken at 400°F (200°C) for 20–25 mins and roast veggies on a sheet pan for 20 mins.

    Q: Can I make it vegetarian or vegan?
    A: Substitute chicken with tofu, tempeh, or chickpeas for a plant-based bowl.

    Q: What sauces go well with this bowl?
    A: Tahini, tzatziki, lemon-yogurt sauce, chimichurri, or even a balsamic glaze.

    Q: How do I store and reheat this?
    A: Store in airtight containers in the fridge for up to 4 days. Reheat in a skillet or microwave.

    Q: Can I freeze it?
    A: You can freeze the grilled chicken separately, but fresh veggies are best eaten fresh or refrigerated.

  • Fluffy Castella Sponge Cake

    Fluffy Castella Sponge Cake

    As a chef who’s slightly obsessed with texture, I have to say this fluffy Castella sponge cake is the definition of soft perfection. Each slice has that signature bounce, an ultra smooth crumb, and a light sweetness that melts on the tongue. I make this when I want a cake that feels elegant yet humble, with no need for frosting or fillings just pure, pillowy satisfaction.
    “Castella sponge cake is what clouds would taste like if you could slice them.” – @SoftBakeDreams
    Why You’ll Fall in Love With This Castella Sponge
    Originating from Japan and inspired by European sponge cakes, Castella (or kasutera) has a uniquely moist, fluffy texture that makes it stand apart from other sponges. The secret? It’s all in the meringue, water bath baking, and gentle folding and when done right, the result is unbeatable.
    Feather light texture: Thanks to whipped egg whites and steam baking, every bite feels like air.
    No butter or heavy fats: It’s made with oil and milk for softness without richness overload.
    Subtly sweet flavor: Just enough sugar to feel indulgent, but never overwhelming.
    Beautiful golden crust: The top bakes into a lightly caramelized layer, no extra topping needed.
    Elegant enough for any table: From afternoon tea to light dessert, it’s always the right choice.
    Fluffy Castella sponge cake with a golden crust sliced neatly on a wooden board
    This light and airy Castella sponge cake is baked to golden perfection with a delicate crumb
    Craving more melt in your mouth bakes? Try our pillowy Japanese cheesecake or the ultra soft milk brioche that bakes up just as light and satisfying.
    ×
    Ezoic
    Step by Step Guide to a Perfect Fluffy Castella Cake
    This cake may look delicate, but it’s very doable with a little care. Follow these steps exactly and you’ll get a perfectly risen, smooth topped sponge with no cracks or collapse.
    Ingredients
    6 egg whites
    6 egg yolks
    85 g sugar (superfine or caster is ideal)
    80 ml vegetable oil
    90 g cake flour or sponge flour
    70 ml milk
    ¼ tsp salt
    Instructions
    1: Whip the Meringue
    In a clean, dry bowl, beat the egg whites until they become foamy.
    Gradually add sugar and continue whipping until stiff peaks form the meringue should be glossy and stable.
    2: Prepare the Batter Base
    Heat the oil for 90 seconds in the microwave or gently on the stove. It should be warm but not boiling.
    Add sifted flour and salt into the warm oil and mix until smooth.
    Stir in the egg yolks and milk, mixing until you have a silky, lump free batter.
    3: Fold in the Meringue
    Take one third of the meringue and gently mix it into the batter to loosen it.
    Then, fold in the remaining meringue in two more additions, using a spatula and gentle motions to keep the batter airy.
    4: Pour and Tap
    Pour the batter into a parchment lined square or loaf tin (avoid greasing the sides).
    Tap the tin on the counter several times to remove air bubbles that might cause holes during baking.
    5: Water Bath Baking
    Place the cake tin inside a larger baking dish and fill the outer dish with hot water halfway up the sides.
    Bake in a preheated oven at 150°C (300°F) for about 60 minutes, or until the center springs back and a toothpick comes out clean.
    6: Cool and Slice
    When done, gently bang the tin on the counter a few times to release steam and prevent shrinking.
    Let the cake cool completely in the tin, then transfer to a cutting board and slice with a serrated knife.
    “The magic of Castella is in the details from how you fold the meringue to how you tap the tin. Every step matters.” – @SpongeWhisperer
    Fluffy Castella sponge cake with a golden crust sliced neatly on a wooden board
    This light and airy Castella sponge cake is baked to golden perfection with a delicate crumb
    Pro Tips for Castella Success
    Techniques That Make a Difference
    This isn’t your average sponge cake the method is part of what gives Castella its signature bounce and cotton soft bite. Here are tips I follow every time:
    ×
    Ezoic
    Use room temperature eggs: They whip better and give more volume.
    Don’t overheat the oil: Just warm enough to blend the flour, but not hot enough to scramble the yolks.
    Always sift your flour: Even a few lumps can weigh the cake down or cause streaks.
    Fold, don’t stir: Keep your motions slow and careful to avoid deflating the airy meringue.
    Bake low and slow: High heat causes cracking 150°C and steam creates that smooth, glossy top.
    Need more steam based bakes? Check out our delicate milk custard rice cake or the beautifully jiggly Japanese cheesecake that uses a similar water bath method for texture that wows.
    “With Castella, it’s not about speed it’s about softness. Let the batter breathe and the oven do its quiet work.” – @SlowBakeClub
    Creative Castella Cake Twists
    This cake is stunning in its simplicity, but here’s how I love to experiment with flavors without compromising texture:
    ×
    Ezoic
    Matcha Castella: Add 1 teaspoon of sifted matcha powder with the flour for a subtle earthy twist.
    Honey infused: Swap out 1 tablespoon of sugar for honey for a deeper golden crust and natural sweetness.
    Lemon version: Add 1 teaspoon of lemon zest and a tiny splash of lemon juice for a bright finish.
    Layered with jam: Slice the cake horizontally and add a thin spread of fruit jam or citrus marmalade between layers.
    Mini Castella bites: Bake the batter in cupcake molds using the same water bath method for adorable, single serve treats.
    Want more cake creativity? Our 3 ingredient sponge cake is perfect for fast flavor experimentation, and the Greek yogurt cake offers a rich but tangy spin on light cake recipes.
    “You can change the flavor, but never the feel Castella must be soft, smooth, and born from patience.” – @FluffMasters
    Perfect Pairings and Serving Suggestions
    What to Serve With Fluffy Castella Sponge Cake
    This sponge cake shines on its own, but pairing it with the right drink or side can turn it into a complete experience. Light, not overly sweet, and full of bounce, Castella complements a range of beverages and toppings.
    Pairing Flavor Profile Why It Works
    Matcha Latte Earthy and creamy Balances the soft sweetness with rich, roasted green tea
    Black Coffee Bold and bitter Highlights the subtle sweetness of the sponge cake
    Whipped Cream and Berries Light, sweet, and tart Adds color and flavor contrast without overwhelming the cake
    Milk Tea Silky and slightly floral A popular Asian pairing that enhances the cake’s milky notes
    Fresh Fruit Compote Sweet and syrupy Moistens the crumb while adding visual flair
    Looking for other light desserts that pair perfectly with tea? Try our orange blender cake or the beloved pineapple quick bread for a sweet bite that still feels light.
    ×
    Ezoic
    “Castella is never loud pair it with subtle, thoughtful flavors that let its softness speak.” – @ZenBakerMoments
    Occasions Where Castella Cake Steals the Show
    This cake isn’t just for special occasions it’s a staple you’ll want to serve any time you need comfort, calm, and class on a plate. Here’s where it shines most:
    Afternoon tea or coffee time: Slice thinly and serve with your favorite warm drink for a relaxing break.
    Elegant brunch spreads: Offer alongside pancakes, fruits, and soft cheeses.
    Light birthday dessert: It’s a lovely alternative to heavy frosting cakes especially with fruit toppings.
    Festive gifting: Bake in mini loaf pans and wrap in parchment for elegant edible gifts.
    Cultural celebrations: Serve during Lunar New Year, tea ceremonies, or minimalist weddings.
    “When you want your dessert to whisper elegance instead of shouting sweetness, Castella is the one.” – @SubtleSlices
    Storage, Make Ahead, and Batch Baking Tips
    How to Store Castella Cake Properly
    The beauty of a good Castella sponge cake is that it actually improves in texture after resting. The cake becomes slightly denser and even more moist the day after baking making it perfect for advance preparation.
    Room Temperature: Wrap the cooled cake tightly in parchment paper and plastic wrap. Store in an airtight container at room temperature for up to 3 days.
    Refrigeration: For longer storage, refrigerate wrapped cake for up to 5 days. Bring to room temperature before serving to regain its soft texture.
    Freezing: Slice the cake, wrap each piece in parchment and then plastic wrap. Freeze in a zip top bag for up to 1 month. Thaw slices at room temp before serving.
    Want more freezer friendly baked goods? Try our crescent donuts or 10 minute skillet bread both hold up beautifully with make ahead prep.
    ×
    Ezoic
    “With Castella, day two is even better store it right and let the flavors deepen overnight.” – @MakeAheadMagic
    Batch Baking for Events and Gifting
    Castella is a dream when baked in batches the cake slices cleanly, holds its shape, and offers an elegant presentation. Whether you’re preparing for a brunch spread, tea party, or gifting during holidays, here’s how to scale it smoothly:
    Double the recipe: Use two baking tins and double all ingredients for 20 servings. Bake side by side and rotate halfway through for even browning.
    Mini loaves: Divide the batter into mini loaf pans and reduce baking time to 25-30 minutes. These make wonderful gifts when wrapped in parchment and ribbon.
    Individual cakes: Bake in muffin or cupcake pans using parchment sleeves. These single portions are great for dessert platters or lunchboxes.
    Layer cake variation: Make two thin Castella cakes and sandwich them with whipped cream and fresh fruit for a light and airy celebration cake.
    Looking for more gifting ideas? Our butter piped cookies and homemade crepes also travel well and bring smiles every time.
    “Baking in batches? Castella is your secret weapon light, easy to portion, and always elegant.” – @BakeInBulk
    Flavor Variations for Every Season
    While traditional Castella is simple, you can easily switch it up by adding subtle ingredients that complement its soft structure. Here are seasonal inspired twists that work beautifully without altering the texture:
    ×
    Ezoic
    Season Flavor Additions Serving Idea
    Spring Matcha powder, lemon zest Serve with berries and fresh mint tea
    Summer Orange zest, almond essence Top with citrus glaze and chilled cream
    Autumn Pumpkin puree (2 tbsp), cinnamon Pair with chai or spiced tea
    Winter Honey, nutmeg, vanilla bean Serve warm with a drizzle of caramel
    Want a bright flavor twist? Don’t miss our Greek yogurt cake or zesty lemon cake for bakes that blend fruit and texture perfectly.
    “Soft enough to absorb seasonal flavors, sturdy enough to hold its shape Castella adapts like a dream.” – @SeasonalSponge
    Castella Sponge vs Other Sponge Cakes
    Let’s take a moment to appreciate what makes Castella unique. Here’s a quick comparison of how this delicate sponge stands next to others in the sponge cake family:
    Cake Type Main Ingredients Texture Best Use
    Castella Eggs, sugar, flour, oil, milk Fluffy, moist, jiggly Tea time, gifting, light desserts
    Basic Sponge Eggs, sugar, flour Light and airy, dry Layered cakes, rolls, filled desserts
    Japanese Cheesecake Cream cheese, eggs, sugar, flour Jiggly, creamy, souffle like Special desserts, chilled servings
    Eggless Vanilla Cake Flour, sugar, milk, oil Moist, dense, soft Quick bakes, dietary alternatives
    Each has its charm, but Castella’s slow baked, water bath magic gives it that silky smooth finish that makes every bite feel delicate and delightful.
    ×
    Ezoic
    “If sponge cake is poetry, Castella is a haiku brief, soft, and unforgettable.” – @MinimalistBakes
    Calories and Nutrition (Per Serving – 1 Slice, Based on 10 Servings)
    Calories: 180
    Total Fat: 9g
    Saturated Fat: 1g
    Cholesterol: 105mg
    Carbohydrates: 20g
    Sugar: 11g
    Protein: 5g
    Fiber: 0.3g
    Sodium: 80mg
    “Just 180 calories of pillowy sweetness per slice this is the cake you enjoy with zero guilt and total pleasure.” – @SoftBakesOnly
    Frequently Asked Questions About Castella Sponge Cake
    Why is my Castella sponge not fluffy?
    This usually happens if the meringue was over or under whipped, or if you folded too aggressively and lost air. Gently folding in stiff, glossy peaks is the key.
    Can I use all purpose flour instead of cake flour?
    Yes, but the texture will be slightly denser. For better results, substitute with a DIY cake flour (remove 2 tablespoons of flour per cup and replace with cornstarch).
    What pan works best for Castella?
    A square or rectangular nonstick pan lined with parchment is ideal. Avoid springform pans, as water baths can leak.
    ×
    Ezoic
    Can I skip the water bath?
    Not recommended. The steam helps prevent cracking, keeps the top glossy, and ensures even, gentle baking.
    How do I store Castella sponge cake?
    Wrap in plastic wrap and store at room temperature for up to 3 days. For longer storage, refrigerate for up to 5 days or freeze for 1 month.
    What’s the best knife for cutting Castella?
    Use a sharp serrated knife and wipe clean between slices to keep the edges smooth and prevent crumbling.
    ×
    Ezoic
    Why did my cake collapse after baking?
    This can happen if the cake is underbaked or if it’s cooled too quickly. Always do the toothpick test and let it cool slowly in the pan before unmolding.
    Is Castella cake gluten free?
    Not as written, but you can try a gluten free cake flour blend. Results may vary, so test in small batches first.
    Can I make mini Castella cakes?
    Absolutely! Use muffin molds or mini loaf pans and reduce baking time to 20-25 minutes. Still use the water bath method for best texture.
    ×
    Ezoic
    Can I make this dairy free?
    Yes, substitute the milk with unsweetened almond or soy milk. Texture remains similar, but flavor will change slightly.
    “Every question about Castella has one answer gentleness. Handle every step with care, and the softness will follow.” – @CastellaCrafted
  • Cheesy Garlic Roasted Cauliflower Steaks

    Cheesy Garlic Roasted Cauliflower Steaks

    These Cheesy Garlic Roasted Cauliflower Steaks are a flavorful and satisfying low-carb alternative to traditional steaks. Thick-cut cauliflower slices are roasted until golden and tender, then topped with a garlic sauce, melted cheese, and fresh herbs for a deliciously rich and savory dish. Serve them as a vegetarian main course or a hearty side dish with your favorite protein.

     Time Needed

    Prep Time: 10 minutes

    Cooking Time: 30 minutes

    Total Time: 40 minutes

     Ingredients

    For the Cauliflower Steaks:

    1 large head of cauliflower

    2 tablespoons olive oil

    ½ teaspoon salt

    ¼ teaspoon black pepper

    ½ teaspoon smoked paprika (optional, for depth of flavor)

    For the Garlic  Sauce:

    3 tablespoons olive oil

    3 cloves garlic, minced

    1 teaspoon Italian seasoning

    ½ teaspoon crushed red pepper flakes (optional, for heat

    For the Cheese Topping:

    ½ cup shredded mozzarella cheese

    ¼ cup grated Parmesan cheese

    2 tablespoons chopped fresh parsley (for garnish)

    Instructions

    1. Prep the Cauliflower

    1. Preheat oven to 425°F (220°C). Line a baking sheet with parchment paper.

    2. Remove leaves and trim the stem of the cauliflower, keeping the core intact.

    3. Slice the cauliflower into ¾-inch thick steaks (you should get 2–4 steaks, with smaller florets left over).

    2. Season & Roast

    1. Arrange the cauliflower steaks on the baking sheet.

    2. Brush both sides with olive oil, then season with salt, pepper, and smoked paprika.

    3. Roast for 15 minutes, then carefully flip and roast for another 10 minutes, until golden and tender.

    See also  Mediterranean Lemon Garlic Lobster Tails

    3. Add the Garlic & Cheese

    1. In a small bowl, mix olive oil garlic, Italian seasoning, and red pepper flakes.

    2. Brush the garlic  over the cauliflower steaks.

    3. Sprinkle each steak with mozzarella and Parmesan cheese.

    4. Finish Roasting

    1. Return to the oven and bake for 5 more minutes, or until the cheese is melted and bubbly.

    2. Remove from the oven and sprinkle with fresh parsley.

    5. Serve & Enjoy

    Serve immediately with your favorite sauce or a side salad.

     Nutritional Information 

    Calories: ~220 kcal

    Protein: 8g

    Carbohydrates: 10g

    Fat: 16g

    Fiber: 4g

    Sodium: ~350mg

    Notes & Variations

    Want it crispier: Broil for the last 2 minutes for a golden, crispy top.

    Dairy-Free: Swap cheese for nutritional yeast and use vegan butter.

    Extra Flavor: Drizzle with balsamic glaze or top with crushed nuts.

    Spicy Kick: Add extra red pepper flakes or drizzle with hot honey

  • Apricot-Swirled Cocoa Vanilla Sheet Cake

    Apricot-Swirled Cocoa Vanilla Sheet Cake

    Apricot-Swirled Cocoa Vanilla Sheet Cake
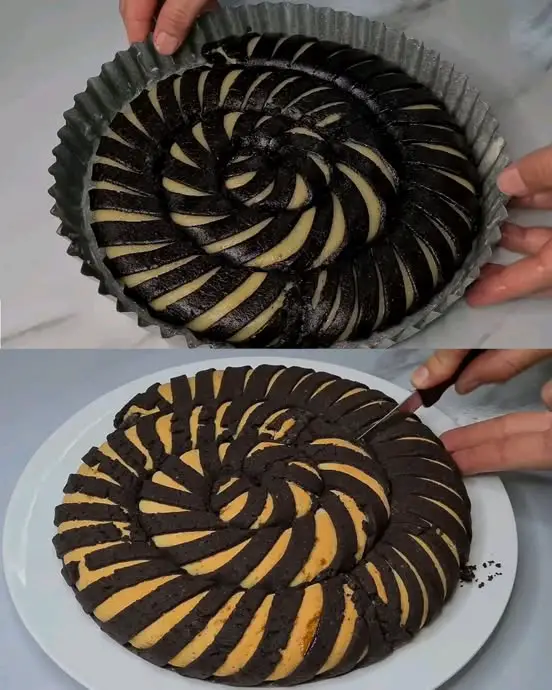
    A single bowl, a swirl of bright apricot jam, the comforting aroma of cocoa and vanilla—this sheet-pan cake proves weeknight baking can be both effortless and extraordinary. Born from old-world pantry frugality, the recipe uses nothing more exotic than eggs, oil, flour, and jam, yet it emerges from the oven with a tender crumb and glossy, fruit-filled marbling that invites you to cut generous squares for family, friends, or the neighbor who just stopped by. The batter comes together in minutes, no electric mixer required, and the 30 × 36 cm (12 × 14 in) tray ensures even baking and plenty of portions. Prefer a round presentation? The same formula slips neatly into a 26 cm (10 in) butter-greased springform pan. Either way, this cake bridges the gap between homestyle simplicity and bakery-worthy charm, ready to be packed in lunchboxes, served with afternoon tea, or dressed up with whipped cream for a last-minute celebration.

    Cooking Time
    Prep: 15 minutes Baking: 35–40 minutes Cooling & jam swirl set: 30 minutes Total: about 1 hour 25 minutes

    Ingredients
    Core Batter

    3 large eggs, room temperature

    150 g (7 ½ Tbsp) granulated sugar

    8 g (2 tsp) vanilla sugar or 2 tsp pure vanilla extract

    Pinch of fine sea salt

    150 ml (15 Tbsp) neutral oil (sunflower or canola)

    6 g (1 ½ tsp) baking powder

    450 g (3 ¾ cups) all-purpose flour, spoon-leveled

    35 g (⅓ cup) unsweetened cocoa powder

    Filling & Finishing

    1 Tbsp (20 g) unsalted butter for greasing pan

    120–150 g (about ½ cup) smooth apricot jam, room temperature

    Step-by-Step Cooking Directions
    Preheat & Prepare Heat oven to 180 °C / 350 °F. Butter a 30 × 36 cm rimmed baking tray (or 26 cm round pan), ensuring corners and sides are well coated. Lightly dust with flour if pan is not non-stick.

    Whisk Wet Ingredients In a large bowl whisk eggs, granulated sugar, vanilla sugar, and salt vigorously for 2 minutes until pale and slightly thick. Slowly drizzle in the oil while whisking; the mixture should look glossy and homogenous.

    Add Dry Ingredients Sift flour, baking powder, and cocoa over the wet base. Switch to a silicone spatula and fold just until you see no flour pockets; over-mixing develops gluten and toughens the crumb.

    10 Benefits of Drinking Rosemary Tea on an Empty Stomach
    10 Benefits of Drinking Rosemary Tea on an Empty Stomach
    Spread & Swirl Pour batter into the prepared pan, smoothing to an even 1.5 cm thickness. Dot teaspoons of apricot jam randomly over the surface, then drag a skewer or butter knife through the dots in gentle figure-eight motions to create marbling without fully blending the jam.

    Bake Place on the center rack and bake 35 minutes (round pan may need 40) until the top springs back lightly and a toothpick inserted into cake (avoiding jam pockets) emerges with a few moist crumbs.

    Cool Set pan on a wire rack 10 minutes. Run a thin knife along edges, then invert onto the rack, peel away parchment if used, and flip upright. Cool at least 20 minutes before slicing so the jam sets into shiny ribbons.

    Nutritional Information (per 1 of 20 squares)
    Calories : 185 Fat : 7 g Sat Fat : 1 g Carbs : 28 g Fiber : 1 g Sugars : 14 g Protein : 3 g Sodium : 55 mg
    (Values calculated with standard nutrition software; actual numbers vary with portion size and jam brand.)

    Origins and Popularity of the Recipe
    Cocoa sheet cakes dotted with fruit preserves trace to central and eastern European home kitchens, where wartime shortages made butter scarce and vegetable oil a thrifty substitute. Housewives stretched flavor with cocoa and brightened winter bakes by spooning in homemade apricot lekvar. Fast-forward to the age of video sharing, and viewers from São Paulo to Seoul have embraced the format for its speed, pantry-friendliness, and dramatic swirl. The recipe’s popularity rests on its universal ingredients and the visual payoff of jam veining—guaranteed likes on social media feeds and guaranteed smiles at the table.

    Reasons Why You’ll Love the Recipe
    **One-bowl convenience—**no creaming butter, no fancy gadgets.

    **Pantry staples—**everything likely sits in your cupboard right now.

    **Jam versatility—**swap in raspberry, strawberry, even marmalade for endless flavor riffs.

    **Crowd size—**twenty tidy squares from a single tray; perfect for bake sales or potlucks.

    **Stays moist—**oil-based cakes resist staling, tasting fresh two days later.

    Health Benefits
    Moderation matters, but this cake offers modest perks: unsweetened cocoa delivers flavonoids that support cardiovascular health, apricots supply vitamin A and antioxidants, and oil lowers saturated fat compared with butter-rich counterparts. The recipe can be made dairy-free (swap butter grease for oil spray) and contains no nuts, easing allergen concerns.

    Serving Suggestions
    Classic teatime Serve room-temperature squares alongside Earl Grey or coffee.

    Dessert plated Top a warm slice with vanilla ice cream and a spoon of extra warmed jam.

    Brunch tray Cut smaller bites, dust lightly with powdered sugar, and partner with fresh berries.

    Celebration layer Bake two thinner sheets, sandwich with whipped cream, and cover with ganache for an impromptu party torte.

    Common Mistakes to Avoid
    Cold eggs Room-temperature eggs emulsify better, yielding lighter crumb.

    Over-mixing Stir only until flour streaks disappear; excess mixing toughens cake.

    10 Surprising Benefits & Uses of Cloves – A Powerful Natural Remedy!
    10 Surprising Benefits & Uses of Cloves – A Powerful Natural Remedy!
    Adding jam too thick Microwave jam 10 seconds to loosen; cold, stiff jam sinks.

    Skipping pan prep Even non-stick trays benefit from butter; jam can scorch and adhere.

    Underbaking center Check multiple spots; jam pockets remain wet even when crumb is done.

    Pairing Recommendations
    Beverages Try a medium-bodied port, a latte with cocoa dusting, or chilled rooibos vanilla tea.

    Savoury contrast Offer a cheese board—sharp cheddar and walnuts cut the sweetness.

    Fruit accent Add roasted apricot halves drizzled with honey for summer dinners.

    Cooking Tips
    For sharp swirl definition, chill the jam slightly and drop it in larger dollops before swirling.

    Use Dutch-process cocoa for a darker hue and mellow chocolate edge; natural cocoa gives brighter flavor.

    To prevent doming in round pan, wrap the outside with a damp cake strip or fold foil collar.

    If using whole-grain flour, replace 25 % of white flour with wheat pastry flour, add 1 Tbsp milk to offset extra absorption.

    Similar Recipes to Try
    Raspberry Vanilla Poke Cake with Cream Cheese Frosting

    German Marble Gugelhupf (Vanilla–Chocolate Swirl)

    Polish Plum Butter Sheet Cake (Powidła Placek)

    Cocoa-Banana Snack Loaf

    Strawberry Jam Roll Sponge

    Variations to Try
    Nutty crunch Sprinkle 60 g chopped toasted hazelnuts over batter before baking.

    Mocha swirl Dissolve 1 Tbsp instant espresso in the oil for deeper coffee notes.

    Boil orange peel with salt and discover how to save money in your kitchen!
    Citrus twist Add zest of one orange to batter; replace half the jam with thin-cut marmalade.

    Gluten-free Use a 1:1 gluten-free baking blend and add ½ tsp xanthan gum for structure.

    Layer bars Bake base without jam, cool, spread jam thickly, then pour melted dark chocolate over; chill and cut.

    Ingredient Spotlight: Apricot Jam
    Apricot jam’s sweet-tart edge pairs beautifully with chocolate, balancing cocoa’s bitterness while adding subtle floral warmth. Traditional European jams are cooked slowly with whole fruit, concentrating natural pectin that sets without additives. When choosing a jar, look for labels listing fruit before sugar and avoid high-fructose corn syrup. For extra zing, warm jam with a teaspoon of lemon juice before swirling. Leftover jam brightens yogurt parfaits, glazes chicken, or sweetens vinaigrettes.

    Conclusion
    This apricot-swirled cocoa vanilla sheet cake is proof that everyday ingredients can create extraordinary moments. From the first whisk to the final crumb-dusted bite, the process is forgiving, the flavors nostalgic yet fresh, and the possibilities for customization endless. Keep the recipe taped inside your pantry door—you’ll reach for it whenever you need a reliable crowd-pleaser, a quick weeknight treat, or a canvas for creative jam experiments. One bite and you’ll understand why generations continue to pass this humble treasure down the family line.

    Frequently Asked Questions
    Can I halve the recipe? Yes. Use a 20 × 20 cm (8 × 8 in) square pan, reduce bake time to 25–28 minutes.

    Is there a vegan option? Replace eggs with ½ cup unsweetened applesauce plus 1 Tbsp flaxseed meal; use plant-based jam and oil spray.

    Why did my swirl sink? Jam was too heavy or batter too thin. Ensure jam is room temp and batter not over-thinned with extra oil.

    Can I use butter instead of oil? Melt and cool 150 g unsalted butter; cake will be richer but slightly denser.

    How do I store leftovers? Wrap slices in parchment; keep in airtight tin at room temperature 3 days or freeze up to 2 months.

    Will brown sugar work? Light brown sugar adds caramel undertone but may darken crumb; substitute equal weight.

    Can I frost this cake? Absolutely. A simple chocolate glaze or dusting of cocoa-powdered sugar looks elegant.

    My cake cracked—what happened? Oven too hot or pan placed too high. Bake center rack and verify oven thermostat.

    Do I need an electric mixer? No. A large whisk or wooden spoon suffices; beating by hand avoids over-aeration that can collapse.

    What other fillings suit this batter? Nutella swirls, cherry preserves, or dulce de leche all work—just thin thick spreads 10 seconds in microwave for easier swirling.

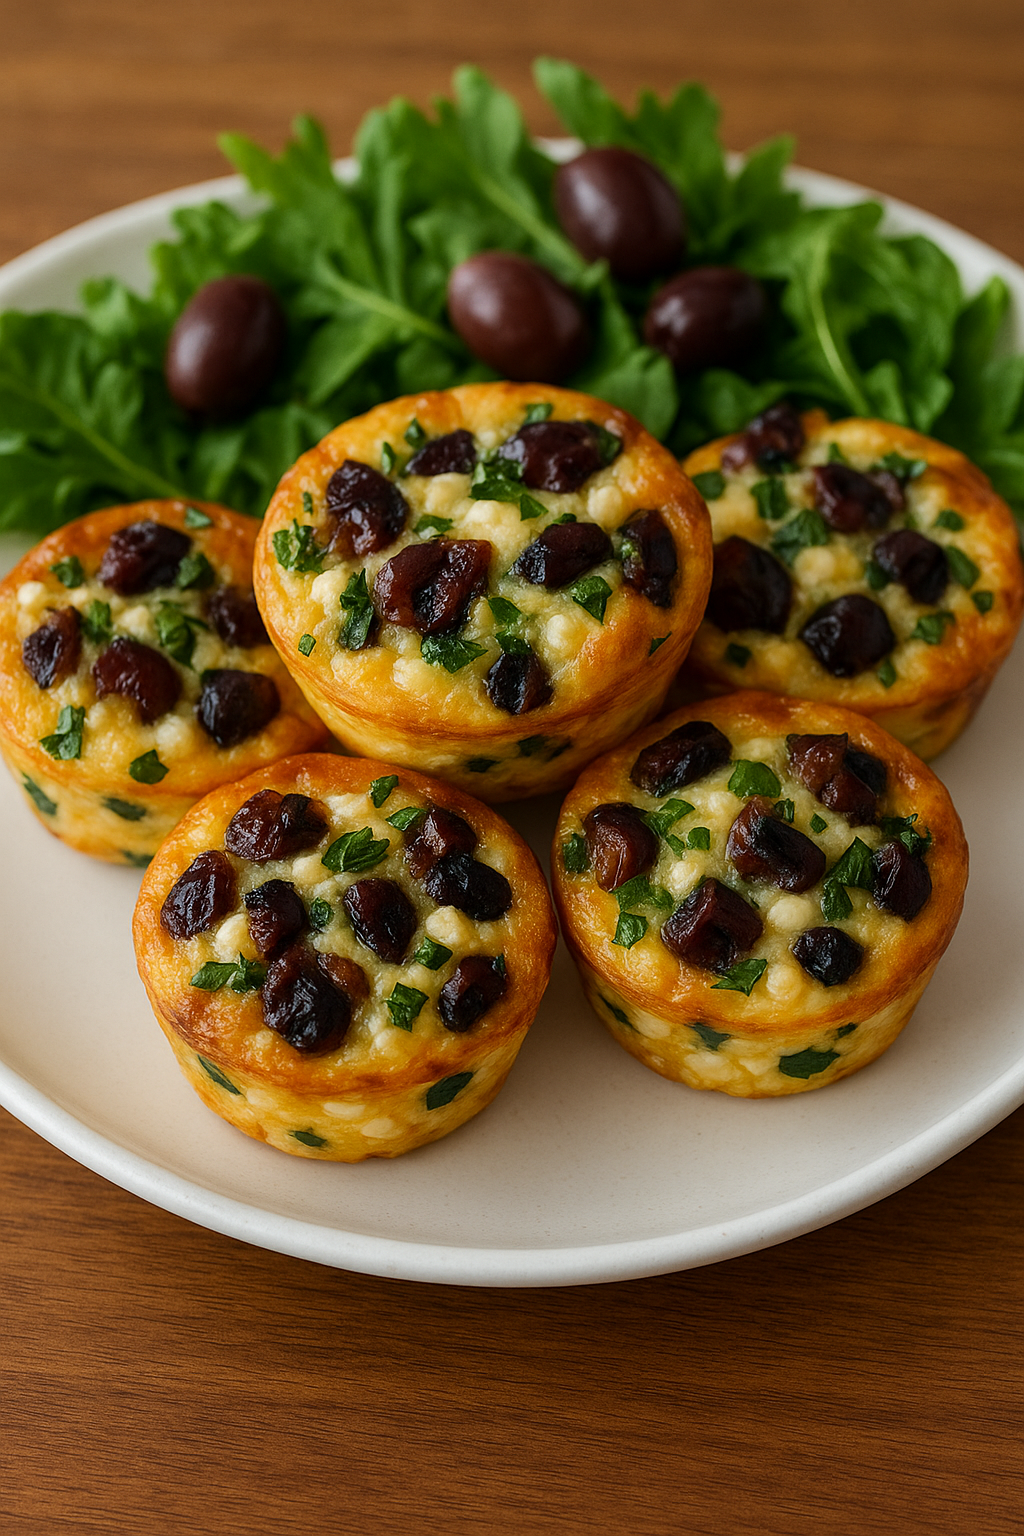
  • Mediterranean Egg Muffins with Sun-Dried Tomatoes & Kalamata Olives

    Mediterranean Egg Muffins with Sun-Dried Tomatoes & Kalamata Olives

    Fluffy, flavorful, protein-packed, and portable – perfect for breakfast, brunch, or snacks!


    Ingredients (Makes 6–8 muffins)

    • 6 large eggs (room temperature for best mixing)

    • 1/4 cup milk (dairy or unsweetened plant-based like almond, oat, or soy)

    • 1/3 cup sun-dried tomatoes, chopped
      (Use oil-packed for more flavor, drain excess oil before chopping)

    • 1/3 cup Kalamata olives, pitted and chopped
      (Can substitute with black olives if preferred)

    • 1/2 cup crumbled feta cheese
      (Sheep’s milk feta adds a tangy kick)

    • 1/4 cup fresh spinach, finely chopped
      (Lightly packed; can sub kale or arugula)

    • Salt, to taste (about 1/4 tsp – feta and olives are salty)

    • Fresh ground black pepper, to taste (about 1/8 tsp)

    • Olive oil or nonstick spray, for greasing muffin tin


    ‍ Instructions

    1. Prep Your Oven & Tin

    • Preheat oven to 375°F (190°C).

    • Grease a standard muffin tin lightly with olive oil or spray. This prevents sticking and adds flavor.

    2. Mix Egg Base

    • In a large bowl, crack in all 6 eggs.

    • Add the 1/4 cup milk, salt, and pepper.

    • Whisk until fully combined and frothy (this helps create fluffy muffins).

    3. Add the Flavor Mix-ins

    • Fold in the chopped sun-dried tomatoes, Kalamata olives, feta cheese, and chopped spinach.

    • Stir gently until evenly distributed. The batter will look colorful and chunky.

    4. Fill the Muffin Tin

    • Use a spoon or measuring cup to fill each muffin cavity about ¾ full.

    • Distribute the solids evenly across cups so every muffin gets a good mix of veggies and cheese.

    5. Bake

    • Bake in the center rack for 18–20 minutes, or until:

      • The tops are golden and puffed.

      • A toothpick inserted into the center comes out clean.

    6. Cool & Serve

    • Let muffins cool in the tin for 5–10 minutes before removing.

    • Use a butter knife to gently loosen the sides if needed.

    • Serve warm or allow to cool completely and store for later.


    Storage & Reheating

    • Fridge: Store in an airtight container for up to 4–5 days.

    • Freezer: Wrap individually and freeze for up to 2 months.

    • Reheat: Microwave for 30–45 seconds or bake at 325°F (160°C) for 5–8 minutes.


    Variations & Add-Ons

    Ingredient Swap/Option
    Cheese Goat cheese, shredded mozzarella, or Parmesan
    Greens Kale, arugula, or finely chopped zucchini
    Spice Add a pinch of red pepper flakes or a dash of hot sauce
    Herbs Add 1 tsp of fresh chopped oregano, parsley, or basil

    ️ Serving Suggestions

    • Breakfast: Pair with toast or avocado slices for a balanced meal.

    • Brunch Platter: Serve alongside hummus, pita, and a cucumber-tomato salad.

    • Snack: Eat chilled or room temp on-the-go.

    • Dinner Side: Works great with grilled meats or a big Mediterranean grain bowl.


    Nutrition Info (Per Muffin – approx.)

    Based on 8 muffins, with whole milk and regular feta:

    • Calories: 110 kcal

    • Protein: 7g

    • Carbohydrates: 3g

    • Fat: 8g

    • Fiber: 0.5g

    • Sugar: 1g

    • Sodium: ~290mg

    (Values vary based on specific brands and ingredients used.)


    Tips for Success

    • Use room temperature eggs for best blending and even baking.

    • Don’t overfill – eggs rise while baking.

    • If using dry sun-dried tomatoes, rehydrate in warm water for 10 minutes.

    • Let cool before storing to avoid excess moisture and soggy muffins.

  • Mini Chicken Pot Pies

    Mini Chicken Pot Pies

    Easy, creamy, and baked in a muffin tin!


    Ingredients:

    • 1 cup cooked chicken, shredded

    • ½ cup frozen mixed vegetables, thawed

    • ⅓ cup cream of chicken soup

    • ¼ tsp garlic powder

    • Salt & pepper, to taste

    • 1 can refrigerated biscuit dough

    • ¼ cup shredded cheese (optional – cheddar, mozzarella, etc.)


    Preparation Instructions:

    1. Preheat oven:
    Set to 375°F (190°C). Lightly grease a muffin tin.

    2. Prepare the biscuit crusts:
    Flatten each piece of biscuit dough slightly and press into muffin cups, shaping into mini crusts that go up the sides.

    3. Mix the filling:
    In a bowl, combine:

    • Shredded chicken

    • Thawed vegetables

    • Cream of chicken soup

    • Garlic powder

    • Salt & pepper
      Mix until evenly combined.

    4. Fill the pies:
    Spoon the filling into each prepared biscuit cup.
    Top with shredded cheese, if using.

    5. Bake:
    Place in oven and bake for 15–18 minutes, until the biscuits are golden brown and the filling is bubbly.

    6. Cool & serve:
    Let cool for a few minutes before removing from the tin.
    Serve warm and enjoy!


    Tips & Variations:

    • No cream of chicken soup? Substitute with a mix of sour cream + a splash of milk or homemade roux.

    • Want crunch? Top with crispy onions or breadcrumbs before baking.

    • Spice it up: Add paprika or a dash of hot sauce to the filling for extra kick.

    • Make ahead: Assemble and store in fridge for up to 1 day before baking.


    Storage:

    • Fridge: Store leftovers in an airtight container for up to 3 days.

    • Freezer: Freeze fully baked pies up to 2 months. Reheat at 350°F until hot.

  • Ham and Cheese Puff Pastry Sticks

    Ham and Cheese Puff Pastry Sticks

    Flaky, cheesy, golden, and ready in under 20 minutes!


    Ingredients:

    • 1 sheet puff pastry, thawed

    • 4 oz sliced ham, chopped or whole slices

    • 4 oz shredded cheese (cheddar, Swiss, or your favorite blend)

    • 1 egg, for egg wash

    • 1 tbsp Dijon mustard (optional, for flavor boost)

    • Salt & pepper, to taste


    Preparation Instructions:

    1. Preheat your oven
    Set to 375°F (190°C). Line a baking sheet with parchment paper.

    2. Prepare the puff pastry

    • Roll out the thawed pastry on a floured surface.

    • (Optional) Spread a thin layer of Dijon mustard for extra flavor.

    3. Add the fillings

    • Lay out the ham evenly across the pastry.

    • Sprinkle shredded cheese on top.

    • Season lightly with salt and pepper, if desired.

    4. Slice and twist

    • Cut into 1-inch wide strips.

    • Gently twist each strip into spirals.

    5. Apply egg wash

    • Beat the egg and brush over each twist for a golden crust.

    6. Bake

    • Arrange on your baking sheet.

    • Bake for 12–15 minutes, until golden brown and crispy.


    Serve Warm!

    Best served straight from the oven for flaky layers, gooey cheese, and savory ham perfection.


    Tips & Variations:

    • Add herbs: Sprinkle dried oregano, thyme, or parsley before baking.

    • Make it spicy: Add chili flakes or a swipe of hot sauce under the ham.

    • Try different combos: Turkey & mozzarella, or spinach & feta are great alternatives!


    Storage & Reheating:

    • Fridge: Store in an airtight container up to 3 days.

    • Reheat: 5–7 mins in a toaster oven or oven at 350°F (175°C) to re-crisp.

  • Garlic Ritz Snacks – The Ultimate Crunch Craving Fix!

    Garlic Ritz Snacks – The Ultimate Crunch Craving Fix!

    Buttery, golden, herby, and addictive—this 10-minute snack is a game-changer!

     Recipe Description

    Craving something salty, crunchy, and full of flavor? These Garlic Ritz Snacks are your new go-to. Buttery Ritz crackers are gently tossed in a savory garlic herb butter, then baked until they’re crisp and golden. Perfect for party platters, soup toppers, or solo snacking straight off the tray!

    ️ Servings

    Makes: 4 servings (or one snack session )
    Prep Time: 5 minutes
    Cook Time: 8–10 minutes
    Total Time: ~15 minutes

     Ingredients

    • 1 sleeve Ritz crackers (about 30 crackers)
    • 4 tbsp butter, melted
    • 1 tsp garlic powder
    • ½ tsp Italian seasoning
    • 2 tbsp fresh parsley, chopped
    • Optional: pinch of black pepper
    • Optional: grated Parmesan (for cheesy version)

     Instructions

    1. Preheat Oven:
      Set your oven to 170°C / 340°F and line a baking sheet with parchment paper.
    2. Make Garlic Butter:
      In a small bowl, mix melted buttergarlic powderItalian seasoningparsley, and black pepper (if using).
    3. Coat the Crackers:
      Gently toss the Ritz crackers in the garlic butter mixture until fully coated.
    4. Bake:
      Spread crackers in a single layer on the baking sheet.
      Bake for 8–10 minutes, or until fragrant and lightly golden. Keep an eye—they brown fast!
    5. Finish & Serve:
      Let cool slightly. Sprinkle with grated Parmesan, if desired, and serve warm or room temp.

     Tips & Notes

    • Don’t skip fresh parsley – it brings brightness to balance the butteriness.
    • Make it spicy by adding chili flakes or cayenne to the butter.
    • Try flavored Ritz like garlic-butter or roasted vegetable for extra punch.
    • Air fryer option: Bake at 325°F for 4–6 minutes, shaking halfway through.

     Nutritional Info (Per Serving, Approximate)

    • Calories: 190
    • Fat: 14g
    • Carbs: 14g
    • Protein: 2g
    • Sodium: ~240mg (varies with cracker brand and cheese use)

     Health Benefits (Let’s Be Honest )

    These are indulgent snacks best enjoyed in moderation, but:

    • Fresh parsley adds antioxidants and vitamin K.
    • Homemade control means less sodium and fewer additives than processed snack mixes.
    • Garlic is known for anti-inflammatory properties.

    ❓ Q&A

    Q: Can I make these ahead?
    A: Yes! Store in an airtight container at room temp for up to 3 days. Re-crisp in the oven for 2–3 minutes.

    Q: What else can I serve these with?
    A: Great with soups, dips, cheese boards, or crumbled on salads.

    Q: Can I use other crackers?
    A: Absolutely—Club crackers, saltines, or even mini toasts work great!

    Q: Can I double the batch?
    A: Totally. Use two trays and rotate halfway through baking for even crispiness.

    Q: Can I skip the butter?
    A: Not recommended—the butter is key to getting the perfect flavor and texture. For a lighter option, try half butter, half olive oil.