Category: healthy food

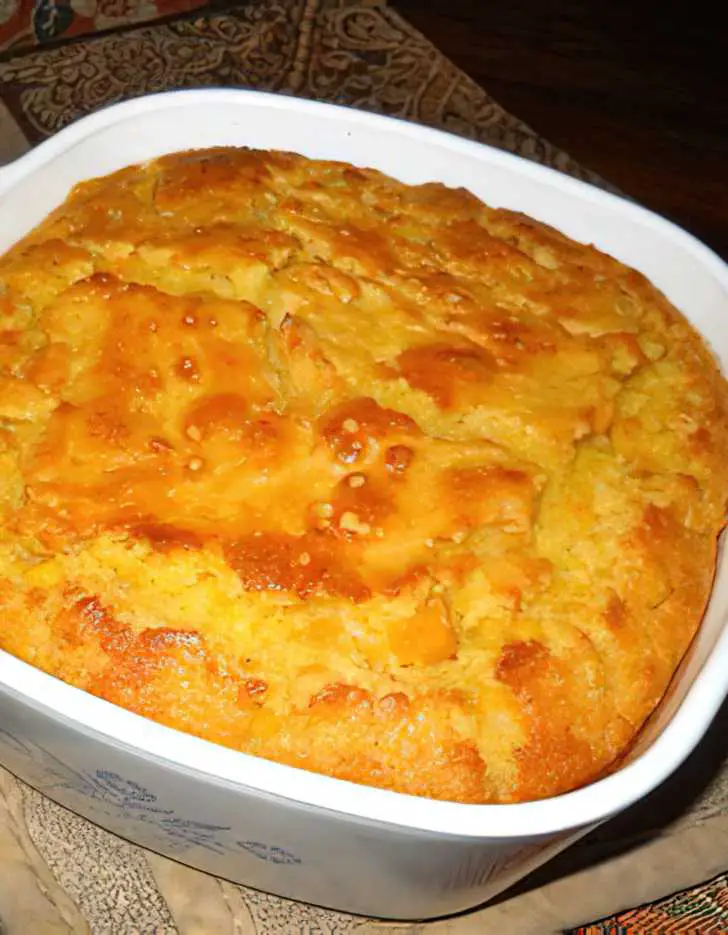
  • Cheesy Baked Potato and Vegetable Casserole

    Cheesy Baked Potato and Vegetable Casserole

    Cheesy Baked Potato and Vegetable Casserole

    Table of Contents

    Ingredients:

    3 large potatoes
    1 onion
    1 carrot
    1 bell pepper
    2 tomatoes
    2 eggs
    1/2 cup liquid yogurt (125 ml / 4.3 fl. oz.)
    4 tablespoons flour (100 g / 3.5 oz.)
    150 grams cheese (5.3 oz)
    Parsley, chopped
    Italian herbs, to taste
    Salt, to taste
    Black pepper, to taste
    Sunflower oil, for frying

    Directions:

    Prepare the potatoes:
    Peel and slice the potatoes.
    Soak them in water for 15 minutes, then drain.
    Sauté the onion:
    Chop the onion and fry in sunflower oil until transparent.
    Add the carrot:
    Grate the carrot and add it to the pan with the onions. Fry lightly until softened.
    Prepare the batter:
    In a large bowl, beat the eggs. Add the liquid yogurt, flour, Italian herbs, salt, and black pepper. Mix well.
    Combine potatoes and batter: Add the drained potatoes to the batter mixture and stir until the potatoes are well coated.
    Bake the base
    : Pour the potato mixture into a greased baking dish. Bake in a preheated oven at 180°C (356°F) for 25 minutes.
    Prepare the peppers and tomatoes: While the base is baking, cut the bell pepper and tomatoes into thin slices.
    Top the casserole
    : After 25 minutes, remove the baking dish from the oven. Top with sliced bell peppers, tomatoes, and grated cheese.
    Final bake: Return the baking dish to the oven and bake for an additional 10 minutes, or until the cheese is melted and bubbly.
    Garnish and serve: Sprinkle with chopped parsley before serving.
    Serving Suggestions:
    Serve with a side salad for a complete meal.
    Pair with crusty bread to soak up any extra sauce.
    Cooking Tips:
    Make sure to soak the potatoes to remove excess starch and ensure they cook evenly.
    Adjust the seasoning to your taste preference.
    Nutritional Benefits:
    Potatoes provide vitamins C and B6, potassium, and fiber.
    Carrots and bell peppers add vitamins A and C, as well as antioxidants.
    Cheese adds calcium and protein.
    Dietary Information:
    Vegetarian: This recipe is suitable for vegetarians.
    Gluten-Free Option: Use a gluten-free flour blend if needed.
    Storage:
    Store leftovers in an airtight container in the refrigerator for up to 3 days.
    Reheat in the oven at 180°C (356°F) until warmed through, or microwave for 1-2 minutes.
    Why You’ll Love This Recipe:
    It’s easy to prepare with simple, wholesome ingredients.
    The casserole is cheesy, hearty, and full of flavorful vegetables.
    Perfect for any meal, it’s a versatile dish that can be enjoyed by the whole family.
    Conclusion:
    This Cheesy Baked Potato and Vegetable Casserole is a delicious and nutritious dish that’s perfect for any occasion. Enjoy the comforting flavors and creamy texture, and share this delightful bake with your loved ones!
  • Hearty Ground Beef and Potato Soup

    Hearty Ground Beef and Potato Soup

    Hearty Ground Beef and Potato Soup

    Table of Contents

    Ingredients

    For the Broth:

    • Carrot: 1, peeled and chopped
    • Onion: 1, halved
    • Peppercorns: 1 tsp
    • Bay Leaves: 3
    • Water: 2 liters (approx. 8 cups)

    For the Soup Base:

    • Onion: 1, finely chopped
    • Olive Oil: 2 tbsp
    • Carrot: 1, peeled and grated
    • Ground Beef: 450 g (approx. 1 lb)
    • Garlic: 3 cloves, minced
    • Tomato Paste: 2 tbsp
    • Potatoes: 2, peeled and diced
    • Salt and Black Pepper: To taste

    For the Garlic Bread:

    • Bread: 3 slices
    • Olive Oil: 2 tbsp
    • Garlic: 5 cloves, minced
    • Dill: 1 tbsp, chopped
    • Parsley: 1 tbsp, chopped
    • Spice Blend: Your choice (e.g., Italian seasoning, paprika)
    • Salt and Black Pepper: To taste

    Instructions

    1. Prepare the Broth

    • Cook the Broth: In a large pot, add 1 chopped carrot1 halved onion1 tsp peppercorns, and 3 bay leaves. Pour in 2 liters of water and cover the pot. Bring it to a boil, then reduce the heat and let it simmer for about 20 minutes. This will create a flavorful base for your soup.

    2. Prepare the Soup Base

    • Sauté Vegetables: In a separate pan, heat 2 tbsp of olive oil over medium heat. Add the finely chopped onion and sauté until soft and translucent, about 5 minutes.
    • Add Carrots and Beef: Add the grated carrot to the pan and cook for an additional 2-3 minutes. Stir in the ground beef, seasoning with salt and black pepper. Cook until the meat is browned and fully cooked through.
    • Add Garlic and Tomato Paste: Stir in the minced garlic and 2 tbsp of tomato paste. Lower the heat and let the mixture simmer for about 10 minutes, allowing the flavors to meld together.

      3. Cook the Soup

      • Strain the Broth: After the broth has simmered, remove the carrot, onion, and bay leaves from the pot using a slotted spoon. Discard these ingredients as they have served their purpose of flavoring the broth.
      • Cook Potatoes: Add the diced potatoes to the broth and bring it to a boil again. Cook until the potatoes are tender, about 10-15 minutes.
      • Combine with Beef Mixture: Stir the cooked beef mixture into the soup and let it cook for an additional 5-10 minutes to blend all the flavors.

      4. Prepare the Garlic Bread

      • Preheat Oven: Preheat your oven to 180°C (350°F).
      • Bake Bread: Place the bread slices on a baking tray and bake for about 15 minutes, or until golden and crispy.
      • Prepare Garlic Spread: In a small bowl, mix the minced garlic2 tbsp olive oilchopped dillchopped parsley, and your spice blend of choice. Add salt and black pepper to taste.
      • Finish Bread: Once the bread is ready, remove it from the oven and spread the garlic-herb mixture over each slice while it’s still warm. The heat from the bread will help the flavors to infuse.

      5. Serve

      • Garnish and Serve: Serve the soup hot, garnished with fresh dill if desired. Pair it with the fragrant garlic bread for a complete, hearty meal that’s sure to satisfy.

      Nutrition Information

      • Servings: 4
      • Calories: Approximately 480 kcal per serving (including garlic bread)
      • Protein: 28g
      • Fat: 24g
      • Carbohydrates: 40g
      • Fiber: 6g
      • Sugar: 7g
      • Sodium: 900mg

      This Hearty Ground Beef and Potato Soup is a fulfilling and nutritious meal that combines the richness of ground beef with the comforting flavors of potatoes and aromatic vegetables. The homemade garlic bread adds a wonderful crunch and a burst of flavor, making this meal perfect for any occasion. Enjoy the warmth and comfort of this hearty soup with your loved ones!

  • Creamy Chicken and Broccoli Soup

    Creamy Chicken and Broccoli Soup

    Creamy Chicken and Broccoli Soup

    Table of Contents

    Ingredients

    For the Soup:

    • Onion: 1, finely chopped
    • Olive Oil: 2 tbsp
    • Carrots: 2, peeled and sliced
    • Celery: 3 sticks, sliced
    • Garlic: 2 cloves, minced
    • Flour: 3 tbsp (25g)
    • Potatoes: 3, peeled and diced
    • Chicken Thighs: 4 boneless, skinless (approx. 500g / 1 lb)
    • Vegetable Broth: 1 liter (approx. 4 cups)
    • Dried Thyme: 1 tsp
    • Red Pepper: 1, diced
    • Broccoli Head: 1, cut into florets
    • Green Peas: 1 cup (150g)
    • Cream: 1/4 cup (60ml)
    • Salt and Black Pepper: To taste

    For the Bread:

    • Bread: 3 slices
    • Olive Oil: 2 tbsp
    • Garlic: 3 cloves, minced
    • Processed Cheese Slices: 2
    • Spice Mix: Your choice (e.g., Italian seasoning, paprika, or garlic powder)

    Instructions

    1. Prepare the Soup Base

    • Sauté the Vegetables: In a large pot, heat 2 tbsp of olive oil over medium heat. Add the chopped onion and sauté until softened and translucent, about 5 minutes.
    • Add Carrots and Celery: Add the sliced carrots and celery to the pot, cooking for another 3-4 minutes, stirring occasionally. Add the minced garlic and cook until fragrant, about 30 seconds.

    2. Thicken the Soup

    • Add Flour: Sprinkle 3 tbsp of flour over the sautéed vegetables and cook, stirring constantly, for about 1 minute. This step helps to thicken the soup and eliminates the raw flour taste.

    3. Cook the Chicken

    • Add Main Ingredients: Add the diced potatoes1 liter of vegetable broth, and chicken thighs to the pot. Season with 1 tsp of dried thymesalt, and black pepper.
    • Simmer: Bring the soup to a simmer, cover the pot, and let it cook for 10-15 minutes, or until the chicken is cooked through and the potatoes are tender.

      4. Prepare the Bread

      • Preheat the Oven: Preheat your oven to 180°C (350°F).
      • Prepare the Bread: Place the bread slices on a baking tray, drizzle with olive oil, and sprinkle with the minced garlic and your chosen spice mix.
      • Bake: Bake the bread in the preheated oven for about 10 minutes, or until golden and crispy. Once baked, remove the bread from the oven and immediately spread the processed cheese slices over each slice while they’re still warm, allowing the cheese to melt slightly.

      5. Finish the Soup

      • Dice the Chicken: Once the chicken is cooked, remove it from the pot and let it cool slightly. Remove any thyme sprigs from the soup if using fresh thyme. Dice the chicken and return it to the pot.
      • Add Broccoli and Peas: Add the broccoli florets and green peas to the soup, cooking for an additional 2-3 minutes until the broccoli is tender.
      • Stir in Cream: Finally, stir in the 1/4 cup of cream and adjust the seasoning with more salt and black pepper if needed.

      6. Serve

      • Serve Hot: Ladle the creamy chicken and broccoli soup into bowls and serve hot, alongside the garlic bread for dipping. The bread’s crispy texture complements the creamy soup, making each bite a satisfying experience.

      Nutrition Information

      • Servings: 4
      • Calories: Approximately 450 kcal per serving (including bread)
      • Protein: 25g
      • Fat: 20g
      • Carbohydrates: 45g
      • Fiber: 8g
      • Sugar: 8g
      • Sodium: 900mg

      This Creamy Chicken and Broccoli Soup is not only comforting and filling but also provides a good balance of protein, fiber, and essential vitamins and minerals. Paired with cheesy garlic bread, it’s a meal that’s both satisfying and nourishing. Enjoy this delightful dish with family and friends for a cozy, delicious dining experience!

  • Homemade Cheese 10 Times Cheaper Than Store-Bought

    Homemade Cheese 10 Times Cheaper Than Store-Bought

    Homemade Cheese 10 Times Cheaper Than Store-Bought

    Table of Contents

    Ingredients:

    A small box of cornstarch – 200 g
    A jar of butter or margarine – 250 g
    2 packets of grated Parmesan cheese – 100 g
    A pinch of salt
    1 liter of milk
    Preparation:
    1. First, mix the milk, cheese, and cornstarch without heating, just to eliminate lumps by stirring a little.
    2. Then add the butter, turn on the heat, and stir until it melts completely.
    3. Continue stirring until the cheese reaches the desired point, i.e., when it easily detaches from the pan.
    4. Then put it in a container (usually, we use glass dishes or ice cream boxes) and wait for it to cool.


  • Easy Ice Cream Recipe: 4 Ingredients and Very Creamy, Yields Well

    Easy Ice Cream Recipe: 4 Ingredients and Very Creamy, Yields Well

    Quick and Creamy Homemade Ice Cream Recipe | Only 4 Ingredients!

    Whip up a batch of deliciously creamy homemade ice cream with just 4 simple ingredients! This easy recipe yields a wonderfully smooth and satisfying treat.

    This basic no-churn ice cream recipe is versatile, and you can customize it by adding different flavors or mix-ins according to your preference. Experiment with different extracts, fruits, or nuts to create your favorite variations. Enjoy your homemade ice cream!

    Introduction: Indulge in the creamy goodness of homemade ice cream with our quick and easy recipe! With just four simple ingredients, you can create a batch of irresistibly smooth and creamy ice cream that will rival any store-bought treat. Whether you’re craving a refreshing dessert on a hot day or simply looking for a delicious sweet treat, this homemade ice cream recipe is sure to satisfy. Let’s dive into how to make this creamy delight that’s bound to become a family favorite.

    Ingredients:

    • 2 cups heavy cream
    • 1 can (14 ounces) sweetened condensed milk
    • 1 teaspoon vanilla extract
    • Your choice of mix-ins (chocolate chips, crushed cookies, fruit, etc.) – optional

    Instructions:

    1. In a large mixing bowl, whip the heavy cream until stiff peaks form. You can use an electric mixer or do this by hand.
    2. In a separate bowl, combine the sweetened condensed milk and vanilla extract. Mix until well combined.
    3. Gently fold the sweetened condensed milk mixture into the whipped cream. Be careful not to deflate the whipped cream; fold until the mixture is smooth and well incorporated.
    4. If desired, fold in your chosen mix-ins, such as chocolate chips or crushed cookies.
    5. Pour the ice cream mixture into a lidded container or a loaf pan, spreading it out evenly.
    6. Cover the container with a lid or plastic wrap and freeze for at least 6 hours or overnight.
    7. Once fully frozen, your easy and creamy homemade ice cream is ready to be scooped and enjoyed!
  • How to bake scones easily and perfectly

    How to bake scones easily and perfectly

    How to bake scones easily and perfectly

    Table of Contents

    To bake Scones you will need :

    3 ¼ cup plain flour
    1 cup unsalted butter very cold
    1 cup buttermilk (very cold)
    2tspn baking powder
    ¼ tsp bicarbonate of soda
    1tsp salt
    3 tspn granulated sugar

    How to bake scones :

    Add flour ,salt, sugar, baking powder, bicarbonate of soda in a mixing bowl combine with a fork
    Grate the butter using a kitchen grater inside the dry ingredients mixture, use a fork to combine until you reach bread crumbs like mixture .
    Place the bowl in the refrigerator for about 15minutes
    Remove from the refrigerator and add very cold buttermilk gradually and at the same time mixing with a fork.
    Add about 1 tblspn of flour on your working surface and pour your dough ( that is not fully combined at this point but don’t add any extra buttermilk)
    Use your hands to mix the dough, eventually it will combine and form a rectangle
    Use a dough cutter and cut the rectangle into half, Place the other half on top of the other, and roll into a 1 cm thick rectangle using a rolling pin
    Now take your biscuit cutter, cut into desired shapes.
    Brush with milk before baking into a preheated oven of 180degrees for about 20 to 25mins.
    Now you know How to bake scones
    Enjoy your English Scones.

  • Baked Cauliflower with Cheese and Herb Sauce

    Baked Cauliflower with Cheese and Herb Sauce

    Baked Cauliflower with Cheese and Herb Sauce

    Table of Contents

    Ingredients

    For the Cauliflower:

    • Cauliflower: 1, divided into florets
    • Lemon: 3 slices
    • Fresh Dill: 2 sprigs
    • Hard Cheese: Amount to taste, grated (e.g., Parmesan)
    • Semi-Hard Cheese: Amount to taste, grated (e.g., Cheddar or Gruyère)
    • Rosemary: To taste
    • Salt: To taste

    For the Sauce:

    • Butter: 150 g (5.3 oz)
    • Milk: 250 ml (8.5 fl oz)
    • Flour: Around 2 tablespoons, to thicken the sauce
    • Salt: To taste
    • Black Pepper: To taste
    • Nutmeg: To taste
    • Garlic: 4 cloves, minced

    Instructions

    1. Prepare the Cauliflower

    • Divide the Cauliflower: Start by dividing the cauliflower into florets. Cut the florets into bite-sized pieces for even cooking.
    • Cook the Cauliflower: Place the sliced cauliflower in a tall pot with plenty of water. Add 3 slices of lemon and 2 sprigs of fresh dill. These additions will infuse the cauliflower with a fresh, zesty flavor. Cover the pot with a lid and cook for 5 minutes until the cauliflower is slightly tender but still firm.

    2. Prepare the Sauce

    • Melt the Butter: In a saucepan, melt 150 g of butter over low heat. Once melted, add 2 tablespoons of flour and stir continuously to create a smooth roux. This will thicken the sauce.
    • Add Milk and Seasonings: Gradually pour in 250 ml of milk while whisking to avoid lumps. Continue to cook on low heat, stirring constantly, until the sauce thickens.
    • Season the Sauce: Season the sauce with a pinch of saltblack pepper, and a dash of nutmeg for warmth. Add the minced garlic and continue to cook for another 2 minutes to allow the flavors to meld together.

      3. Assemble the Dish

      • Drain the Cauliflower: Once the cauliflower is cooked, drain it thoroughly and place it in a baking dish.
      • Add the Cheese and Sauce: Sprinkle a generous handful of grated hard cheese (like Parmesan) over the cauliflower. Add a pinch of rosemary for an aromatic touch. Pour the prepared sauce evenly over the cauliflower.
      • Top with More Cheese: Sprinkle a handful of grated semi-hard cheese (like Cheddar or Gruyère) over the top. This will melt beautifully and form a golden crust.

      4. Bake the Cauliflower

      • Preheat the Oven: Preheat your oven to 200°C (390°F).
      • Bake: Place the baking dish in the preheated oven and bake for 15 minutes or until the cheese is melted and golden brown.

      5. Serve

      • Serve Hot: Remove the baked cauliflower from the oven and let it cool slightly before serving. This dish is best enjoyed hot, with the cheese bubbly and the cauliflower tender.

      Nutrition Information

      • Servings: 4
      • Calories: Approximately 350 kcal per serving
      • Protein: 12g
      • Fat: 28g
      • Carbohydrates: 14g
      • Fiber: 4g
      • Sugar: 5g
      • Sodium: 600mg

      This Baked Cauliflower with Cheese and Herb Sauce is a delicious and satisfying dish that brings out the best in simple ingredients. The combination of creamy sauce, melted cheese, and tender cauliflower makes it a perfect choice for a cozy dinner. Enjoy this dish with your loved ones, and watch it quickly become a new favorite in your household!

  • Blueberry and Cream Cheese Cake

    Blueberry and Cream Cheese Cake

    Ingredients

    For the Sponge Cake:

    • 5 egg yolks
    • A dash of salt
    • 60 grams of granulated sugar
    • 40 grams of unsweetened cocoa powder
    • 45 grams of water
    • 80 grams of all-purpose flour
    • 1 tablespoon of cornstarch
    • 1 teaspoon of baking powder
    • 5 egg whites
    • An additional 60 grams of granulated sugar
    For the Blueberry Cream Cheese Filling:
    • 18 grams of gelatin powder
    • 120 grams of cold water for gelatin
    • 600 grams of cream cheese softened
    • 240 grams of powdered sugar
    • 500 grams of fresh blueberries
    • 60 grams of granulated sugar
    • 2 tablespoons of fresh lemon juice
    • 500 grams of heavy cream 33% fat content
    • An additional 3 grams of gelatin
    • 20 grams of cold water for the additional gelatin

    Instructions

    For the Sponge Cake:

    • Prepare: Preheat your oven to 180℃ (356℉). Line the baking dish with parchment paper.
    • Yolk Mixture: Beat the egg yolks with a dash of salt and 60 grams of sugar until light and fluffy. Incorporate the cocoa and water smoothly, followed by sifting in the flour, cornstarch, and baking powder.
    • Egg Whites: In a separate bowl, whisk the egg whites to soft peaks, gradually adding 60 grams of sugar until stiff peaks form.
    • Combine: Gently fold the egg whites into the yolk mixture to maintain airiness.
    • Bake: Pour the batter into the prepared dish, smoothing the top. Bake for 25 minutes. Let cool before assembling.

    For the Blueberry Cream Cheese Filling:

    • Gelatin Prep: Sprinkle the gelatin over the cold water in two separate bowls (18g for the cheese mixture, 3g for the cream) and let it bloom for about 5 minutes.
    • Cheese Mixture: Whip the cream cheese and powdered sugar until smooth. Gently warm the first gelatin mixture until dissolved and mix into the cheese along with the lemon juice.
    • Blueberry Blend: In a saucepan, combine blueberries, 60 grams of sugar, and cook until the berries begin to burst. Allow to cool slightly, then blend into the cheese mixture.
    • Whipped Cream: Whip the heavy cream to soft peaks. Warm the additional gelatin mixture and incorporate into the whipped cream.
    • Fold: Gently fold the whipped cream into the blueberry cheese mixture for a light, airy filling.
    Assembly:
    • Spread the blueberry cream mixture over the cooled sponge cake base. Chill in the refrigerator for at least 3 hours to set.

    To Serve:

    • Slice the cake into generous pieces and serve chilled. Each bite promises a harmonious blend of velvety cream cheese, bursting blueberries, and chocolatey sponge cake.
  • The Best Dinner in the World: Stuffed Cabbage Rolls

    The Best Dinner in the World: Stuffed Cabbage Rolls

    The Best Dinner in the World: Stuffed Cabbage Rolls

    Table of Contents

    Ingredients

    • Onion: 1, peeled and diced
    • Olive Oil: For sautéing
    • Chili Pepper: To taste, chopped
    • Red Bell Pepper: 1, chopped
    • Salt: To taste
    • Cooked Beef: 2.6 oz (75 g), chopped
    • Potatoes: 1.7 lb (800 g), peeled and quartered
    • Chinese Cabbage: To taste, leaves separated
    • Eggs: 3
    • Flour: 3 tablespoons (24 g)
    • Breadcrumbs: 3.5 oz (100 g)
    • Vegetable Oil: For frying

    Preparation

    1. Getting Started

    Begin by preparing your ingredients. Peel and finely dice the onion into small cubes. Heat up some olive oil in a frying pan over low heat and add the diced onion. Sauté the onion until it turns a beautiful golden brown. This step is crucial as it develops the base flavor for the dish.

    2. Cooking the Filling

    While the onion is cooking, chop the red bell pepper and chili pepper into small cubes. Adjust the amount of chili pepper according to your heat preference. Add the chopped peppers to the pan with the onion. Continue cooking the mixture over medium heat until the peppers are soft and tender, releasing their sweet and spicy flavors.

    Next, take the cooked beef and chop it into small, bite-sized pieces. Add the beef to the pan with the onions and peppers. Stir everything together and let it cook for a few more minutes until the flavors meld into a delicious, savory filling. Season the mixture with salt to taste.

    3. Preparing the Potatoes

    While your filling is cooking, peel and quarter the potatoes. Place them in a pot of salted water and bring to a boil. Cook the potatoes until they are tender, about 15-20 minutes. Once the potatoes are cooked through, drain them well.

    Mash the potatoes until smooth and creamy. You can use a potato masher or a fork. The mashed potatoes will add a comforting, creamy texture to the filling. If you prefer a richer mash, you can add a little butter or milk, but this step is optional.

    4. Preparing the Cabbage Leaves

    Now it’s time to prepare the Chinese cabbage leaves. Separate the leaves and blanch them in boiling water for about 30 seconds to 1 minute. This will soften the leaves, making them pliable and easier to work with. Once blanched, drain the cabbage leaves and set them aside to cool slightly.

    5. Assembling the Rolls

    To assemble your cabbage rolls, lay out each Chinese cabbage leaf on a flat surface. Spoon a generous amount of the beef and potato mixture onto the center of each leaf. Carefully roll up the cabbage leaves, tucking in the sides as you go to create a tight, secure roll. The goal is to keep the filling snugly wrapped inside.

    6. Breading and Frying

    For that irresistible crispy exterior, it’s time to bread and fry the rolls. In a shallow dish, beat the eggs and mix them with the flour to create a light batter. Dip each cabbage roll into the egg and flour mixture, making sure it’s evenly coated.

    Next, roll the coated cabbage rolls in the breadcrumbs until they are fully covered. The breadcrumbs will add a crunchy layer that contrasts beautifully with the soft, flavorful filling.

    Heat a generous amount of vegetable oil in a frying pan over medium-high heat. Once the oil is hot, carefully place the breaded cabbage rolls into the pan. Fry them until they are golden brown and crispy on all sides, about 3-4 minutes per side. Be sure to turn them gently to ensure even cooking.

    7. Serving Suggestions

    Your Stuffed Cabbage Rolls are now ready to be enjoyed! Serve them hot and crispy, right out of the pan. These rolls are delicious on their own, but you can elevate the dish by pairing it with a fresh salad, a tangy dipping sauce, or even a dollop of sour cream. The combination of textures and flavors will make every bite a satisfying experience.

    Nutrition Information and Serving Size

    Serving Size:

    This recipe makes approximately 4 servings.

    Nutrition Per Serving (approximate values):

    • Calories: 310 kcal
    • Protein: 12g
    • Fat: 15g
    • Carbohydrates: 36g
    • Fiber: 5g
    • Sugar: 3g
    • Sodium: 400mg

    Conclusion

    This recipe is not just a meal—it’s a celebration of flavors and textures. The crispy exterior gives way to a soft, savory filling that’s both comforting and delicious. Whether you’re cooking for a family dinner or a special occasion, these stuffed cabbage rolls are sure to become a favorite in your culinary repertoire. Enjoy them every day, because with a dish this good, you’ll never get tired of it!

  • The Delightful German Apple Oatmeal Recipe: A Taste of Germany’s Finest

    The Delightful German Apple Oatmeal Recipe: A Taste of Germany’s Finest

    The Delightful German Apple Oatmeal Recipe

    Table of Contents

    If you’re on the hunt for a hearty and delicious breakfast option, look no further than the German Apple Oatmeal recipe. This delightful concoction of oatmeal, fresh apples, and a hint of vanilla essence is not only a nutritious way to kickstart your day but also a taste of Germany’s culinary excellence. In this article, we’ll take you through the step-by-step process of crafting this delectable dish that has been a favorite in Germany for generations.

    Ingredients

    • 1 cup of oatmeal
    • 50 grams of walnuts
    • 2 apples
    • 30 ml of water
    • 1 teaspoon of vanilla essence (adjust to taste)
    • Agave syrup (to taste)
    Preparing the Oatmeal

    To begin, finely grind the oatmeal in a blender. Next, chop the walnuts using a kitchen knife, and cut one of the apples into smaller cubes.

    Apple Puree

    In this step, put one of the apples and the water into a blender and blend them into a smooth puree. Take the second apple and cut it into smaller pieces. In a separate bowl, mix these apple pieces with the chopped walnuts, crushed oatmeal flakes, vanilla essence, and agave syrup.

    Combining the Ingredients

    Now, it’s time to bring all the elements together. Add the applesauce to the mixture and thoroughly combine everything. You should achieve a consistent mass that can be easily spread with a spoon onto a baking sheet lined with parchment paper.

    Baking

    Place the oat biscuits into an oven preheated to 200°C (392°F) and bake them for approximately 30 minutes, or until they turn golden brown and crispy.The end result is a batch of delightful oatmeal biscuits infused with the flavors of fresh apples and a touch of vanilla essence. This German apple oatmeal recipe perfectly balances the earthy richness of oatmeal with the sweetness of apples and the crunch of walnuts, making it a favorite among both kids and adults alike.

  • MILK BREAD WITH SESAME

    MILK BREAD WITH SESAME

    MILK BREAD WITH SESAME

    Table of Contents

    Ingredients: 


    • 500g of flour
    • 250 ml of milk
    • 2 teaspoons of salt
    • 3 spoonfuls of sugar
    • 1 teaspoon olive oil
    • 20 g fresh yeast
    • 1 egg Sesame seeds
    • 90g butter


    Preparation: 

    1. Mix the sifted flour together with the salt and sugar.
    2. We heat the milk in the microwave for less than 1 minute and dissolve the yeast in it, add 60 g of melted butter, check that the yeast has completely dissolved.
    3. We make a hole in the center of the flour and pour the milk mixture little by little. We knead. The dough should be elastic.
    4. We put the dough on a bowl painted with olive oil and cover with a cloth. We let rest for 1 hour.
    5. Divide the dough into pieces and form balls of more or less the same size. Grease a mold about 24 cm in diameter and place the balls of dough.
    6. Divide the dough into pieces and form balls of more or less the same size. Grease a mold about 24 cm in diameter and place the balls of dough. Cover again with the cloth and let rest for 40 minutes.
    7. Paint the surface with beaten egg and decorate with sesame seeds. Bake at 170º C for about 40 minutes, make sure it does not brown too much, if so, place aluminum foil on top until it is ready. We check it by poking it, if it comes out clean, it will be ready to cool and serve
  • The Key to the Ideal Pastry Cream July 21, 2024 by Noty Cheese The Key to the Ideal Pastry Cream Table of Contents The Key to the Ideal Pastry Cream Ingredients 480 ml (2 cups) whole milk 1/2 cup (100 g) granulated sugar, divided 1 vanilla bean or 1 tsp vanilla extract 5 large egg yolks 30 g (1/4 cup) cornstarch 2 tbsp (30 g) unsalted butter, finely chopped  Instructions Prepare the Milk Mixture: In a medium saucepan, combine the whole milk with half of the granulated sugar (1/4 cup). Add the seeds from the vanilla bean or, if using vanilla extract, add it later. Set the saucepan over medium heat and bring the mixture to a gentle simmer, stirring occasionally to dissolve the sugar.  Prepare the Egg Mixture:  In a separate bowl, whisk together the egg yolks, the remaining 1/4 cup of granulated sugar, and the cornstarch until the mixture is creamy and pale, about 2-3 minutes.  Temper the Eggs:  When the milk mixture is hot, gradually add about one-third of it to the egg mixture, whisking continuously to prevent curdling. Pour the tempered egg mixture back into the saucepan with the remaining hot milk.  Cook the Pastry Cream:  Return the saucepan to medium heat, whisking continuously until the mixture thickens and starts to bubble, about 2-3 minutes. Once it begins to boil, continue cooking for 1-2 minutes to ensure the cornstarch is fully cooked.  Finish the Pastry Cream:  Remove the saucepan from the heat and immediately whisk in the butter and any vanilla extract if a vanilla bean wasn’t used. Strain the pastry cream through a fine-mesh sieve into a clean bowl to remove any lumps or bits of cooked egg. Press a piece of plastic wrap directly onto the surface of the pastry cream to prevent a skin from forming. Allow the pastry cream to cool to room temperature, then refrigerate until thoroughly chilled, at least 2 hours  See also  Clean Your Bowel: The Ultimate Detox Drink .Use Fresh Ingredients: Fresh milk, eggs, and butter significantly enhance the flavor and texture of your pastry cream. Whisk Continuously: To ensure a smooth texture, whisk continuously while cooking to prevent lumps. Strain the Cream: Straining the pastry cream guarantees a silky smooth texture, free from any cooked egg bits. Proper Cooling: Applying plastic wrap directly to the surface of the pastry cream prevents a skin from forming, which can affect the texture.  CategoriesEasy Recipes Enjoy a Zesty Pineapple Lemonade – Refreshing and Sugar-Free! ‎‎ Garlic Butter Steak and Potatoes Skillet Search for: Search …  Popular install apk on chromebook Step-by-Step Tutorial: How to Install APK on Chromebook! February 6, 2024 Proofreading 10 Best Online Proofreading Jobs for Beginners That Pay $25 Per Hour January 30, 2024

    The Key to the Ideal Pastry Cream July 21, 2024 by Noty Cheese The Key to the Ideal Pastry Cream Table of Contents The Key to the Ideal Pastry Cream Ingredients 480 ml (2 cups) whole milk 1/2 cup (100 g) granulated sugar, divided 1 vanilla bean or 1 tsp vanilla extract 5 large egg yolks 30 g (1/4 cup) cornstarch 2 tbsp (30 g) unsalted butter, finely chopped Instructions Prepare the Milk Mixture: In a medium saucepan, combine the whole milk with half of the granulated sugar (1/4 cup). Add the seeds from the vanilla bean or, if using vanilla extract, add it later. Set the saucepan over medium heat and bring the mixture to a gentle simmer, stirring occasionally to dissolve the sugar. Prepare the Egg Mixture: In a separate bowl, whisk together the egg yolks, the remaining 1/4 cup of granulated sugar, and the cornstarch until the mixture is creamy and pale, about 2-3 minutes. Temper the Eggs: When the milk mixture is hot, gradually add about one-third of it to the egg mixture, whisking continuously to prevent curdling. Pour the tempered egg mixture back into the saucepan with the remaining hot milk. Cook the Pastry Cream: Return the saucepan to medium heat, whisking continuously until the mixture thickens and starts to bubble, about 2-3 minutes. Once it begins to boil, continue cooking for 1-2 minutes to ensure the cornstarch is fully cooked. Finish the Pastry Cream: Remove the saucepan from the heat and immediately whisk in the butter and any vanilla extract if a vanilla bean wasn’t used. Strain the pastry cream through a fine-mesh sieve into a clean bowl to remove any lumps or bits of cooked egg. Press a piece of plastic wrap directly onto the surface of the pastry cream to prevent a skin from forming. Allow the pastry cream to cool to room temperature, then refrigerate until thoroughly chilled, at least 2 hours See also Clean Your Bowel: The Ultimate Detox Drink .Use Fresh Ingredients: Fresh milk, eggs, and butter significantly enhance the flavor and texture of your pastry cream. Whisk Continuously: To ensure a smooth texture, whisk continuously while cooking to prevent lumps. Strain the Cream: Straining the pastry cream guarantees a silky smooth texture, free from any cooked egg bits. Proper Cooling: Applying plastic wrap directly to the surface of the pastry cream prevents a skin from forming, which can affect the texture. CategoriesEasy Recipes Enjoy a Zesty Pineapple Lemonade – Refreshing and Sugar-Free! ‎‎ Garlic Butter Steak and Potatoes Skillet Search for: Search … Popular install apk on chromebook Step-by-Step Tutorial: How to Install APK on Chromebook! February 6, 2024 Proofreading 10 Best Online Proofreading Jobs for Beginners That Pay $25 Per Hour January 30, 2024

    The Key to the Ideal Pastry Cream

    Table of Contents

    The Key to the Ideal Pastry Cream
    Ingredients

    480 ml (2 cups) whole milk
    1/2 cup (100 g) granulated sugar, divided
    1 vanilla bean or 1 tsp vanilla extract
    5 large egg yolks
    30 g (1/4 cup) cornstarch
    2 tbsp (30 g) unsalted butter, finely chopped

    Instructions

    Prepare the Milk Mixture:

    In a medium saucepan, combine the whole milk with half of the granulated sugar (1/4 cup).
    Add the seeds from the vanilla bean or, if using vanilla extract, add it later.
    Set the saucepan over medium heat and bring the mixture to a gentle simmer, stirring occasionally to dissolve the sugar.

    Prepare the Egg Mixture:

    In a separate bowl, whisk together the egg yolks, the remaining 1/4 cup of granulated sugar, and the cornstarch until the mixture is creamy and pale, about 2-3 minutes.

    Temper the Eggs:

    When the milk mixture is hot, gradually add about one-third of it to the egg mixture, whisking continuously to prevent curdling.
    Pour the tempered egg mixture back into the saucepan with the remaining hot milk.

    Cook the Pastry Cream:

    Return the saucepan to medium heat, whisking continuously until the mixture thickens and starts to bubble, about 2-3 minutes.
    Once it begins to boil, continue cooking for 1-2 minutes to ensure the cornstarch is fully cooked.

    Finish the Pastry Cream:

    Remove the saucepan from the heat and immediately whisk in the butter and any vanilla extract if a vanilla bean wasn’t used.
    Strain the pastry cream through a fine-mesh sieve into a clean bowl to remove any lumps or bits of cooked egg.
    Press a piece of plastic wrap directly onto the surface of the pastry cream to prevent a skin from forming.
    Allow the pastry cream to cool to room temperature, then refrigerate until thoroughly chilled, at least 2 hoursUse Fresh Ingredients: Fresh milk, eggs, and butter significantly enhance the flavor and texture of your pastry cream.
    Whisk Continuously: To ensure a smooth texture, whisk continuously while cooking to prevent lumps.
    Strain the Cream: Straining the pastry cream guarantees a silky smooth texture, free from any cooked egg bits.
    Proper Cooling: Applying plastic wrap directly to the surface of the pastry cream prevents a skin from forming, which can affect the texture.

  • Bread in 10 Minutes! No Oven Required! The Tastiest I’ve Ever Eaten! Anyone Can Do It

    Bread in 10 Minutes! No Oven Required! The Tastiest I’ve Ever Eaten! Anyone Can Do It

    Bread in 10 Minutes! No Oven Required! The Tastiest I’ve Ever Eaten! Anyone Can Do It

    Table of Contents

    Bread has been a staple in human diets for thousands of years. It’s a symbol of nourishment, comfort, and tradition. However, in today’s fast-paced world, not everyone has the time to wait for dough to rise and bake in an oven. That’s where this incredible recipe comes in – bread in just 10 minutes, without an oven! This method is not only quick and easy but also results in the most delicious bread you’ve ever tasted. Perfect for beginners and experienced bakers alike, this recipe will revolutionize your kitchen routine.

    Ingredients
    • 17 oz (480 g) plain flour
    • 7.8 oz (220 g) white yogurt
    • 6.8 fl oz (200 ml) water
    • 2 teaspoons (10 g) baking powder
    • 1 teaspoon oil
    • 1 teaspoon salt
    • 3.5 oz (100 g) butter
    • Parsley (to taste)
    Step-by-Step Instructions
    1. Preparing the Dough

    Start by pouring the white yogurt into a large mixing bowl. Add 200 ml of water and 1 teaspoon of salt, then whisk everything thoroughly until you achieve a smooth, thin liquid. This mixture serves as the base for your dough.

    Next, sift plain flour through a fine sieve to ensure there are no lumps. Gradually add the sifted flour and 2 teaspoons of baking powder to the yogurt mixture. Mix with your hands until you form a cohesive and slightly sticky dough.

    Add 1 teaspoon of vegetable oil to the dough and continue kneading. The oil helps to make the dough more manageable and prevents it from sticking to your hands and the bowl. Knead until the dough is smooth and elastic, forming it into a round loaf.

    2. Shaping the Dough

    Sprinkle a little plain flour on your work surface and turn the dough out onto it. Lightly flour the surface of the dough and use your hands to spread it into a flat pancake. Divide the dough into two equal pieces.

    Roll each piece out with a rolling pin and then cut each into five smaller pieces, giving you a total of ten dough portions. Shape each portion into a small ball. Place these dough balls on a floured plate and cover them with cling film to prevent them from drying out as you work.

    3. Rolling the Pancakes

    Take one dough ball, dust it with a bit of plain flour, and flatten it with your hands. Use a rolling pin to roll it into a thin pancake with a diameter of about 10 to 12 centimeters. Set it aside and repeat the process with the remaining dough balls. Ensure the unused dough balls are covered with cling film to keep them moist.

    4. Cooking the Bread

    Heat a dry, shallow pan over medium heat. Once the pan is hot, place as many of the rolled-out dough pancakes as can fit without overlapping. Let them cook for about a minute. When the dough starts to harden, flip them to the other side. As they cook, the pancakes will begin to puff up and form fluffy loaves.

    Continue to move and turn the pancakes in the pan to ensure they cook evenly and don’t burn. Once they are golden brown and cooked on both sides, remove them from the pan.

    5. Finishing Touches

    Melt the butter and mix it with freshly chopped parsley. Generously spread this mixture on both sides of each cooked pancake. The butter adds richness, while the parsley provides a fresh, herby flavor that complements the bread perfectly.

    Serving Suggestions

    These quick and easy bread patties are incredibly versatile. Serve them warm as a side to soups and salads, use them as a base for sandwiches, or enjoy them on their own with a bit of honey or jam. They are perfect for any meal of the day and can be stored in an airtight container for a couple of days, making them a convenient option for busy schedules.

    Conclusion

    This 10-minute bread recipe is a testament to how simple ingredients and quick methods can produce extraordinary results. Whether you’re a novice cook or an experienced baker, this recipe will become a go-to in your kitchen repertoire. Not only is it fast and easy, but it’s also incredibly tasty and versatile, ensuring that you always have fresh, homemade bread at your fingertips.

  • Homemade Buttered Leavened Peels

    Homemade Buttered Leavened Peels

    Homemade Buttered Leavened Peels

    Table of Contents

    Indulge in these delicious Homemade Buttered Leavened Peels, perfect for any meal or occasion. These soft, buttery rolls are simple to make and can be filled with your favorite ingredients. Follow these easy steps to create a delightful treat for your family and friends.

    Ingredients

    • ¾ cup warm milk + 1 tablespoon for brushing
    • 1 teaspoon sugar
    • 1.4 ounces fresh yeast or 1 tablespoon dry yeast
    • 1 cup (2 sticks) butter
    • 1 teaspoon salt
    • ⅓ cup oil
    • 1 ¼ cups water
    • 7 ¼ cups plain flour
    • 1 egg yolk
    • Sesame seeds, for sprinkling
    • Coarse salt, for sprinkling
    Instructions
    Activate the Yeast

    In a bowl, mix the warm milk, sugar, and yeast. Let it sit for at least 10 minutes to allow the yeast to rise. Meanwhile, place the butter in the freezer.

    Prepare the Dough

    In a large mixing bowl, combine 500 grams of flour and 1 teaspoon of salt. Mix well. Add the activated yeast mixture, warm water, and ⅓ cup of oil. Stir until you get a smooth batter.

    Knead the Dough

    Gradually add the remaining flour, mixing until you have a dough that does not stick to your hands. Once the dough is ready, brush it with the rest of the oil. Cover the dough with a towel and let it rise in a warm place for an hour.

    Roll Out the Dough

    After the dough has risen, remove it from the bowl and roll it out on a floured work surface. Grate the frozen butter all over the dough, then carefully roll it up. Divide the rolled dough into 5 equal parts.

    Shape the Peels

    Roll each part into a circle and divide it into 8 triangles. You can fill each triangle with your choice of filling, such as homemade sausage, ham, sausage, hard or processed cheese. Roll each triangle into a roll and place it on a baking sheet lined with baking paper. Cover the rolls with a towel and let them rise for another 30 minutes.

    Bake the Peels

    Preheat the oven to 200°C (392°F). Mix the egg yolk with 1 tablespoon of milk and brush it over the risen rolls. Sprinkle with sesame seeds and coarse salt to taste. Bake the rolls for 25-30 minutes, or until they are golden brown. Once baked, remove them from the oven and let them cool.

    Serve

    Serve the peels warm, alone, or with your favorite spread. Enjoy the buttery, flaky goodness of these homemade rolls!

    Nutritional Information

    These buttered leavened peels are a delicious and hearty treat. Here is the approximate nutritional breakdown per serving (based on 16 servings):

    • Calories: 200 kcal
    • Protein: 5g
    • Fat: 10g
      • Saturated Fat: 6g
    • Carbohydrates: 24g
      • Fiber: 1g
      • Sugars: 1g
    • Sodium: 200mg
    • Vitamin A: 6% DV
    • Calcium: 4% DV
    • Iron: 10% DV

    Conclusion

    These Homemade Buttered Leavened Peels are a delightful addition to any meal. Easy to make and customizable with your favorite fillings, they are sure to become a family favorite. Enjoy them fresh from the oven and share the joy with your loved ones.

  • Quick and Economical Airy Jam Cake

    Quick and Economical Airy Jam Cake

    Quick and Economical Airy Jam Cake

    Table of Contents

    Ingredients:

    • 2 eggs
    • 50g sugar (4 tablespoons)
    • 8g vanilla sugar
    • 50 ml milk (5 tablespoons)
    • 50 ml vegetable oil (8 tablespoons)
    • 110g wheat flour (5 rounded tablespoons)
    • 16g baking powder (2 rounded teaspoons)
    • Apricot jam (or your preferred jam)
    • Chopped peanuts or your choice of decoration

    Instructions:

    1. In a mixing bowl, combine 2 eggs, 50g of sugar, and 8g of vanilla sugar. Mix well.
    2. Add 50 ml of milk and mix until well combined.
    3. Pour in 50 ml of vegetable oil and continue mixing.
    4. Gradually add 110g of wheat flour and 16g of baking powder. Mix until you have a smooth batter.
    5. Prepare an 18 cm casserole dish by lining it with baking paper and greasing it. Dust it with flour.
    6. Pour some of the batter into the prepared baking dish.
    7. Place the dish in a preheated oven at 180°C (356°F) for 15 minutes.
    8. Remove the dish from the oven and spread a layer of apricot jam (or your preferred jam) over the partially baked batter.
    9. Pour the remaining batter on top of the jam layer.
    10. Return the dish to the oven and bake for an additional 15-20 minutes at 180°C (356°F) until the cake is golden brown and a toothpick inserted into the center comes out clean.
    11. Once the cake is done, remove it from the oven and let it cool completely.
    12. After cooling, grease the top of the cake with more jam and decorate it with chopped peanuts or any preferred topping.
    13. Enjoy your tender and airy Jam Cake!