Category: Recipes

  • How to Make Delicious Baked Crack Chicken

    How to Make Delicious Baked Crack Chicken

    Savor the irresistible flavors of “Addictive Eats: Baked Crack Chicken,” a dish so delightfully tasty it’s hard to stop eating! This baked chicken combines the creamy richness of cheese and the robust flavors of ranch seasoning with crispy bacon, creating a meal that’s not only delicious but also incredibly satisfying. Perfect for a family dinner, potluck, or any gathering where you want to impress, baked crack chicken is easy to prepare and guaranteed to be a hit.

    Why You’ll Love Baked Crack Chicken:

      • Creamy and Flavorful: Rich cream cheese and sharp cheddar meld perfectly with the savory taste of ranch.
      • Easy to Make: Simple preparation with minimal hands-on time.
      • Versatile: Serve it as is, over rice, tucked into sandwiches, or even as a dip.
      • Family-Friendly: A guaranteed crowd-pleaser that appeals to both adults and kids.

    Ingredients Notes For Baked Crack Chicken:

      • Chicken Breasts: Boneless, skinless chicken breasts are ideal for this recipe, ensuring a quick and even cooking.
      • Cream Cheese: Adds a creamy texture and tangy flavor, serving as the base for the cheese mixture.
      • Ranch Seasoning: Provides all the spices you need in one packet, making this dish flavorful with minimal effort.
      • Bacon: Cooked until crispy and crumbled, it adds a smoky, crunchy texture.
      • Cheddar Cheese: Shredded for easy melting; adds a sharp, cheesy flavor that complements the creamy base.
      • Green Onions: Chopped for garnishing, adding a fresh, sharp bite that cuts through the richness.
    • Garlic Powder: Enhances the overall flavor profile of the dish.

    Recipe Steps:

      1. Preheat the Oven:
        • Preheat your oven to 375°F (190°C). Lightly grease a baking dish.
      1. Prepare the Chicken:
        • Place the chicken breasts in the prepared baking dish. Season them with salt, pepper, and garlic powder.
      2. Mix the Cheese Mixture:
          • In a bowl, combine softened cream cheese, half of the ranch seasoning packet, and half of the shredded cheddar. Spread this mixture over the chicken breasts evenly.

      3. Bake:
        • Cover with foil and bake in the preheated oven for 20 minutes. Remove the foil, sprinkle the remaining cheddar cheese over the top, and bake uncovered for another 10-15 minutes or until the chicken is thoroughly cooked and the cheese is bubbly.
    1. Add Bacon and Serve:
      • Sprinkle the cooked, crumbled bacon and chopped green onions over the top before serving.

    Storage Options:

      • Refrigerate: Store leftovers in an airtight container in the refrigerator for up to 3 days.
    • Reheat: Warm in the oven or microwave until heated through. Adding a little milk can help keep the chicken moist when reheating.

    Ingredients

      • 4 boneless skinless chicken breasts

      • Salt and pepper to taste
      • 2 teaspoons garlic powder
      • 8 ounces cream cheese softened

      • 1 cup cheddar cheese shredded
      • 1/2 cup green onions chopped
      • 8 slices bacon cooked and crumbled

    • 1/2 cup ranch dressing

    Instructions

    • Savor the irresistible flavors of “Addictive Eats: Baked Crack Chicken,” a dish so delightfully tasty it’s hard to stop eating! This baked chicken combines the creamy richness of cheese and the robust flavors of ranch seasoning with crispy bacon, creating a meal that’s not only delicious but also incredibly satisfying. Perfect for a family dinner, potluck, or any gathering where you want to impress, baked crack chicken is easy to prepare and guaranteed to be a hit.

    Why You’ll Love Baked Crack Chicken:

      • Creamy and Flavorful: Rich cream cheese and sharp cheddar meld perfectly with the savory taste of ranch.

      • Easy to Make: Simple preparation with minimal hands-on time.
      • Versatile: Serve it as is, over rice, tucked into sandwiches, or even as a dip.
      • Family-Friendly: A guaranteed crowd-pleaser that appeals to both adults and kids.

    Ingredients Notes For Baked Crack Chicken:

      • Chicken Breasts: Boneless, skinless chicken breasts are ideal for this recipe, ensuring a quick and even cooking.
      • Cream Cheese: Adds a creamy texture and tangy flavor, serving as the base for the cheese mixture.
      • Ranch Seasoning: Provides all the spices you need in one packet, making this dish flavorful with minimal effort.

      • Bacon: Cooked until crispy and crumbled, it adds a smoky, crunchy texture.
      • Cheddar Cheese: Shredded for easy melting; adds a sharp, cheesy flavor that complements the creamy base.
      • Green Onions: Chopped for garnishing, adding a fresh, sharp bite that cuts through the richness.

    • Garlic Powder: Enhances the overall flavor profile of the dish.

    Recipe Steps:

    Preheat the Oven:

    • Preheat your oven to 375°F (190°C). Lightly grease a baking dish.

    Prepare the Chicken:

      • Place the chicken breasts in the prepared baking dish. Season them with salt, pepper, and garlic powder.

    Mix the Cheese Mixture:

    • In a bowl, combine softened cream cheese, half of the ranch seasoning packet, and half of the shredded cheddar. Spread this mixture over the chicken breasts evenly.

    Bake:

    • Cover with foil and bake in the preheated oven for 20 minutes. Remove the foil, sprinkle the remaining cheddar cheese over the top, and bake uncovered for another 10-15 minutes or until the chicken is thoroughly cooked and the cheese is bubbly.

    Add Bacon and Serve:

      • Sprinkle the cooked, crumbled bacon and chopped green onions over the top before serving.

    Storage Options:

    • Refrigerate: Store leftovers in an airtight container in the refrigerator for up to 3 days.
    • Reheat: Warm in the oven or microwave until heated through. Adding a little milk can help keep the chicken moist when reheating.
  • Pan Fried Cod with Lemon Butter Sauce

    Pan Fried Cod with Lemon Butter Sauce

    If you’re in search of an elegant yet effortless dinner, look no further than this pan-fried cod with lemon butter sauce. In just a few simple steps, you’ll have flaky, mild-tasting fish fillets adorned with a bright, herby butter sauce that adds incredible richness. It’s a restaurant-quality dish that comes together in a flash!

    The Beauty of Cooking Cod

    The key is using fresh, high-quality cod fillets. Cod has such a delicate, subtle flavor that makes it the perfect canvas for all sorts of accompanying sauces and ingredients. For this recipe, we’ll let the pure sweet taste of the fish shine by merely seasoning it with salt, pepper, and your choice of fresh herbs like parsley, dill, or tarragon.

    Once seasoned, you’ll quickly sear the cod in a hot skillet to get that gorgeous golden crust. The fish cooks up rapidly – we’re talking just a couple of minutes per side. That’s one of the beauties of cod. You get such tender, succulent results in almost no time at all.

    The Luscious Lemon Butter Sauce

    As the fish rests for a moment, you’ll whip up the luscious lemon butter sauce right in that same skillet. Just a few pats of butter melted with a glug of lemon juice, some more fresh herbs, and a sprinkle of salt and pepper.

    That’s truly all it takes to elevate this mild, lean protein into something downright decadent and luxurious tasting. While the cod is certainly healthy, that lemon butter sauce is what transforms this dish into something so special. The bright citrus cuts through the richness of the butter in the most delightful way. Each forkful is unbelievably vibrant, velvety, and lush.

    Serving Suggestions

    When plating, nestle the seared cod fillets in a shallow pool of that glorious lemon-herb butter. The sauce clings to every tender flake and infuses the whole dish with incredible fragrance and dimension. You can even use a spoon to baste the fish while you’re eating for even more luscious flavor.

    For an easy, gorgeous meal, serve this pan-fried cod alongside herb-tossed baby potatoes and sautéed garden veggies like zucchini, spinach, or asparagus. Add a slice of crusty bread for sopping up any extra butter sauce and you’ve got restaurant-worthy indulgence with minimal effort.

    The beauty of this simple recipe is that it looks and tastes like such an elegant, understated luxury. But it all comes together with just a handful of fresh, quality ingredients and no fuss whatsoever. Truly the ideal healthy-ish dinner for any occasion – whether a lazy weeknight, a date night in, or an impromptu dinner party with friends.

    I’ve got a feeling once you try this pan-fried cod with its vibrant lemon butter sauce, it’ll become an instant staple in your dinner rotation. It’s such a quick, easy way to elevate mild, delicate cod into something so lively, rich, and special. Just be prepared for everyone to be asking for seconds!

    Ingredients

    • 4 cod fillets 6 oz each, patted dry
      2 tbsp olive oil
      Kosher salt and freshly ground black pepper
      4 tbsp unsalted butter
      Juice of 1 lemon
      2 tbsp finely chopped fresh herbs parsley, dill, tarragon

    Instructions

    Pat cod fillets completely dry and season both sides with salt, pepper and fresh herbs.

    Heat olive oil in a large skillet over medium-high heat until shimmering.

    Add cod fillets and cook for 4-5 minutes per side until opaque and flaky in the center when tested with a fork. Transfer to a plate.

    Reduce heat to medium and add butter to the skillet. Once melted, stir in lemon juice and more fresh herbs. Taste and season with salt and pepper as needed.

    Pour the lemon butter sauce over the cod fillets and serve immediately, garnished with extra herbs if desired.

  • Slow Cooker Roast with Gravy

    Slow Cooker Roast with Gravy

    Slow Cooker Roast with Gravy is the ultimate comfort food, perfect for family gatherings or cozy weeknight dinners. The slow-cooking process ensures the meat is tender and flavorful, while the rich gravy enhances every bite.

    Ingredients:

    ° 2-3 pounds of your preferred roast (such as chuck or sirloin)

    ° 3/4 cup beef broth

    ° 1 tablespoon Kitchen Bouquet (browning and seasoning sauce)

    ° 2 tablespoons all-purpose flour

    ° 1 can (10.5 ounces) cream of mushroom soup

    ° 1 tablespoon red wine vinegar

    ° 1 package (1 ounce) onion soup mix

    ° 1 tablespoon Worcestershire sauce

    ° 1/2 teaspoon dried thyme

    ° 1/2 teaspoon garlic powder

    ° 2 tablespoons butter

    ° 1/4 teaspoon black pepper

    Instructions:

    1. Prepare the Slow Cooker: In a small bowl, mix the beef broth, Kitchen Bouquet, flour, cream of mushroom soup, red wine vinegar, onion soup mix, Worcestershire sauce, thyme, garlic powder, butter, and black pepper until well combined.

    2. Add the Roast: Place the roast in the slow cooker. Pour the mixture over the roast, ensuring it is evenly coated.

    3. Cook: Cover and cook on low for 8-10 hours or on high for 4-6 hours, until the meat is tender and easily shredded with a fork.

    4. Make the Gravy: Once the roast is cooked, transfer it to a plate and cover with foil to keep warm. Pour the liquid from the slow cooker into a saucepan and bring to a simmer over medium heat. Cook, stirring occasionally, until the gravy thickens to your desired consistency.

    5. Serve: Slice the roast and serve with the rich gravy. Pair with creamy mashed potatoes, roasted vegetables, a simple green salad, and warm crusty bread for a complete meal.

    Enjoy this delicious and comforting Slow Cooker Roast with Gravy, a dish that’s sure to satisfy everyone’s taste buds!

  • Bread in 10 Minutes: An Easy Way to Make Delicious Bread

    Bread in 10 Minutes: An Easy Way to Make Delicious Bread

    Ingredients

    for the recipe


    The components required for this delectable bread are:

    4 cups of flour, equivalent to 480 grams.

    1 cup (220 grams) of yogurt

    Approximately 250 milliliters, which is equivalent to about 3/4 cup, of unflavored water.

    A quantity of ten grams of powdered yeast, equivalent to one packet

    The quantity of salt is eight grams, which is equivalent to one teaspoon when measured in powder form.

    One tablespoon (15 milliliters) of vegetable oil is required.

    Approximately fifty milliliters, or three and a half tablespoons, of avocado oil

    1. Create the rolls manually by shaping them with your hands.

    Begin by combining the yoghurt, water, and baking powder in a kneading bowl. Thoroughly combine the ingredients until a homogeneous mixture is achieved.

    Created.

    Continue working until you are satisfied with the outcome.

    Subsequently, meticulously incorporate the components by kneading them until a pliable dough is formed. Then, gradually add flour, salt, and

    Edible oil derived from plants. To maintain the bread’s consistency, refrain from excessively kneading it.

    Copy & paste

    The completed dough should be split into 10 identical sections and thereafter covered to avoid any alteration.

    Dehydrating.Flatten each ball into a circular shape with a diameter similar to that of a dessert plate.

    Oven-free recipes

    Press the dough circles to make them flat and cook them in a frying pan over medium heat until they get golden brown, flipping them over.

    Once. Oil is not required.

    Applying the final details

    Prior to serving, apply a substantial amount of butter to each piece of bread while it is still warm in order to intensify the taste.

    Create delectable culinary creations

    That is the whole of it.Now you have the opportunity to savor the flavor of your just cooked bread. Apply heat to it and experience the subsequent absence of sound.

    As the dishes are removed and happiness permeates the atmosphere.

    Overview

    A simple recipe may be swiftly transformed in just ten minutes into a remarkable dinner that is certain to

    Delight your palate and wow your visitors. No oven or specialized abilities are required to excel at this simple task.

    Recipe for making bread. What are you currently delaying?Indulge in the delight of freshly made bread today by acquiring

    Skilled in culinary innovation.

    Essential Details (Commonly Asked Questions)

    1. Is Greek yogurt a suitable replacement for normal yogurt?

    Indeed, Greek yogurt is as suitable for this recipe as normal yogurt. In order to get the desired texture of the dough,

    If desired, it may be necessary to modify the quantity of water due to the thicker consistency of Greek yogurt compared to conventional yogurt.The number 2.

    Is olive oil necessary for bread baking?

    You may use olive oil or any alternative cooking oil according to your preference; it effectively enhances the taste of the dish.

    Bread. To get optimal results, it is advisable to warm the pan before placing the bread pieces.

    3. Can other components, like as cheese or herbs, be included into the dough?

    Certainly! Incorporate your preferred herbs, cheese, or garlic into the dough before to kneading to see the resulting outcome.

    Flavors are revealed. Feel at liberty to engage in experimentation and make adjustments to the components according to your own preferences.

    Fourth: What is the shelf life of the leftover bread?Excess bread may be preserved in a hermetically sealed container.

    The container may be stored at room temperature for a maximum of two to three days. An alternative is to preserve the bread by freezing it.

    Subsequently employed. Merely heat in the oven or microwave.

    Can the quantity of bread baked be increased by twofold by doubling the recipe?

    Indeed! To increase the quantity of bread you bake, you may easily double the number of ingredients by two or three.At what time

    When kneading the dough, be mindful of its consistency and make any adjustments to the cooking time.

  • Easy and Delicious Cabbage Omelette Recipe: Better Than Meat!

    Easy and Delicious Cabbage Omelette Recipe: Better Than Meat!

    Welcome to the world of cabbage delight! In this article, we’re going to explore a simple yet irresistible recipe for cabbage omelette that will make you forget all about meat. From its humble origins to its rise as a culinary superstar, cabbage has earned its place on our plates. Get ready to embark on a journey of flavor and nutrition with this easy recipe.

    Ingredients

    To whip up this delectable cabbage omelette, you’ll need:

    • 1 carrot
    • 1 pepper
    • 1 teaspoon salt
    • 1 teaspoon pepper
    • 1 teaspoon paprika
    • 4 1/4 cups (1 liter) water
    • 4 spring onions
    • 3 eggs
    • 1/2 cup (50 g) cheddar cheese
    • 14 ounces (400 g) head cabbage
    • 3 tablespoons (45 ml) vinegar
    • 1 pinch parsley
    • 1 tablespoon ketchup
    • 2 sprigs dill
    Preparation

    Let’s get started by preparing the ingredients:

    • Cut the cabbage into strips and immerse it in the vinegar and water.
    • Chop the cabbage into fine pieces.
    • Peel the carrot and cut it into strips, and do the same with the red pepper.
    • Slice the spring onions and chop the parsley.
    • Beat the eggs in a bowl.
    4. Cooking

    Now, let’s cook up this savory delight:

    • Drain the cabbage after it has soaked in water and vinegar for 10 minutes.
    • Combine the drained cabbage with beaten eggs in a clean container.
    • Add chopped vegetables, salt, pepper, and paprika. Mix well.
    • Grease a pan with vegetable oil and pour in the mixture.
    • Cook for 10 minutes with a lid on.
    • Flip the omelette and continue cooking until golden brown.
    • Spread ketchup, grated cheese, and dill on the surface.
    5. Serving

    Your cabbage omelette is now ready to be served! You can cut it into squares or slices and plate it beautifully. Get ready to impress your taste buds with this delightful dish!

    6. Health Benefits

    Not only is this cabbage omelette bursting with flavor, but it’s also packed with nutritional benefits. Cabbage is rich in vitamins and antioxidants that promote overall health. By incorporating cabbage into your diet, you can boost your immune system, improve digestion, and even aid in weight loss. Plus, this recipe provides a healthy dose of protein from the eggs and cheese, making it a well-rounded meal for any occasion.

    7. Tips and Tricks
    • Experiment with spices: Feel free to customize this recipe by adding your favorite spices and herbs.
    • Make it vegan: Skip the eggs and cheese for a vegan-friendly version of this omelette.
    • Serve with sides: Pair your cabbage omelette with a side salad or roasted vegetables for a complete meal.
    8. Variations
    • Asian-inspired: Add soy sauce, ginger, and garlic for an Asian twist on this classic recipe.
    • Mediterranean flair: Incorporate olives, feta cheese, and sun-dried tomatoes for a Mediterranean-inspired omelette.
  • CHICKEN BUBBLE BISCUIT BAKE CASSEROLE

    CHICKEN BUBBLE BISCUIT BAKE CASSEROLE

    A delicious easy to make Casserole this scrumptious Chicken Bubble Biscuit Bake is loaded with tender juicy chicken in a creamy ranch and bacon filling, topped with refrigerator biscuits and golden crispy cheese!

    I took to Instagram and asked y’all what recipe you wanted me to post next. This Chicken Bubble Biscuit Bake was the overwhelming favorite! Y’all have the best taste. That’s why you’re my friends! 

    They wanted the wonderful Chicken pocket dinner made with store bought crescent dough stuffed with chicken filling and baked. It’s a great recipe, but not super practical for a camping situation.

    Ingredients

    • 3 cups cooked chopped chicken, or canned chicken
    • 2 cans cream of chicken soup
    • 1 1/2 cups sour cream
    • 1 cup grated cheese
    • 2 Tablespoons Ranch dressing mix
    • 1/4 cup cooked, chopped bacon
    • 1 (12 oz) can refrigerator Grands Jr Biscuits
    • 1 additional cup grated cheese for top of casserole

    How To Make Chicken Bubble Biscuit Bake Casserole

    1. Preheat oven to 350°. Lightly spray a 9 x 13-inch pan with cooking spray. Set aside.
    2. Combine chicken, soup, sour cream, 1 cup grated cheese, Ranch dressing mix, and bacon. **Cut each biscuit into 4 pieces. Toss with chicken mixture.
    3. Pour chicken mixture into prepared pan. Top with remaining cup of grated cheese.Bake for 25-35 minutes, until bubbly and biscuits are golden brown.

    ** Please note if you do not like biscuits that are “doughy” like a dumpling then place the chicken mixture on the bottom of the dish and top it off with the biscuits!

    Notes

    You can use canned chicken in this recipe and you can also make your own homemade biscuits if trying to keep this a pantry recipe.

  • Baked Creamy Chicken Mozzarella Pasta

    Baked Creamy Chicken Mozzarella Pasta

    Introduction

    Baked Creamy Chicken Mozzarella Pasta is a comforting and delectable dish that brings together the rich flavors of creamy sauce, tender chicken, and melted mozzarella cheese. This recipe is perfect for a cozy family dinner, a potluck, or any occasion where you want to impress your guests with minimal effort. The harmonious blend of herbs, garlic, and cheese enveloping the pasta and chicken creates an irresistible dish that is both hearty and satisfying. Let’s dive into the detailed process of creating this delightful meal.

    Ingredients:

    For the Chicken:

    • 2 large boneless, skinless chicken breasts
    • Salt and pepper to taste
    • 1 tablespoon olive oil
    • 2 cloves garlic, minced
    • 1 teaspoon dried oregano
    • 1 teaspoon dried basil

    For the Pasta:

    • 12 ounces pasta (penne, rigatoni, or fusilli work well)
    • Salt for boiling water

    For the Creamy Sauce:

    • 2 tablespoons unsalted butter
    • 2 tablespoons all-purpose flour
    • 2 cups whole milk
    • 1 cup heavy cream
    • 1 cup grated Parmesan cheese
    • 1 teaspoon garlic powder
    • 1/2 teaspoon onion powder
    • Salt and pepper to taste

    For Assembly:

    • 2 cups shredded mozzarella cheese
    • 1/2 cup grated Parmesan cheese
    • 1/4 cup chopped fresh parsley (optional, for garnish)

    Instructions:

    Prepare the Chicken:

    1. Season the Chicken:
      Season the chicken breasts with salt, pepper, dried oregano, and dried basil on both sides. The herbs will infuse the chicken with a wonderful aroma and flavor.
    2. Cook the Chicken:
      Heat olive oil in a large skillet over medium-high heat. Add the minced garlic and sauté for about 1 minute until fragrant. Add the chicken breasts and cook for 5-7 minutes on each side, or until they are golden brown and cooked through. Remove the chicken from the skillet and let it rest. Once cooled, cut the chicken into bite-sized pieces.

    Prepare the Pasta:

    1. Cook the Pasta:
      Bring a large pot of salted water to a boil. Add the pasta and cook according to the package instructions until al dente. Drain the pasta and set it aside. It’s important not to overcook the pasta as it will continue to cook in the oven later.

    Prepare the Creamy Sauce:

    1. Make the Roux:
      In a medium saucepan, melt the unsalted butter over medium heat. Add the all-purpose flour and whisk continuously for about 2 minutes to form a roux. The roux should be smooth and slightly bubbly but not browned.
    2. Add Milk and Cream:
      Gradually whisk in the whole milk and heavy cream, ensuring there are no lumps. Continue to cook the mixture, whisking constantly, until it thickens, about 5-7 minutes. The sauce should be thick enough to coat the back of a spoon.
    3. Season the Sauce:
      Add the grated Parmesan cheese, garlic powder, onion powder, salt, and pepper to the sauce. Stir until the cheese is fully melted and the sauce is smooth. Taste and adjust the seasoning if necessary.

    Assemble the Dish:

    1. Combine Pasta and Sauce:
      In a large mixing bowl, combine the cooked pasta, bite-sized chicken pieces, and the creamy sauce. Mix until the pasta and chicken are evenly coated with the sauce.
    2. Prepare for Baking:
      Preheat your oven to 375°F (190°C). Lightly grease a 9×13-inch baking dish. Pour the pasta and chicken mixture into the prepared baking dish, spreading it out evenly.
    3. Add the Cheese:
      Sprinkle the shredded mozzarella cheese and grated Parmesan cheese evenly over the top of the pasta mixture. The cheese will melt and form a deliciously gooey topping as it bakes.

    Bake the Dish:

    1. Bake the Pasta:
      Place the baking dish in the preheated oven and bake for 20-25 minutes, or until the cheese is melted, bubbly, and golden brown. If you prefer a more golden and crispy top, you can broil the dish for an additional 2-3 minutes, keeping a close eye on it to prevent burning.

    Serve and Garnish:

    1. Garnish the Dish:
      Once the pasta is baked to perfection, remove it from the oven and let it cool for a few minutes. Garnish with chopped fresh parsley for a pop of color and added freshness.
    2. Serve:
      Serve the Baked Creamy Chicken Mozzarella Pasta hot, with a side of garlic bread or a fresh green salad for a complete meal. Enjoy the rich, creamy, and cheesy goodness in every bite.

    Conclusion

    Baked Creamy Chicken Mozzarella Pasta is a dish that brings comfort and joy with every spoonful. The tender chicken, perfectly cooked pasta, and luscious creamy sauce make this a standout recipe that is sure to become a family favorite. The ease of preparation and the delicious results make it an ideal choice for both weeknight dinners and special occasions. Whether you’re a novice cook or an experienced chef, this recipe is straightforward and rewarding, promising a delightful dining experience. Indulge in the creamy, cheesy, and flavorful delight of this pasta dish and savor the satisfaction it brings.

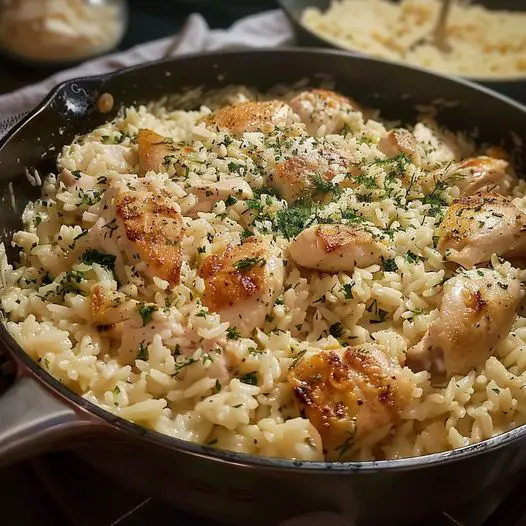
  • Garlic Parmesan Chicken

    Garlic Parmesan Chicken

    Ingredients

    • Chicken Breasts 680g / 1.5 lbs, cubed: Provides a tender and flavorful base.
    • Butter 56g / 4 tablespoons: Adds richness and helps sauté the ingredients.
    • White Onion 1, diced: Adds sweetness and depth to the dish.
    • Garlic 4 cloves, minced: Infuses the dish with a robust garlic flavor.
    • Dried Thyme 1 teaspoon: Adds an earthy flavor.
    • Dried Rosemary 1/2 teaspoon, crumbled: Adds a fragrant, pine-like taste.
    • Chicken Broth 600ml / 2.5 cups: Provides a flavorful cooking liquid.
    • Long-Grain White Rice 190g / 1 cup, not quick cooking: Absorbs flavors and cooks to perfection.
    • Heavy Cream 120ml / 1/2 cup: Adds creaminess to the sauce.
    • Parmesan Cheese 60g / 1/2 cup, freshly grated: Adds a savory, cheesy flavor.
    • Kosher Salt and Freshly Ground Black Pepper to taste: Essential for seasoning.
    • Fresh Parsley chopped, for serving: Adds a fresh, vibrant touch.

    Instructions

    • Heat your skillet over medium-high heat and melt the butter. Add diced onion and sauté until it softens (approx. 2-3 mins).
    • Introduce the cubed chicken to the skillet and season with kosher salt, freshly ground black pepper, thyme, and rosemary. Cook until chicken develops a golden-brown crust on all sides, roughly 5 minutes. Stir in the minced garlic and cook for another minute.
    • Pour in chicken broth and rice, and mix until well combined. Bring the mixture to a boil, cover your skillet, and turn down the heat to medium-low.
    • Allow the mixture to simmer until the rice becomes tender (about 15-20 mins). Once ready, take off the heat and mix in the heavy cream and freshly grated parmesan.
    • Serve this scrumptious meal with extra parmesan and a sprinkle of chopped fresh parsley if desired.

    Notes

    This Garlic Parmesan Chicken and Rice recipe is extremely versatile. You can substitute the chicken with turkey or even tofu for a vegetarian version. Remember to adjust the cooking time depending on the substitute used. Also, consider using fresh herbs if available for an extra kick of flavor. Enjoy your cooking journey with this fabulous one-pot wonder!

    The beauty of our Garlic Parmesan Chicken and Rice recipe is in its simplicity. It’s a hearty, comforting dish that comes together in one pot with minimum fuss and maximum flavor. Packed with savory chicken, creamy parmesan, and fluffy rice, it’s a meal your family will be asking for again and again. So why wait? Get your pot ready and whip up this delicious feast today!
  • Spicy Parmesan-Garlic Chicken Skewers

    Spicy Parmesan-Garlic Chicken Skewers

    Ingredients

    • 4 lb boneless skinless chicken thighs
    • 2 tbsp olive oil
    • 2 tbsp BBQ seasoning

    Spicy Garlic Parmesan Butter:

    • 1 stick unsalted butter softened
    • 1 tbsp chopped parsley
    • 1 tbsp roasted garlic paste
    • 1/4 c grated Parmesan Cheese
    • 3 tbsp buffalo sauce
    • 1 tsp kosher salt
    • 1 tsp black pepper

    Instructions

    • Prep Chicken: Cut the chicken thighs. Into 1-inch pieces. And place them in a bowl.
    • Season: Add olive oil. And BBQ seasoning to the chicken. Stir. Until the chicken is evenly coated.
    • Skewer: Thread the seasoned chicken pieces. Onto wooden skewers.
    • Make Butter Mixture: In a separate bowl. Mix together the softened butter, parsley, garlic paste, Parmesan cheese, buffalo sauce, salt, and pepper.
    • Grill: Preheat the grill to medium-high. Grill the skewers. Turning occasionally. Until the chicken starts to cook evenly.
    • Apply Butter: When the chicken reaches an internal temperature of 135°F. Start brushing with the spicy garlic Parmesan butter. Continue to grill. And apply butter. Until the internal temperature of the chicken is 165°F.
    • Final Brush: Remove the skewers from the grill. And brush one more time. With the butter mixture. Before serving.
    • Enjoy your delicious. And flavorful chicken skewers!

    Notes

    To enjoy these Spicy Parmesan-Garlic Chicken Skewers. As a gluten-free option. You’ll want to make a couple of simple swaps. First, ensure that your BBQ seasoning is labeled gluten-free. As some seasoning blends. Can contain hidden gluten. In the form of additives or fillers. If you’re unsure. You can easily make your own mix. Using basic spices like paprika, garlic powder, onion powder, and a touch of cayenne for heat. All naturally gluten-free.

    Additionally, check your buffalo sauce. And other condiments. For any gluten-containing ingredients. Many sauces are gluten-free. But it’s always safe to read labels. Or contact manufacturers. If you’re unsure.

    With these small adjustments. You can confidently serve these tantalizing skewers. Knowing they are safe. And enjoyable for everyone. Regardless of dietary restrictions. Enjoy the robust flavors. Without the gluten!

  • Classic Baked Macaroni And Cheese Perfection

    Classic Baked Macaroni And Cheese Perfection

    Ingredients

    • 1 pound dried elbow pasta
    • 1/2 c unsalted butter
    • 1/2 c all-purpose flour
    • 1 1/2 c whole milk
    • 2 1/2 c half and half
    • 4 c shredded medium cheddar cheese divided (measured after shredding)
    • 2 c shredded Gruyere cheese divided (measured after shredding)
    • 1/2 tablespoon salt
    • 1/2 teaspoon black pepper
    • 1/4 teaspoon smoked paprika smoked paprika preferred

    Instructions

    • Preheat Oven & Prepare Dish: Heat your oven to 325 degrees F (163 degrees C). Grease a 3-quart baking dish. And set aside.
    • Boil Pasta: Bring a large pot of salted water to a boil. Add the elbow pasta. And cook until just under al dente (about 1 minute less than the package directions). Drain the pasta. And toss it with a bit of olive oil. To prevent sticking.
    • Shred & Mix Cheeses: While the pasta cooks. Shred the cheddar and Gruyere cheeses. Mix them together and divide them into three portions: 3 cups for the sauce, 1.5 cups for layering, and 1.5 cups for the topping.
    • Make Cheese Sauce: In a saucepan. Melt the butter. Over medium heat. Add the flour. And whisk. Until it forms a paste. Gradually add the half and half and milk. Whisking constantly. Until the mixture is smooth. Continue heating. And whisking. Until the sauce thickens. To the consistency of thin cream soup.
    • Combine Cheese and Pasta: Remove the sauce from heat. Stir in the salt, pepper, paprika, and 3 cups of the mixed cheeses. Until melted. And smooth. Combine the cheese sauce. With the drained pasta. In a large bowl, mixing well.
    • Assemble: Pour half of the saucy pasta. Into the prepared baking dish. Sprinkle with 1.5 cups of cheese. Add the remaining pasta. Then top with the last 1.5 cups of cheese.
    • Bake: Place the dish in the oven. And bake for 15 minutes. Or until the cheese is bubbly. And golden brown on top.

    Notes

    To whip up a gluten-free version of this scrumptious Classic Baked Macaroni and Cheese. Simply swap the traditional elbow pasta. For your favorite gluten-free pasta variety. Make sure it’s a good quality brand. That holds up well. Under baking conditions. For the roux. Replace all-purpose flour. With an all-purpose gluten-free flour blend. That’s designed for baking. These small tweaks. Will let you enjoy. The same creamy, cheesy delight. Without the gluten. Gather your ingredients. And get ready. To savor every bite!
  • How to Make Korean Cheese Corn at Home

    How to Make Korean Cheese Corn at Home

    Dive into the creamy and savory delight of “Seoul-ful Snack: Korean Cheese Corn,” a popular Korean side dish that combines sweet corn with melted cheese for a truly indulgent experience. This simple yet flavorful dish is often found in Korean BBQ restaurants and is beloved for its irresistible blend of sweetness, saltiness, and cheesy goodness. Perfect as a side dish, appetizer, or a unique party snack, Korean Cheese Corn is sure to be a hit with its comforting warmth and crowd-pleasing flavors.

    Why You’ll Love Korean Cheese Corn:

    • Quick and Easy: Requires minimal ingredients and can be prepared in just a few minutes.
    • Comfort Food: The combination of sweet corn and melted cheese offers ultimate comfort.
    • Versatile: Perfect alongside Korean BBQ, as a side with dinner, or enjoyed on its own.
    • Kid-Friendly: A great way to get kids excited about eating their veggies.

    Ingredients Notes For Korean Cheese Corn:

    • Corn: Use canned sweet corn for convenience, or fresh corn kernels if in season for the best flavor.
    • Mayonnaise: Adds creaminess and depth to the dish.
    • Sugar: A touch of sugar enhances the natural sweetness of the corn.
    • Mozzarella Cheese: Melts beautifully, creating a gooey and stringy topping. You can also mix in a bit of cheddar for extra flavor.
    • Butter: Provides richness and helps bind the corn and cheese together.
    • Salt and Pepper: Season to taste.
    • Green Onions or Parsley: For garnish, adding a pop of color and freshness.

    Recipe Steps:

    1. Preheat the Oven:
      • Preheat your oven to 375°F (190°C) or prepare your broiler if you prefer to broil the cheese topping.
    2. Prepare the Corn Mixture:
      • Drain the corn well if using canned. In a mixing bowl, combine the corn, a good dollop of mayonnaise, a sprinkle of sugar, salt, and pepper. Mix well until all the corn is evenly coated.
    3. Cook the Corn:
      • In a skillet, melt a small amount of butter. Add the corn mixture and sauté briefly until the corn is heated through and infused with the butter.
    4. Add Cheese:
      • Transfer the heated corn to an oven-safe dish. Sprinkle a generous layer of shredded mozzarella (and cheddar, if using) over the top.
    5. Bake or Broil:
      • Bake in the preheated oven for about 10-15 minutes or until the cheese is fully melted and bubbly. For a browner, more caramelized top, broil for the last few minutes of cooking.
    6. Garnish and Serve:
      • Garnish with chopped green onions or parsley. Serve hot as a side dish or with toothpicks as a snack.

    Storage Options:

    • Refrigerate: Store any leftovers in an airtight container in the refrigerator for up to 3 days.
    • Reheat: Best reheated in the oven or microwave to maintain the creaminess of the cheese.

    Ingredients

    • 2 cups frozen corn kernels thawed
    • 1/2 cup mayonnaise
    • 1/2 cup mozzarella cheese shredded
    • 1/2 cup cheddar cheese shredded
    • 1 green onion chopped
    • 1 tablespoon sugar optional, adjust to taste
    • Salt and pepper to taste
    • 1 teaspoon Korean chili powder or paprika optional, for color and a hint of spice

    Instructions

    Preheat the Oven:

    • Preheat your oven to 400°F (200°C). This high temperature is perfect for getting a nicely browned top.

    Mix Ingredients:

    • In a large mixing bowl, combine the thawed corn kernels, mayonnaise, half of the mozzarella, half of the cheddar, green onion, and sugar if using. Season with salt, pepper, and Korean chili powder or paprika if desired.
    • Mix everything thoroughly until the corn is well-coated with the mayonnaise and the ingredients are evenly distributed.

    Transfer to a Baking Dish:

    • Transfer the corn mixture to a suitable ovenproof dish. Spread the mixture evenly.

    Add Cheese:

    • Sprinkle the remaining mozzarella and cheddar cheeses over the top of the corn mixture. This will create a deliciously cheesy crust as it bakes.

    Bake:

    • Place the dish in the preheated oven and bake for about 10-15 minutes, or until the cheese is melted and bubbly. For a golden top, you can switch the oven to broil for the last 2-3 minutes, but watch it closely to prevent burning.

    Serve:

    • Serve hot, ideally as a side with Korean BBQ or as a savory-sweet appetizer. It pairs wonderfully with grilled meats or as a standalone dish with some crusty bread.
  • How to Make Tender Oven-Baked Ribs

    How to Make Tender Oven-Baked Ribs

    Savor the deliciousness of “Perfectly Tender: Oven-Baked Ribs” for an effortless way to enjoy fall-off-the-bone ribs without needing a grill. Slow-cooked in the oven, these ribs are seasoned with a flavorful dry rub and finished with a sticky, sweet, and smoky BBQ sauce. Ideal for any occasion, these ribs are sure to satisfy your BBQ cravings.

    Why You’ll Love Oven-Baked Ribs:

    • Tender and Juicy: Slow-cooked for ultimate tenderness.
    • Flavorful: Rich in BBQ flavor with a perfect blend of spices.
    • Easy to Make: Simple steps for a delicious result.
    • Indoor Cooking: Enjoy BBQ ribs year-round, regardless of the weather


    Ingredients Notes For Oven-Baked Ribs:

    • Pork Ribs: Baby back ribs or St. Louis-style ribs.
    • Dry Rub: A mix of brown sugar, paprika, garlic powder, onion powder, salt, pepper, and optional cayenne for heat.
    • BBQ Sauce: Your favorite store-bought or homemade BBQ sauce.
    • Apple Cider Vinegar: Adds moisture and a slight tanginess.
    • Honey: Optional, for added sweetness and caramelization.
    • Foil: For wrapping the ribs during cooking.
    • Recipe Steps:

      1. Prepare the Ribs:
        • Preheat your oven to 300°F (150°C).
        • Remove the membrane from the back of the ribs for better texture. Pat the ribs dry with paper towels.
      2. Apply the Dry Rub:
        • In a small bowl, mix 1/4 cup of brown sugar, 1 tablespoon of paprika, 1 teaspoon of garlic powder, 1 teaspoon of onion powder, 1 teaspoon of salt, 1/2 teaspoon of black pepper, and 1/4 teaspoon of cayenne pepper (if using). Rub this mixture evenly over both sides of the ribs.
      3. Wrap and Cook the Ribs:
        • Place each rack of ribs on a large piece of aluminum foil. Drizzle 1-2 tablespoons of apple cider vinegar over the ribs. Wrap the ribs tightly in the foil to create a sealed packet.
        • Place the foil-wrapped ribs on a baking sheet and bake in the preheated oven for 2.5 to 3 hours, or until the ribs are tender and easily pull away from the bone.
      4. Glaze with BBQ Sauce:
        • Carefully unwrap the ribs and discard the foil. Brush a generous amount of your favorite BBQ sauce over both sides of the ribs.
      5. Finish in the Oven:
        • Increase the oven temperature to 400°F (200°C). Place the ribs back on the baking sheet, uncovered. Bake for an additional 15-20 minutes, brushing with more BBQ sauce halfway through, until the sauce is bubbly and caramelized.
      6. Serve:
        • Let the ribs rest for a few minutes before cutting into individual ribs. Serve with extra BBQ sauce on the side.

      Storage Options:

      • Refrigerate: Store any leftovers in an airtight container in the refrigerator for up to 3 days. Reheat in the oven or microwave before serving.
      • Freeze: Wrap the cooked ribs tightly in aluminum foil and place in a freezer-safe bag. Freeze for up to 2 months. Thaw in the refrigerator overnight and reheat in the oven.

    Ingredients

    • 2 racks of baby back ribs or St. Louis-style ribs
    • 2 tablespoons olive oil
    • Dry Rub:
    • 1/4 cup brown sugar
    • 1 tablespoon smoked paprika
    • 1 tablespoon garlic powder
    • 1 tablespoon onion powder
    • 1 teaspoon black pepper
    • 1 teaspoon salt
    • 1 teaspoon chili powder
    • 1 teaspoon cumin
    • 1/2 teaspoon cayenne pepper optional, for heat
    • Barbecue Sauce:
    • 1 cup barbecue sauce store-bought or homemade

    Instructions

    • Preheat the Oven:
    • Preheat your oven to 275°F (135°C).
    • Prepare the Ribs:
    • Remove the membrane from the back of the ribs. Slide a knife under the membrane at one end of the ribs and use a paper towel to grip and pull it off.
    • Pat the ribs dry with paper towels.
    • Apply the Dry Rub:
    • In a small bowl, mix together all the ingredients for the dry rub.
    • Rub the olive oil over both sides of the ribs.
    • Generously sprinkle the dry rub over both sides of the ribs, pressing it into the meat with your fingers.
    • Wrap the Ribs:
    • Place each rack of ribs on a large piece of aluminum foil, meat side up. Wrap the ribs tightly in the foil, ensuring they are completely sealed.
    • Place the wrapped ribs on a baking sheet.
    • Bake the Ribs:
    • Bake in the preheated oven for 2.5 to 3 hours, or until the ribs are tender and the meat is pulling away from the bones.
    • Apply the Barbecue Sauce:
    • Remove the ribs from the oven and carefully unwrap them.
    • Increase the oven temperature to 450°F (230°C).
    • Brush the ribs generously with barbecue sauce on both sides.
    • Place the ribs back on the baking sheet, uncovered.
    • Finish the Ribs:
    • Return the ribs to the oven and bake for an additional 10-15 minutes, or until the barbecue sauce is caramelized and bubbly. Watch closely to prevent burning.
    • Serve:
    • Remove the ribs from the oven and let them rest for a few minutes before cutting into individual ribs.
    • Serve with additional barbecue sauce on the side, if desired.
  • Grilling the Perfect Texas Roadhouse Steak At Home

    Grilling the Perfect Texas Roadhouse Steak At Home

    Craving the bold flavors and succulent tenderness of a Texas Roadhouse steak without leaving your home? This copycat recipe brings the iconic steakhouse experience to your kitchen, featuring a perfectly seasoned and grilled steak that rivals the restaurant favorite. Known for its juicy goodness and flavorful crust, Texas Roadhouse steaks are a hit among meat lovers. By following this simple yet effective recipe, you can recreate the magic of Texas Roadhouse’s grilled masterpiece, complete with the signature seasoning blend that gives these steaks their unforgettable taste.

    Why You’ll Love This Texas Roadhouse Steak Copycat Recipe:

    • Steakhouse Quality at Home: Achieve that restaurant-quality flavor and tenderness without the steakhouse price tag.
    • Perfectly Seasoned: The homemade seasoning blend ensures each bite is packed with flavor.
    • Versatile: Works great with your choice of steak cuts, whether it’s a ribeye, sirloin, or New York strip.
    • Grill or Stovetop: Flexible cooking methods mean you can enjoy this steak year-round, regardless of the weather.

    Ingredients Notes For Texas Roadhouse Steak:

    • Steak: Choose a high-quality cut for the best results. Ribeye, sirloin, or New York strip are all excellent choices.
    • Texas Roadhouse Steak Seasoning: Combine kosher salt, black pepper, garlic powder, onion powder, and a hint of brown sugar for a touch of sweetness. Add smoked paprika and cayenne pepper for depth and a slight kick.
    • Butter: For finishing the steak, adding richness, and enhancing its natural flavors.

    Recipe Steps:

    1. Prepare the Seasoning: Mix together the seasoning ingredients in a bowl. Adjust the amounts based on your preference for saltiness or heat.
    2. Season the Steak: Liberally apply the seasoning blend to both sides of the steak, pressing gently to ensure it adheres.
    3. Let It Rest: Allow the seasoned steak to sit at room temperature for about 30-40 minutes before cooking. This step helps ensure even cooking.
    4. Cook Your Steak: Preheat your grill or skillet to high heat. For grilling, cook each side for 4-5 minutes for medium-rare, adjusting the time based on the thickness of the steak and desired doneness. If using a skillet, sear the steak on high heat to develop a crust, then lower the heat to finish cooking to your liking.
    5. Rest Before Serving: Let the steak rest for 5-10 minutes after cooking, covered loosely with foil. This allows the juices to redistribute throughout the meat, ensuring a juicy result.
    6. Serve with Butter: Top each steak with a pat of butter before serving for an extra layer of flavor.

    Storage Options:

    • Refrigerate Leftovers: Store any leftover steak in an airtight container in the refrigerator for up to 3 days.
    • Reheating: Gently reheat leftovers in a skillet over low heat or in the oven at a low temperature to avoid overcooking.

    Ingredients

    Steak:

    • Ribeye or New York Strip steaks about 1 to 1 1/2 inches thick (these cuts are most similar to what’s often served at Texas Roadhouse)

    Texas Roadhouse Steak Rub:

    • 2 teaspoons kosher salt
    • 2 teaspoons brown sugar
    • 1/4 teaspoon cornstarch helps the seasoning stick to the steak
    • 1/4 teaspoon garlic powder
    • 1/4 teaspoon garlic salt
    • 1/4 teaspoon onion powder
    • 1/4 teaspoon turmeric
    • 1/4 teaspoon paprika smoked paprika adds a nice touch
    • 1/4 teaspoon chili powder
    • 1/4 teaspoon black pepper
    • A pinch of cayenne pepper adjust to taste

    Instructions

    Prepare the Steak Rub:

    • Mix all the dry ingredients together in a bowl. This rub will give you a similar flavor profile to what you might find in a Texas Roadhouse kitchen.

    Season the Steak:

    • Pat your steaks dry with paper towels to remove any excess moisture. This is important for getting a good sear.
    • Generously apply the steak rub on both sides of your steaks. Gently press the seasoning into the meat to ensure it sticks. Let the steaks sit at room temperature for about 40 minutes before cooking. This helps the steak cook more evenly.

    Preheat Your Grill or Skillet:

    • If you’re grilling, preheat your grill to high heat. For stovetop cooking, heat a cast-iron skillet over high heat until it’s smoking slightly. A hot cooking surface is crucial for developing a flavorful crust.

    Cook the Steak:

    • For grilling: Place the steaks on the grill and cook for about 4-5 minutes on each side for medium-rare, depending on the thickness of the steak. Adjust the time if you prefer your steak more or less done.
    • For stovetop: Add a small amount of high-smoke-point oil to the skillet and then add your steaks. Cook for the same amount of time as grilling, flipping once halfway through.

    Let the Steak Rest:

    • Remove the steaks from the grill or skillet and let them rest on a cutting board or plate for about 5-10 minutes. Resting allows the juices to redistribute throughout the steak, ensuring a juicy bite.

    Serve:

    • Serve your steaks with your choice of sides. Classic options include baked potatoes, steamed vegetables, or a crisp salad.
  • Southern Fried Chicken Batter Recipe: A Classic, Crowd-Pleasing Favorite

    Southern Fried Chicken Batter Recipe: A Classic, Crowd-Pleasing Favorite

    Southern fried chicken is a beloved comfort food, known for its crispy, golden crust and juicy, flavorful meat. The secret to this iconic dish lies in the batter, which creates that perfect crunch and irresistible taste. This Southern Fried Chicken Batter recipe is a tried-and-true method that we’ve used for countless dinners, always resulting in rave reviews.

    Southern Fried Chicken is a dish that embodies comfort and tradition. Its crispy, flavorful coating and tender, juicy meat make it a favorite at family gatherings, picnics, and Sunday dinners. This recipe delivers that classic Southern taste and texture, ensuring that every bite is a delightful experience. Enjoy this timeless dish with your favorite sides for a meal that’s sure to please everyone at the table! Here’s how to make it:

    INGREDIENTS:

    • 2 pounds chicken pieces (breasts, thighs, drumsticks, or wings)
    • 2 cups buttermilk
    • 2 cups all-purpose flour
    • 1 tablespoon paprika
    • 1 teaspoon garlic powder
    • 1 teaspoon onion powder
    • 1 teaspoon salt
    • 1/2 teaspoon black pepper
    • 1/2 teaspoon cayenne pepper (optional, for a bit of heat)
    • 1 teaspoon baking powder
    • Vegetable oil, for frying

    INSTRUCTIONS:

    Method:

    1. Marinate the Chicken:
      • Place the chicken pieces in a large bowl or a ziplock bag.
      • Pour the buttermilk over the chicken, ensuring all pieces are well-coated.
      • Cover and refrigerate for at least 2 hours, or overnight for the best flavor and tenderness.
    2. Prepare the Batter:
      • In a large shallow dish, combine the flour, paprika, garlic powder, onion powder, salt, black pepper, cayenne pepper (if using), and baking powder.
      • Mix well to ensure the spices are evenly distributed throughout the flour.
    3. Heat the Oil:
      • Fill a large, heavy-bottomed skillet or Dutch oven with vegetable oil to a depth of about 2 inches.
      • Heat the oil over medium-high heat until it reaches 350°F (175°C). Use a kitchen thermometer to ensure the oil is at the correct temperature for frying.
    4. Coat the Chicken:
      • Remove the chicken pieces from the buttermilk, allowing any excess to drip off.
      • Dredge each piece in the seasoned flour mixture, pressing firmly to ensure a good coating.
      • Place the coated chicken on a wire rack and let it sit for about 10 minutes. This helps the coating adhere better during frying.
    5. Fry the Chicken:
      • Carefully place the chicken pieces into the hot oil, being mindful not to overcrowd the pan. Fry in batches if necessary.
      • Fry the chicken for about 10-12 minutes, turning occasionally, until the coating is golden brown and the chicken is cooked through. The internal temperature should reach 165°F (75°C).
    6. Drain and Serve:
      • Remove the fried chicken from the oil and place it on a wire rack set over a baking sheet to drain excess oil. This keeps the coating crispy.
      • Allow the chicken to rest for a few minutes before serving.

    Tips for Perfect Southern Fried Chicken:

    • Buttermilk Brine: Marinating the chicken in buttermilk tenderizes the meat and adds flavor. For an extra layer of seasoning, add a tablespoon of hot sauce or a few dashes of Worcestershire sauce to the buttermilk.
    • Seasoned Flour: Make sure the flour is well-seasoned to ensure every bite of chicken is flavorful. Adjust the spice levels to your preference.
    • Oil Temperature: Maintaining the oil at the right temperature is crucial. If the oil is too hot, the coating will burn before the chicken cooks through. If it’s too cool, the chicken will absorb more oil and become greasy.
    • Resting Time: Letting the coated chicken rest before frying helps the batter adhere better, resulting in a crispier coating.

    Variations:

    • Spicy Southern Fried Chicken: Increase the cayenne pepper and add a teaspoon of chili powder to the flour mixture for a spicy kick.
    • Herb-Infused Chicken: Add dried herbs like thyme, oregano, or rosemary to the flour mixture for an aromatic twist.
    • Buttermilk Substitute: If you don’t have buttermilk, you can make a substitute by adding 1 tablespoon of lemon juice or vinegar to 1 cup of milk. Let it sit for 5 minutes before using.
  • Savory Cheesesteak Meatloaf

    Savory Cheesesteak Meatloaf

    Ingredients

    • 1 1/2 lb lean ground beef
    • 1 large onion chopped
    • 1 green bell pepper chopped small
    • 1/2 c whole milk
    • 1/2 c mushrooms chopped (optional)
    • 1 tbsp olive oil
    • 1 c bread crumbs regular, Italian style, or panko
    • 1 large egg
    • 1/2 teaspoon salt & 1 teaspoon pepper
    • 1 teaspoon garlic powder
    • 1 teaspoon onion powder
    • 1/2 teaspoon Adobo seasoning
    • 3 tbsp Worcestershire sauce
    • 8 slices of mozzarella or provolone cheese thick cut

    Instructions

    • Preheat Oven: Set your oven to 350°F (175°C).
    • Cook Vegetables: Heat olive oil in a skillet. Over medium heat. Add chopped onions and green peppers. And sauté until they are soft and tender.
    • Mix Ingredients: In a large bowl. Combine the cooked onions and peppers with ground beef, whole milk, mushrooms (if using), bread crumbs, egg, garlic powder, onion powder, Adobo seasoning, salt, pepper, and Worcestershire sauce. Mix well with your hands. Until everything is evenly incorporated.
    • Prepare Loaf Pan: Grease a loaf pan with a little oil. Or non-stick spray. Place half of the meat mixture into the pan. Pressing to form an even layer.
    • Add Cheese: Lay four slices of cheese over the meat layer.
    • Add Remaining Meat: Cover the cheese with the remaining meat mixture. Pressing gently to seal the edges.
    • Bake: Place the loaf pan in the oven. And bake for 30 minutes.
    • Add More Cheese: Remove the pan from the oven. Add the remaining four slices of cheese on top. And return to the oven. Bake for another 10-15 minutes. Or until the cheese is melted. And slightly crispy.
    • Rest and Serve: Let the meatloaf rest. For a few minutes after baking before slicing. This helps the juices settle. And makes the meatloaf easier to cut.
    • Enjoy! Serve warm slices of your delicious cheesesteak meatloaf and enjoy!

    Notes

    If you’re looking to enjoy this Savory Cheesesteak Meatloaf. But need it to be gluten-free. Here’s a simple modification. To keep everything on track. Without compromising taste. Or texture. Substitute the regular bread crumbs. For a gluten-free alternative. Many stores offer gluten-free bread crumbs. That mimics the texture. And binding properties of traditional ones. Additionally, ensure your Worcestershire sauce is labeled gluten-free. As some brands may contain traces of gluten. With these tweaks. You’ll have a delicious, gluten-free meatloaf. That everyone can savor!