Ingredients:
– 2 ripe bananas, sliced
– 1 cup vanilla pudding
– 1 cup whipped cream
– 1/2 cup diced tropical fruits (like mango and pineapple)
– 1 cup ladyfinger cookies or sponge cake pieces
– 1/4 cup shredded coconut (optional)
– Mint leaves for garnish
Directions:
1. Begin by layering half of the ladyfingers or sponge cake at the bottom of a beautiful trifle dish or a large bowl.
2. Next, pour a luscious layer of vanilla pudding over the cake.
3. Now, it’s time to add your sliced bananas and those vibrant diced tropical fruits on top of the pudding.
4. Spread half of the whipped cream over this fruity layer for extra sweetness.
5. Repeat those layers! Start again with the ladyfingers, followed by more pudding, fruits, and finish it off with the remaining whipped cream.
6. For that beachy vibe, sprinkle shredded coconut on top and add some mint leaves for a touch of freshness.
7. Chill in the refrigerator for at least 2 hours before serving, letting all those wonderful flavors meld together.
Enjoy this tropical paradise in a bowl! ![]()
![]()
![]()
Category: Recipes
-

Banana Vanilla Pudding & Tropical Fruit Trifle
-

Just blend BANANA with LEMON
This blend is not just a treat for the taste buds but a smart, nutritious choice that supports a healthy lifestyle without the need to constantly reach for store-bought alternatives.
A Symphony of Flavors and Benefits
The banana and lemon concoction is more than just a delightful mix; it’s a powerhouse of nutrition. Bananas, with their rich supply of potassium, fiber, and natural sugars, offer a quick energy boost while aiding in digestion and heart health. Lemons, bursting with vitamin C, not only invigorate the senses but also enhance immune function, aid in digestion, and contribute to skin health.
The Joy of Homemade Convenience
Creating this magical blend couldn’t be easier. You’ll need one ripe banana and the juice of one fresh lemon. Simply peel the banana, slice it into a blender, squeeze in the lemon juice, and blend until smooth. The result is a refreshing, energizing drink that can serve as a morning wake-up, an afternoon pick-me-up, or a delightful complement to any meal.
But the versatility of this blend extends beyond just a drink. Use it as a dressing for salads, a topping for pancakes or oatmeal, or even as a base for smoothie bowls. The possibilities are as boundless as your creativity, making it a staple in your kitchen repertoire.
Embracing the Homemade Philosophy
In a world where convenience often comes packaged and processed, returning to the basics with homemade solutions like the banana and lemon blend is a refreshing change. It’s about more than just saving money at the market; it’s about taking control of your health, knowing exactly what goes into your body, and embracing the joy of creating something delightful from scratch.
So, the next time you consider reaching for a store-bought sna -

Sausage, Egg, and Cheese Breakfast Roll-Ups
Ingredients:
5 eggs
1 can (8 oz) Pillsbury™ refrigerated crescent dinner rolls
8 sausage links
4 slices Cheddar cheese
Salt and pepper to taste
Instructions:Preheat oven to 350°F (175°C). Beat eggs, reserving 2 tbsp for brushing; scramble the rest.
Unroll dough, separate into 8 triangles. Cut each cheese slice in half; place on each triangle.
Top with scrambled eggs and a sausage link. Loosely roll up, place on an ungreased cookie sheet.
Brush with reserved eggs, sprinkle with salt and pepper.
Bake for 15-18 minutes until golden brown.
Prep Time: 10 mins | Cooking Time: 18 mins | Total Time: 28 mins | Kcal: 250 per roll-up | Servings: 8 -
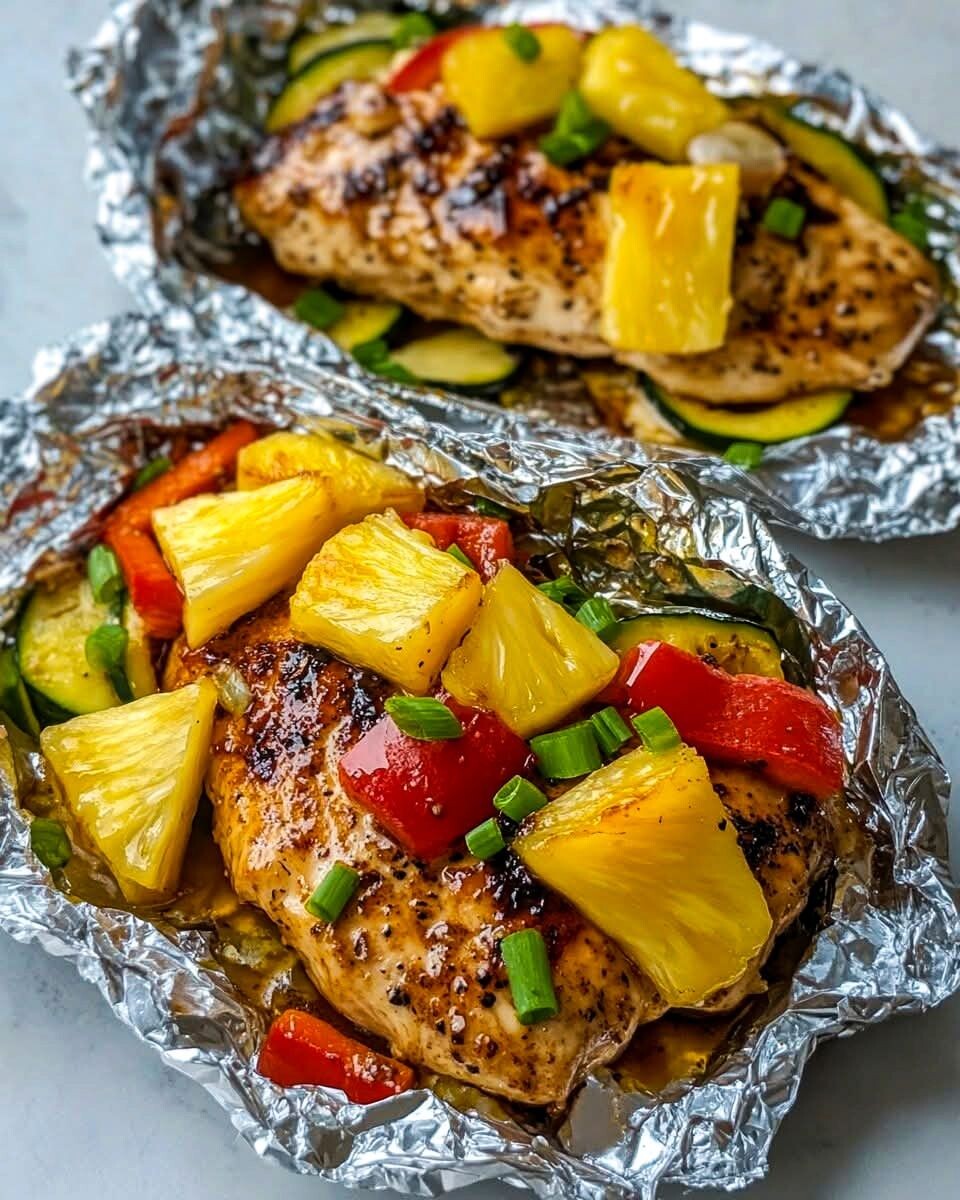
Teriyaki Chicken and Pineapple Foil Packets
Ingredients:
– 2 boneless, skinless chicken breasts
– 1 cup fresh pineapple chunks
– 1/4 cup teriyaki sauce
– 1 tablespoon olive oil
– 1 red bell pepper, sliced
– 1 carrot, thinly sliced
– 1 zucchini, sliced
– 2 green onions, chopped
– Salt and pepper to taste
– Aluminum foil for wrappingInstructions:
1. Preheat your oven to 400°F (200°C).
2. Cut two large pieces of aluminum foil and lay them flat on your countertop.
3. Place each chicken breast in the center of the foil pieces, drizzle with olive oil, and season with salt and pepper.
4. Top each chicken breast with pineapple chunks, bell pepper slices, carrot slices, and zucchini slices.
5. Pour the teriyaki sauce evenly over the chicken and veggies.
6. Fold the sides of the foil over the chicken and vegetables to create a sealed packet.
7. Place the foil packets on a baking sheet and bake in the preheated oven for about 25-30 minutes, or until the chicken is fully cooked and reaches an internal temperature of 165°F (75°C).
8. Carefully open the foil packets, being cautious of the steam. Garnish with chopped green onions before serving.Notes:
Feel free to add your favorite vegetables to the foil packets for extra flavor and nutrition.
You can also cook these packets on a grill instead of in the oven for a delightful smoky taste.
Preparation time: 10 minutes | Cooking time: 30 minutes | Total time: 40 minutes | Kcal: Approximately 350 per serving | Servings: 2 servings -

Homemade Strawberry Ice Cream
Homemade Strawberry Ice Cream
Ingredients:
– 2 cups fresh strawberries, hulled and sliced
– 3/4 cup granulated sugar
– 1 cup heavy cream
– 1 cup milk
– 1 teaspoon vanilla extract
– Pinch of saltDirections:
1. Start by mashing those sweet strawberries in a mixing bowl! Add 1/4 cup of sugar and let them sit for about 30 minutes to really bring out their juicy goodness.
2. While the strawberries are getting all flavorful, whisk together the heavy cream, milk, the rest of the sugar, vanilla extract, and a pinch of salt in a separate bowl. This will create a rich and creamy base for your ice cream.
3. Once the strawberries are ready, stir them into the cream mixture, giving it a nice gentle mix until everything is combined.
4. Now, it’s time for some ice cream magic! Pour your mixture into an ice cream maker and churn it according to the manufacturer’s instructions. You’ll start to see that delicious ice cream come to life!
5. Transfer the churned ice cream into a container and pop it in the freezer for at least 4 hours. Patience is key here; the wait will be worth it! -

Soft Apple Cookies – A Cozy, Classic Treat
Soft Apple Cookies – A Cozy, Classic Treat
These Soft Apple Cookies are tender, moist, and bursting with apple flavor in every bite. With just the right amount of sweetness and a hint of vanilla, these cookies strike the perfect balance between comfort and refreshment. Chunks of fresh apples tucked into a soft butter cookie base make these irresistible any time of year—but especially delightful in fall when apples are at their peak.
Made with basic pantry ingredients, this recipe is a breeze to whip up and delivers a batch of pillowy cookies that are perfect for snacking, sharing, or pairing with your favorite hot drink.
Preparation Time: 15 minutes
Bake Time: 20 minutes
Total Time: 35 minutes
Yield: About 24 cookies
Cuisine: American / Cozy Baked GoodsIngredients
-
-
2 eggs
-
-
-
½ cup (100 g) granulated sugar
-
¼ tsp vanilla extract
-
½ cup (100 g) butter, softened
-
-
-
1 tsp baking powder
-
¼ tsp salt
-
1½ to 2 cups (250–300 g) all-purpose flour
-
-
2 apples, peeled, cored, and diced
-
Powdered sugar (optional, for dusting)
Step-by-Step Cooking Directions
Preheat the oven
Preheat your oven to 350°F (175°C). Line a baking sheet with parchment paper or a silicone mat.Mix wet ingredients
In a large bowl, whisk together the eggs, sugar, and vanilla extract until smooth and slightly pale. Add the softened butter and whisk again until the mixture becomes creamy and well combined.Add dry ingredients
Add baking powder and salt, then begin incorporating the flour in three parts. Start with 1½ cups of flour and mix with a spatula or wooden spoon. If the dough is too sticky, add a little more flour—up to 2 cups total—until you get a soft, scoopable consistency.Add the apples
Peel and core the apples, then dice them into small cubes. Fold the diced apples into the dough, ensuring they’re evenly distributed.Portion the cookies
Use a tablespoon or small cookie scoop to place rounded spoonfuls of dough onto your prepared baking sheet. Leave about 2 inches between cookies, as they will spread slightly.Bake the cookies
Bake for 18–20 minutes or until the cookies are lightly golden at the edges and firm to the touch. Allow them to cool for 5 minutes on the tray, then transfer to a wire rack.Optional dusting
Once the cookies have cooled completely, dust lightly with powdered sugar for a classic bakery finish.Nutritional Information (per cookie, based on 24 cookies)
-
-
Calories: 110
-
-
-
Protein: 2g
-
Carbohydrates: 14g
-
Sugar: 6g
-
-
-
Fat: 5g
-
Saturated Fat: 3g
-
Cholesterol: 20mg
-
-
-
Sodium: 60mg
-
Fiber: 0.8g
-
Vitamin C (from apples): 3% D
-
The Origins and Popularity of the Recipe
Apple-based baked goods have deep roots in American and European home cooking. From pies to crisps to cakes, apples have been a beloved ingredient for centuries. These cookies are a softer, more snackable version of traditional apple desserts. Unlike crunchy cookies, these are cakey and tender, often described as little “apple pillows.”
With the increasing popularity of fall baking and cozy treats, soft apple cookies have surged on food blogs, Pinterest boards, and in family kitchens. They’re ideal for school lunches, quick breakfasts, or after-dinner dessert with a hot cup of tea or cider.
Reasons Why You’ll Love the Recipe
-
-
Soft and cake-like texture that melts in your mouth
-
-
-
Full of real apple chunks in every bite
-
Naturally sweet with subtle spice (add cinnamon if desired)
-
Perfect for fall baking or anytime you’re craving apples
-
-
-
Quick and easy – no need to chill the dough
-
Family-friendly – a great way to use up apples
-
Freezer-friendly – bake ahead and enjoy later
-
Health Benefits
While a treat, these cookies do offer some natural goodness:
-
-
Apples provide fiber, vitamin C, and antioxidants
-
Less sugar than traditional cookies
-
-
-
No artificial preservatives – made fresh in your own kitchen
-
Portion-controlled – each cookie is a satisfying bite-sized snack
-
Eggs and butter provide protein and fat for satiety
-
Serving Suggestions
-
-
Pair with coffee, tea, or hot apple cider
-
-
-
Serve warm with a scoop of vanilla ice cream for an elevated dessert
-
Tuck into school or office lunch boxes as a wholesome snack
-
Add a cream cheese glaze or caramel drizzle for a fancy touch
-
-
Include in a fall cookie platter with molasses cookies, snickerdoodles, and oatmeal raisin
-
Dust with cinnamon sugar for added spice
Cooking Tips
-
-
Use crisp apples like Granny Smith, Honeycrisp, or Fuji for best texture
-
Don’t overmix once you add the flour—gentle folding keeps cookies light
-
-
-
Use room temperature butter for easy mixing
-
Measure flour carefully – too much will make cookies dense
-
Chop apples small and evenly so they cook through without making the dough soggy
-
-
Let cookies cool on the tray briefly before transferring—this prevents breakage
Variations to Try
-
-
Add cinnamon or nutmeg to the dough for warm spice
-
Stir in chopped walnuts or pecans for crunch
-
Mix in dried cranberries or raisins for a festive touch
-
-
-
Swap vanilla extract with maple or almond for a flavor twist
-
Use whole wheat flour for extra fiber and a nuttier flavor
-
Add shredded coconut or oats to create a rustic texture
-
-
Make them mini for bite-sized tea cookies
Conclusion
These Soft Apple Cookies are the definition of home-baked comfort. Moist, sweet, and dotted with tender apple chunks, they’re an easy and rewarding treat to bake from scratch. Whether you’re celebrating the fall harvest, baking for a loved one, or just craving something soft and satisfying, this recipe will become a go-to favorite in your kitchen. So grab those apples, warm up your oven, and bake a batch of cookies that feel like a cozy hug.
-
-
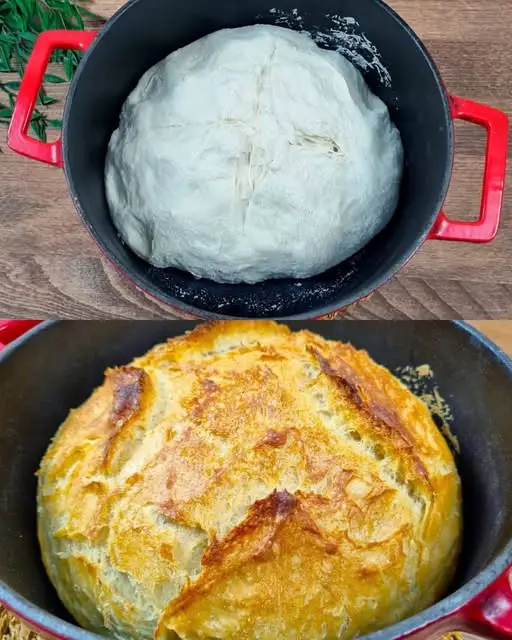
No-Knead Artisan Bread (Crispy Outside, Soft and Airy Inside)
No-Knead Artisan Bread (Crispy Outside, Soft and Airy Inside)
This No-Knead Artisan Bread is the perfect example of how a handful of simple ingredients can yield an impressive, bakery-quality loaf right in your home kitchen. With a crispy golden crust and a light, porous interior, this bread is ideal for everything from sandwiches and soups to brunch boards and gourmet spreads. You don’t need a mixer, kneading skills, or fancy techniques—just a bowl, your hands, and a bit of patience. This recipe relies on a high-hydration dough and a slow fermentation to develop flavor and structure without extensive kneading.
The method mimics the traditional European style of baking, where long fermentation enhances the dough’s complexity and digestibility. With only four core ingredients—flour, water, yeast, and salt—you’ll make a rustic, airy loaf that’s better than anything store-bought. Whether you’re new to bread making or a seasoned baker, this method guarantees delicious results every single time.
Preparation Time: 10 minutes
Resting Time: 2–3 hours (or overnight)
Cook Time: 45 minutes
Total Time: 3 hours 55 minutes
Yield: 1 large round loaf (serves 8)
Cuisine: Traditional European-style artisan breadA full list of ingredients
-
-
370 ml (12.5 oz / 1.5 cups) warm water (around 38°C / 100°F)
-
-
-
10 g (1 tablespoon) active dry yeast
-
500 g (17.6 oz / 4 cups) bread flour
-
8 g (1 teaspoon) salt
-
Step-by-step cooking directions
-
-
Activate the yeast
-
-
In a large mixing bowl, pour in the warm water.
-
Add the dry yeast and whisk lightly until dissolved. Let sit for 5–10 minutes until foamy, indicating the yeast is active.
-
-
-
Mix the dough
-
-
Add the bread flour and salt to the yeast mixture.
-
Stir with a wooden spoon, spatula, or your hands until a shaggy dough forms.
-
-
Scrape the sides of the bowl to gather the dough into a rough ball. It will be sticky and slightly wet—that’s perfect.
-
-
-
-
Let the dough rise (bulk fermentation)
-
-
Cover the bowl with plastic wrap or a damp towel.
-
-
Let it rest at room temperature (20–25°C or 68–77°F) for 2–3 hours, or until doubled in size and bubbly.
-
For more flavor, you can ferment it in the refrigerator overnight and bake it the next day.
-
-
-
-
Generously flour a clean surface and your hands.
-
Transfer the dough from the bowl to the floured surface using a spatula.
-
Gently fold the dough over itself a few times to form a loose ball. Avoid over-handling it.
-
Shape the dough
-
-
Shape it into a round loaf using your hands, tucking the sides underneath to create surface tension.
-
-
-
-
Rest the dough before baking
-
-
Cover the shaped dough with a clean kitchen towel and let it rest for 15–30 minutes while you preheat your oven.
-
-
-
Preheat the oven and baking vessel
-
-
Place a cast iron Dutch oven (or an enamel, ceramic, or Pyrex pot with a lid) into your oven.
-
Preheat the oven to 220°C (428°F) with the pot inside for at least 30 minutes. This ensures a super hot surface for your bread to rise instantly when baked.
-
-
-
Transfer the dough to the pot
-
-
Carefully remove the hot pot from the oven using oven mitts.
-
Dust the bottom lightly with flour or place parchment paper inside.
-
-
Transfer the dough ball into the pot (don’t worry if it looks imperfect).
-
Score the top with a sharp knife or razor to help it expand in the oven.
-
-
Bake
-
-
Spray or sprinkle a little water on the dough for a crispier crust.
-
Cover with the lid and bake for 30 minutes.
-
Remove the lid and continue baking for 15–20 minutes until golden brown and crusty.
-
-
-
Cool and serve
-
-
Remove the bread and transfer it to a wire rack.
-
Let it cool completely before slicing to avoid a gummy interior.
-
-
Enjoy fresh, toasted, or however you love your bread!
-
-
Nutritional information (per slice, assuming 8 slices)
Calories: 180
Carbohydrates: 35 g
Protein: 6 g
Fat: 0.5 g
Fiber: 2 g
Sodium: 250 mgThe origins and popularity of the recipe
Artisan-style, no-knead bread became a culinary phenomenon thanks to Jim Lahey’s influential method popularized in The New York Times in the early 2000s. But this style of breadmaking dates back centuries in Europe, where natural fermentation and high-hydration doughs were the standard before industrial techniques simplified bread into something bland and uniform.Today, artisan bread has seen a massive revival as home bakers look for better texture, flavor, and control over their ingredients. The no-knead method fits perfectly into modern lifestyles, requiring little hands-on time while delivering maximum results. Whether rustic boules in France or Italian pane casereccio, this humble method echoes global baking traditions.
Reasons why you’ll love the recipe
-
-
No special equipment needed
-
-
-
No kneading—just mix and rest
-
Crispy artisan-style crust with soft, airy crumb
-
Simple pantry ingredients
-
-
-
Impresses guests without fuss
-
Customizable with add-ins like olives, herbs, garlic, or cheese
-
Naturally vega
-
Health benefits
-
-
Slow fermentation enhances digestibility
-
-
-
Lower gluten formation may ease digestion for some
-
Rich in complex carbohydrates for steady energy
-
Sodium is easily adjustable
-
-
Can be enriched with whole grains or seeds for fiber and minerals
Serving suggestions
-
-
Serve warm with butter, olive oil, or herbed cream cheese
-
Use as the base for avocado toast or breakfast sandwiches
-
Slice thick for dipping into soups and stews
-
-
-
Make next-level grilled cheese or crostini
-
Toast and top with smoked salmon, ricotta, or hummus
-
Cube and roast for croutons in salads
-
Cooking tips
-
-
Use a scale for accuracy if possible—especially with flour
-
-
-
Always let your bread cool before slicing to avoid a dense interior
-
Flour your hands and surface generously to prevent sticking
-
Experiment with overnight proofing in the fridge for more depth of flavor
-
-
If you don’t have a Dutch oven, use a heavy baking tray with an inverted bowl or tented foil
Variations to try
-
-
Herbed bread: Add 1 tablespoon of dried herbs like rosemary or thyme to the dough
-
Cheddar jalapeño loaf: Mix in 1 cup shredded cheddar and 1 chopped jalapeño
-
Garlic parmesan: Add roasted garlic cloves and a dusting of parmesan before baking
-
-
-
Whole wheat version: Swap 100–150g of bread flour for whole wheat
-
Seed crusted bread: Roll the shaped dough in sesame, poppy, or flax seeds before baking
-
Olive and sun-dried tomato: Stir in chopped kalamata olives and sun-dried tomatoe
-
Conclusion
No-Knead Artisan Bread is the definition of “easy does it.” With minimal ingredients, simple steps, and zero kneading, this recipe opens the door for anyone—no matter their baking level—to enjoy homemade, crusty, bakery-style bread. It’s a low-effort, high-reward method that gives you delicious results every single time. Whether you’re eating it plain or building gourmet sandwiches, this bread elevates your meal and your confidence in the kitchen.It’s also a great introduction to baking for kids and families, offering a tangible, tasty way to bond over food. You don’t need experience, expensive ingredients, or fancy tools. Just a bowl, a spoon, and your oven. Try it once, and you’ll never go back to store-bought again.
-
-
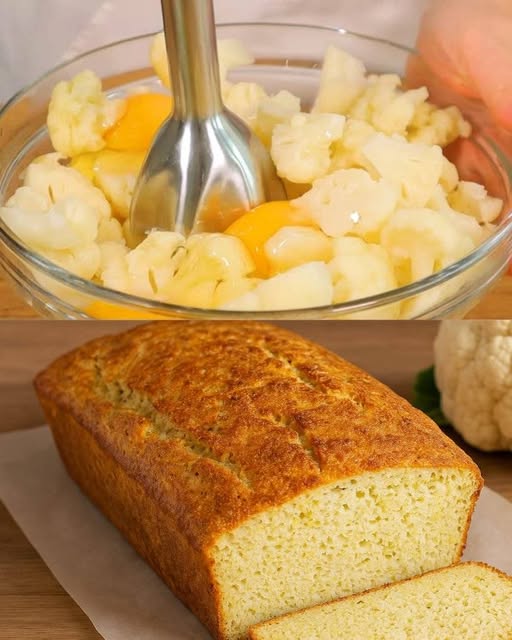
Cauliflower Almond Flour Bread: A Fluffy, Low-Carb Delight
Cauliflower Almond Flour Bread: A Fluffy, Low-Carb Delight
This Cauliflower Almond Flour Bread is the perfect low-carb, gluten-free solution for bread lovers looking to stay healthy without compromising on taste. With its soft, airy texture and mild nutty flavor, this bread makes a delicious base for sandwiches, a side to your soups, or even a breakfast toast. It’s protein-rich, high in fiber, and nutrient-dense—perfect for keto, paleo, and gluten-free diets.
This bread is ideal for meal prep, freezes beautifully, and provides a satisfying, bread-like texture while staying light and wholesome. Whether you’re looking to cut back on carbs, eat more veggies, or simply explore alternative bread options, this cauliflower almond flour bread is a must-try!
Preparation Time: 25 minutes
Cook Time: 50 minutes
Total Time: 1 hour 15 minutes
Yield: One 8×4-inch loaf (12 slices)
Cuisine: Gluten-Free / Low-Carb / Keto-FriendlyIngredients
For the Bread:
-
-
3 cups finely riced cauliflower (fresh or frozen and thawed)
-
6 large eggs, separated
-
6 tablespoons canola oil (substitute olive oil for paleo or keto)
-
-
-
1 ¼ cup superfine almond flour
-
1 tablespoon baking powder
-
1 teaspoon salt
-
Step-by-Step Directions
1. Preheat the Oven
Start by preheating your oven to 350°F (175°C).
Line an 8×4-inch loaf pan with parchment paper for easy removal after baking.2. Prepare the Cauliflower
Place the riced cauliflower in a microwave-safe bowl.
Microwave for 3-4 minutes or until tender and cooked through.
Let it cool completely.
Place small amounts of the cauliflower into a clean tea towel or cheesecloth and squeeze out as much water as possible. This step is crucial to avoid soggy bread.
Repeat until all moisture is removed.3. Beat the Egg Whites
Separate the eggs into yolks and whites.
Place the egg whites into a large clean mixing bowl.
Using a hand mixer or stand mixer, beat the egg whites on high speed until stiff peaks form (about 3–5 minutes).
Set aside.4. Mix the Batter Base
In another bowl, mix the egg yolks, canola or olive oil, almond flour, baking powder, and salt until a thick paste forms.
Fold in the prepared cauliflower, ensuring it’s evenly mixed into the batter.5. Fold in Egg Whites
Add ¼ of the stiff egg whites into the cauliflower-almond mixture.
Gently fold with a spatula—do not stir harshly, as you want to preserve the air in the batter.
Repeat until all egg whites are incorporated.
The final mixture should be light, pale, and fluffy.6. Transfer and Bake
Pour the batter into the lined loaf pan.
Smooth the top with a spatula.
Place in the oven and bake for 45–50 minutes, or until a toothpick inserted into the center comes out clean and the top is golden brown.7. Cool and Slice
Let the bread cool in the pan for 10 minutes, then transfer it to a wire rack.
Cool completely before slicing to maintain its structure.Nutritional Information (Per Slice, 12 Slices Total)
-
-
Calories: 135
-
-
-
Protein: 6g
-
Fat: 11g
-
Carbohydrates: 4g
-
-
-
Fiber: 2g
-
Sugar: 1g
-
Net Carbs: 2g
-
-
Cholesterol: 105mg
-
Sodium: 180mg
The Origins and Popularity of Cauliflower Bread
Cauliflower has taken the culinary world by storm over the past decade. Popularized in low-carb and gluten-free communities, cauliflower serves as a clever and nutritious substitute for starches like rice, potatoes, and even bread. Almond flour, traditionally used in European patisserie, adds richness and nutrition to the bread.
With the rise of keto and paleo diets, innovative cooks began blending riced cauliflower with nut-based flours to recreate bread’s satisfying texture. This specific combination has become a staple in health-conscious kitchens worldwide.
Reasons Why You’ll Love This Recipe
-
-
Low in Carbs, High in Satisfaction: Just 2g net carbs per slice.
-
Versatile: Works for sandwiches, breakfast toast, or as a dinner side.
-
Meal-Prep Friendly: Make once, enjoy all week.
-
-
Easy to Make: No kneading or yeast required.
-
Kid-Approved: Soft and mild in flavor—great for picky eaters.
Health Benefits
-
-
Cauliflower is high in fiber, antioxidants, vitamin C, and folate.
-
-
-
Almond Flour is rich in vitamin E, magnesium, and healthy fats.
-
Eggs provide complete protein and choline, supporting brain function.
-
Olive Oil (if used) contributes heart-healthy monounsaturated fats.
-
-
Naturally gluten-free, grain-free, and low-glycemic.
Serving Suggestions
-
-
Toast it and top with avocado, poached eggs, or nut butter.
-
Make sandwiches with turkey, lettuce, and hummus.
-
- Serve alongside soups, chili, or salads.
-
-
Top with cream cheese and herbs for a savory snack.
-
Use it as a base for mini pizzas with marinara and cheese.
-
Cooking Tips
-
-
Don’t skip the squeezing step. Removing moisture from the cauliflower is crucial.
-
Use superfine almond flour for the best texture—coarse almond meal may create a gritty result.
-
Beat the egg whites properly. This gives the bread its lift and lightness.
-
-
If the top is browning too fast, tent it with foil during the last 10 minutes of baking.
-
Cool completely before slicing—warm slices may crumble.
-
-
Herb Cauliflower Bread: Add chopped rosemary, thyme, or oregano to the batter.
-
-
-
Cheesy Cauliflower Bread: Fold in ½ cup shredded cheddar or parmesan.
-
Spicy Version: Add a dash of chili flakes or cayenne for a kick.
-
Sweet Version: Omit garlic/savory spices and add cinnamon, nutmeg, and a touch of stevia or honey.
-
-
Zucchini Add-In: Swap half the cauliflower for shredded and drained zucchini.
Conclusion
This Cauliflower Almond Flour Bread is more than just a bread alternative—it’s a delicious way to enjoy your favorite foods while sticking to your health goals. With its light and fluffy crumb, beautiful golden crust, and subtle nutty flavor, it’s a versatile addition to any meal.
Easy to make and endlessly adaptable, this loaf proves you don’t need gluten or grains to enjoy a great slice of bread. Keep it on hand for meal prep, toast it up for breakfast, or use it to wow your guests at brunch. Once you try this, traditional bread might just take a back seat
-
-

Oven-Baked BBQ Chicken
Ingredients
4 lbs chicken pieces (drumsticks, thighs, or breasts)
1 cup BBQ sauce (store-bought or homemade)
2 tbsp olive oil
1 tbsp smoked paprika
1 tsp garlic powder
1 tsp onion powder
½ tsp salt
½ tsp black pepper
1 tbsp brown sugar (optional, for extra caramelization)
Fresh cilantro or parsley (garnish)
Instructions
Prep: Preheat oven to 400°F (200°C). Line a baking sheet with foil or parchment.
Season: Toss chicken with olive oil, paprika, garlic powder, onion powder, salt, and pepper. Arrange skin-side up.
Bake: 35 mins. Brush with BBQ sauce, then bake 10-15 mins more until internal temp reaches 165°F (74°C).
Broil (optional): 2-3 mins -

✨ Cookies & Cream Ice Cream Sundae
An easy, creamy, crunchy dessert that combines classic Cookies & Cream ice cream with irresistible toppings! Ideal to pamper yourself anytime.

 Prep Time: 10 min |
  Servings: 2 |
  Calories: 450 per serving
 Ingredients:
 2 cups of cookies and cream ice cream
 6 stuffed chocolate cookies (crushed)
 1⁄4 cup chocolate sauce
 2 tablespoons of liquid caramel
 1⁄4 cup mini chocolate chips
 1⁄2 cup whipped cream
 2 Moroccan cherries (for decoration)
 Instrucciones:
 Prepare the glasses: Place a little chocolate and caramel sauce at the bottom of each glass or glass.

 Add the Ice Cream: Add a large scoop of ice cream to each cup.

 Crispy Toppings: Sprinkle crushed cookies and mini chocolate chips over ice cream.

 Extra Layers: Repeat with more ice cream and more toppings.
 Finish with Cherry Whipped Cream: Decorate with whipped cream, an extra touch of chocolate sauce, and a cherry on top.

 Serve and Enjoy: Ready to Savour this Heavenly Sundae!
 Chef’s Tips:
 Swap cookies for brownies or cake pieces for more texture.
 Add caramelized nuts for an extra crunch touch.
 Serve in frozen glasses to keep ice cream cold longer.
-
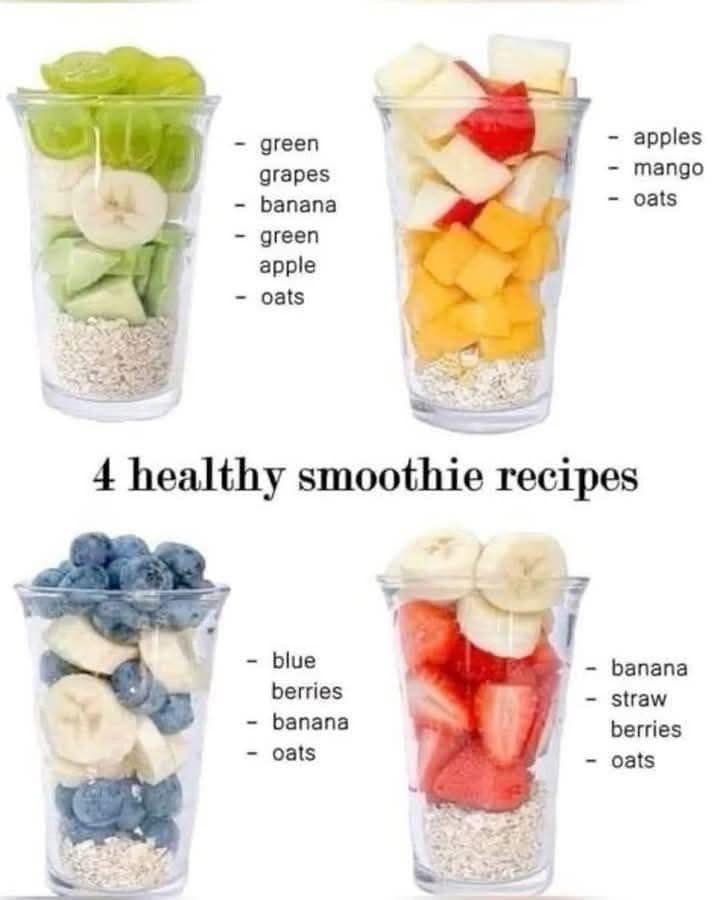
4 Smoothies to enjoy with different kind of nuts.
Recipes

Avocado Almond:
1 banana
1 avocado
1/4 cup almond nuts
1 cup milk
Ice cubes
Strawberry Walnuts:
1 banana
1 cup strawberry
1/4 cup walnuts
1 tablespoon vanilla yogurt
1 cup almond milk
Ice cubes
Mango Pistachio:
1 banana
1 mango
1/4 cup pistachio
1 cup almond milk
Ice cubes
Blueberry Cashew:
1 banana
1/2 cup blueberries
1/2 cup pineapple
1/4 cup cashews
1 cup almond milk
Ice cubes -

Carrot, Lemon and Apple Juice Recipe
Carrot, Lemon and Apple Juice Recipe
Ingredients
1 medium carrot
1 apple (red or green your preferred)
Juice of 1 lemon
200 ml of cold water
Preparation
Wash the carrots and the apples well. Cut them both into pieces.
In a blender, add the carrot, an apple, lemon juice and water.
Beat everything until it becomes homogeneous.
Cook if you wish and serve fresh. -
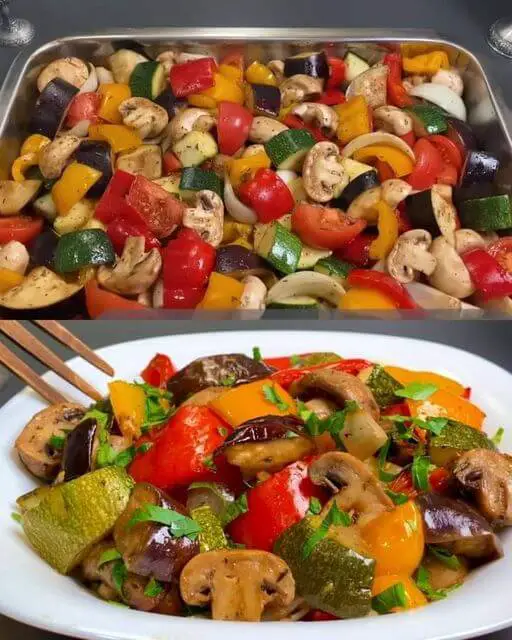
Roasted Vegetable Medley with Aubergine
Roasted Vegetable Medley with Aubergine
Ingredients
-
- 1 aubergine, chopped
- 1 zucchini, chopped
-
- 2 paprikas, chopped
- 300 grams mushrooms, chopped
- 2 onions, chopped
-
- 3 tomatoes, chopped
- 6 cloves garlic, minced
- 50 ml vegetable oil
-
- 50 ml soy sauce
- 1 tablespoon Provencal herbs
- 1 tablespoon sugar
-
- 1 tablespoon balsamic vinegar
- 0.5-1 teaspoon salt
- Fresh parsley for garnish
Directions
- Prepare the Vegetables:
-
- Preheat your oven to 180°C (350°F).
- Wash and chop the aubergine, zucchini, paprikas, mushrooms, onions, and tomatoes into bite-sized pieces.
- Peel and mince the garlic cloves.
-
- Season the Vegetables:
-
- In a large bowl, combine the chopped vegetables and minced garlic.
- In a separate bowl, mix the vegetable oil, soy sauce, Provencal herbs, sugar, balsamic vinegar, and salt.
- Pour the seasoning mixture over the vegetables and toss well to coat evenly.
-
- Bake the Vegetables:
-
- Transfer the seasoned vegetables to a baking dish or a baking tray lined with parchment paper.
- Bake in the preheated oven for 60 minutes, stirring halfway through, until the vegetables are tender and slightly caramelized.
-
- Serve:
-
- Garnish the roasted vegetables with fresh parsley before serving.
- Bon appétit!
-
Serving Suggestions
-
- Side Dish: Serve as a side dish with grilled meats or fish.
- Main Course: Enjoy as a main course with a side of crusty bread or rice.
Cooking Tips
-
- Cheese Option: For an extra layer of flavor, sprinkle some grated cheese over the vegetables during the last 10 minutes of baking.
- Garlic Adjustment: Adjust the amount of garlic according to your preference for a more or less intense flavor.
Nutritional Benefits
- Rich in Nutrients: This dish is rich in vitamins, minerals, and antioxidants from the variety of vegetables.
- Low-Calorie: It’s a low-calorie and nutrient-dense option that fits well into a balanced diet.
Dietary Information
-
- Vegan and Gluten-Free: This recipe is vegan and gluten-free.
- Lower Sodium: To reduce sodium, use a low-sodium soy sauce.
Storage
-
- Leftovers: Store any leftovers in an airtight container in the refrigerator for up to 3 days.
- Reheating: Reheat in the oven or microwave before serving.
Why You’ll Love This Recipe
- Simple and Delicious: It’s a simple yet delicious way to enjoy a variety of vegetables.
- Flavor Enhancement: The seasoning enhances the natural flavors of the vegetables.
- Versatile: It’s easy to prepare and perfect for both everyday meals and special occasions.
-
-
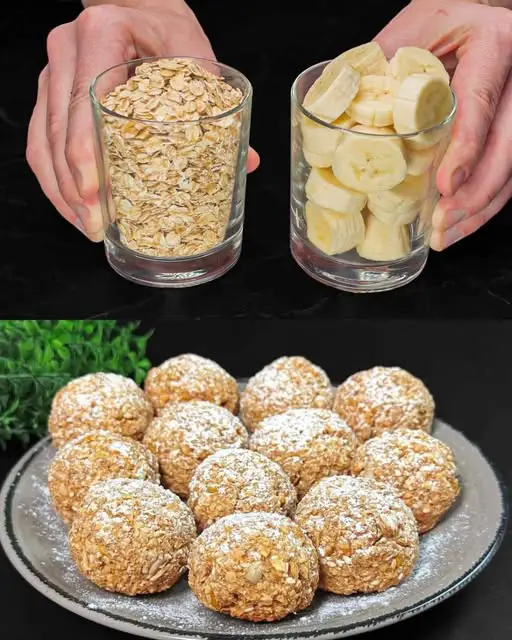
Baked Oatmeal with Nuts, Seeds, and Fruits
Baked Oatmeal with Nuts, Seeds, and Fruits
Today, we’re making a nutritious and delicious Baked Oatmeal with Nuts, Seeds, and Fruits. This recipe combines the hearty goodness of oatmeal with the crunch of nuts and seeds, and the natural sweetness of apple and banana. Perfect for breakfast or a healthy snack, this baked oatmeal is easy to prepare and absolutely delightful. Let’s get started!
Preparation Time
-
- Preparation Time: 10 minutes
- Cooking Time: 30 minutes
- Total Time: 40 minutes
Ingredients
-
- 1 cup oatmeal
- 1/2 cup nuts, chopped (your choice of walnuts, almonds, pecans, etc.)
-
- 1 tablespoon sweetener (honey, maple syrup, or stevia)
- 1 tablespoon sesame seeds
- 1 tablespoon sunflower seeds
-
- 1/4 teaspoon cinnamon
- 1 apple, peeled and chopped
- 1 banana, mashed
- 1/2 cup oatmeal (additional)
Directions
Preparing the Mixture:
-
- Preheat the Oven:
- Preheat your oven to 180°C (360°F).
- Preheat the Oven:
-
- Combine Dry Ingredients:
- In a large mixing bowl, combine 1 cup of oatmeal, 1/2 cup of chopped nuts, 1 tablespoon of sesame seeds, 1 tablespoon of sunflower seeds, and 1/4 teaspoon of cinnamon. Mix well.
- Prepare the Fruits:
-
- Peel and chop the apple into small pieces.
- In a separate bowl, mash the banana with a fork.
-
- Combine Wet and Dry Ingredients:
-
- Add the chopped apple and mashed banana to the dry ingredients.
- Add the 1 tablespoon of sweetener and mix everything thoroughly.
- Add the additional 1/2 cup of oatmeal to help bind the mixture.
-
- Combine Dry Ingredients:
Baking the Oatmeal:
- Prepare the Baking Dish:
- Lightly grease a baking dish with a bit of oil or line it with parchment paper.
- Bake the Oatmeal:
-
- Pour the mixture into the prepared baking dish and spread it out evenly.
- Bake in the preheated oven for 30 minutes, or until the top is golden brown and the mixture is set.
-
Serving:
- Serve the Baked Oatmeal:
-
- Allow the baked oatmeal to cool slightly before slicing it into squares or bars.
- Serve warm or at room temperature.
-
Serving Suggestions
-
- Enjoy the baked oatmeal on its own or with a dollop of yogurt.
- Drizzle with honey or maple syrup for added sweetness if desired.
Cooking Tips
-
- Ensure the banana is ripe for optimal sweetness and easier mashing.
- You can add other seeds or nuts according to your preference.
Nutritional Benefits
- This baked oatmeal is packed with fiber from the oats, apple, and banana.
- Nuts and seeds add healthy fats and protein, making this a nutritious start to your day.
Dietary Information
-
- This recipe is naturally dairy-free and can be made gluten-free by using certified gluten-free oats.
- It’s also vegan-friendly, making it suitable for various dietary needs.
Storage Tips
-
- Store any leftovers in an airtight container at room temperature for up to 3 days.
- For longer storage, keep in the refrigerator for up to a week.
Why You’ll Love This Recipe
-
- This baked oatmeal is a nutritious and delicious way to enjoy a wholesome breakfast or snack.
- It’s easy to prepare and can be customized with your favorite nuts and seeds.
- Perfect for meal prep, it makes a great grab-and-go option for busy mornings.
Conclusion
Thank you for joining me in making this delicious Baked Oatmeal with Nuts, Seeds, and Fruits. This recipe is a wonderful way to start your day with a nutritious and satisfying meal. Enjoy this baked oatmeal with your family and friends for a healthy and tasty treat.
-
-
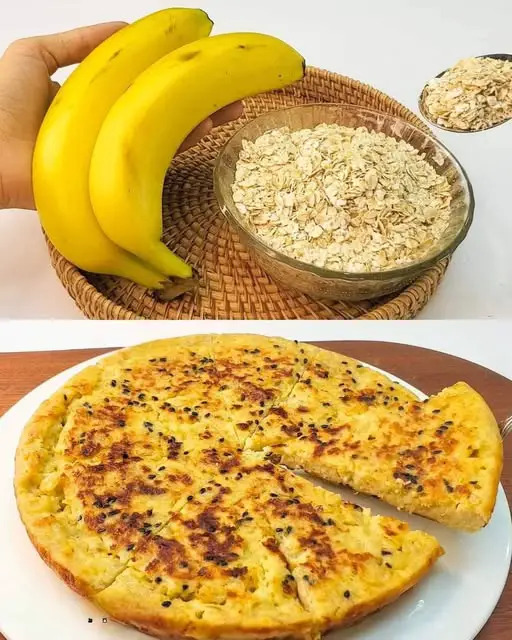
Oatmeal Banana Pancakes
Oatmeal Banana Pancakes
These Oatmeal Banana Pancakes are a perfect breakfast option, combining the nutritious benefits of oats, eggs, and bananas. Quick to make and delicious, this recipe is ideal for a healthy start to your day. Packed with vitamins and fiber, these pancakes can help you feel fuller longer and may aid in weight loss.
Preparation Time:
-
- Prep Time: 10 minutes
- Cooking Time: 15 minutes
- Total Time: 25 minutes
Ingredients:
-
- 1 cup oats (80 grams)
- 2 eggs
- 1 cup warm milk or plant milk (200 ml)
-
- 1 banana
- 50g cheese (optional)
- 1/2 teaspoon salt
- Olive oil
- Black sesame seeds
Directions:
-
- Prepare the Oat Mixture:
- In a bowl, combine 1 cup of oats and 1 cup of warm milk. Let it sit for a few minutes to soften the oats.
- Add 2 eggs to the oat mixture and mix well.
- Prepare the Oat Mixture:
-
- Add the Banana:
- Mash 1 banana and add it to the oat and milk mixture. Bananas are rich in vitamins A, B, C, and E, and help maintain good health while keeping you full longer.
- Mix well to combine.
- Add the Banana:
-
- Add the Cheese and Seasoning:
- If you like, add 50g of cheese to the mixture. If you prefer a dairy-free option or don’t like cheese, you can skip this step.
- Add 1/2 teaspoon of salt and mix well.
- Add the Cheese and Seasoning:
- Cook the Pancakes:
-
- Heat a small amount of olive oil in a non-stick frying pan over low heat.
- Pour a portion of the mixture into the pan and sprinkle with black sesame seeds.
- Cover the pan with a lid and fry over low heat until the bottom is golden brown.
- Carefully turn the pancake over using a plate or spatula, and cook until the other side is also golden brown.
-
- Serve:
-
- Once cooked, remove the pancake from the pan and repeat the process with the remaining batter.
- Serve warm, and enjoy your meal!
-
Serving Suggestions: These pancakes are delicious on their own or topped with fresh fruit, yogurt, or a drizzle of honey. They make a great breakfast or snack.
Cooking Tips:
-
- For added flavor, you can add a pinch of cinnamon or vanilla extract to the batter.
- Make sure to cook the pancakes over low heat to ensure they cook through without burning.
Nutritional Benefits:
-
- Oats are a great source of fiber and help in maintaining a healthy digestive system.
- Bananas provide essential vitamins and minerals and help you feel full longer.
- Eggs add protein and important nutrients, making these pancakes a balanced meal.
Dietary Information:
-
- This recipe can be made gluten-free by using certified gluten-free oats.
- For a dairy-free option, use plant-based milk and omit the cheese.
Storage:
-
- Store any leftover pancakes in an airtight container in the refrigerator for up to 3 days.
- Reheat in a pan or microwave before serving.
Why You’ll Love This Recipe:
-
- Quick and easy to prepare.
-
- Nutritious and filling, perfect for a healthy breakfast.
- Versatile and can be customized with your favorite ingredients.
- Deliciously light and fluffy pancakes that everyone will love.
Conclusion: These Oatmeal Banana Pancakes are a fantastic way to start your day with a nutritious and delicious meal. If you like this recipe, please let me know in the comments and share it on social networks. Enjoy your meal and have a nice day!
-
