Category: Recipes

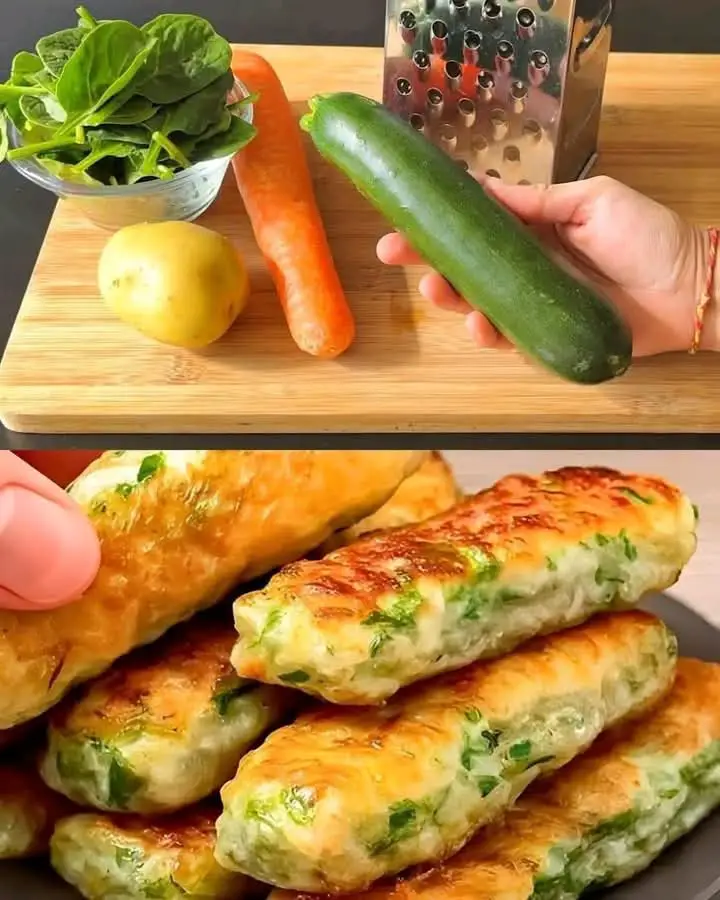
  • Mediterranean Zucchini Veggie Sticks

    Mediterranean Zucchini Veggie Sticks

    Mediterranean Zucchini Veggie Sticks


    Ingredients:


    • 1 medium zucchini (grated)
    • 1 medium potato (grated)
    • 1 small carrot (grated)
    • 1 cup fresh spinach (chopped)
    • 100 grams feta cheese (or grated mozzarella for a milder taste)
    • 2 cloves garlic (minced)
    • 2 tbsp fresh parsley (chopped)
    • 1 egg
    • 2 tbsp olive oil (plus more for pan frying)
    • ½ tsp dried oregano
    • Salt and ground black pepper to taste
    • 2–3 tbsp flour or breadcrumbs (for binding)
    • Optional: a pinch of chili flakes or sumac for Mediterranean kick

    Instructions:


    1. Prep the veggies:


    Grate the zucchini, potato, and carrot.


    Squeeze out excess moisture from grated vegetables using a clean cloth or paper towel.


    Chop spinach and parsley.


    2. Mix the batter:


    In a bowl, combine all grated veggies, chopped spinach, parsley, garlic, and cheese.


    Add egg, olive oil, oregano, salt, pepper, and flour/breadcrumbs.


    Mix until it becomes a thick, sticky dough.


    3. Shape the sticks:


    Take spoonfuls of the mixture and shape them into small logs or patties.


    4. Cook:


    Heat olive oil in a nonstick pan over medium heat.


    Fry the sticks for 2–3 minutes on each side until golden brown and crispy.


    5. Serve:


    Enjoy warm with a side of tzatziki sauce or hummus for a true Mediterranean touch.

  • Mediterranean Spinach Quiche

    Mediterranean Spinach Quiche

    Mediterranean Spinach Quiche


    Ingredients:


    • For the Crust (or use store-bought pie crust):
    • 1 ¼ cups (150 g) all-purpose flour
    • 100 g (7 tbsp) cold unsalted butter, cut into cubes
    • 1 egg yolk
    • 1–2 tbsp cold water
    • Pinch of salt

    For the Filling:


    • 200 g (7 oz) fresh spinach (or thawed frozen spinach, squeezed dry)
    • 1 small red or yellow onion, finely chopped
    • 2 cloves garlic, minced
    • 4 large eggs
    • ¾ cup (180 ml) heavy cream
    • ½ cup (120 ml) milk
    • 100 g (about ¾ cup) crumbled feta cheese (or mix with grated mozzarella)
    • 1 tbsp extra virgin olive oil
    • ½ tsp dried oregano
    • ¼ tsp ground black pepper
    • Optional: 6–8 cherry tomatoes (halved) and a few kalamata olives for topping


    Instructions:


    1. Prepare the crust:


    In a bowl, mix flour and salt.


    Add cold butter and rub with your fingertips until the mixture resembles coarse crumbs.


    Add egg yolk and just enough cold water to form a dough.


    Wrap and refrigerate for 20–30 minutes.


    Roll out the dough and press it into a greased 9-inch (23 cm) tart pan. Prick the bottom with a fork.


    Pre-bake at 180°C (350°F) for 10 minutes.


    2. Make the filling:


    Heat olive oil in a pan. Sauté onion until translucent.


    Add garlic, cook for 1 minute, then stir in spinach. Cook until wilted (or warm if using thawed spinach). Let cool slightly.


    In a bowl, whisk eggs, cream, milk, oregano, and pepper.


    Stir in crumbled feta and spinach mixture.


    3. Assemble the quiche:


    Pour filling into the pre-baked crust.


    Optional: Top with cherry tomato halves and olives for that Mediterranean look and taste.


    Bake at 180°C (350°F) for 35–40 minutes, or until the center is set and top is golden.


    4. Serve:


    Let cool for 10 minutes before slicing. Serve warm or at room temperature.

  • Wholesome Bliss: Protein-Packed Broccoli Cheddar Soup

    Wholesome Bliss: Protein-Packed Broccoli Cheddar Soup

    Wholesome Bliss: Protein-Packed Broccoli Cheddar Soup


    Dive into this velvety soup that harmonizes rich flavors with nourishing ingredients. It’s a delightful way to savor your greens while boosting your protein intake!


    INGREDIENTS:


    • – 2 cups fresh broccoli florets
    • – 1 cup low-sodium vegetable broth
    • – 1 cup unsweetened almond milk
    • – 1 cup shredded low-fat cheddar cheese
    • – 1 cup cooked, shredded chicken breast (optional for extra protein)
    • – 1 small onion, diced
    • – 2 cloves garlic, minced
    • – 1 tablespoon olive oil
    • – Salt and pepper to taste
    • – 1 teaspoon paprika (optional)

    INSTRUCTIONS:


    1. In a large pot, warm the olive oil over medium heat. Add the diced onion and minced garlic, sautéing until they turn translucent.


    2. Incorporate the broccoli florets and vegetable broth into the pot. Bring to a boil, then lower the heat and let it simmer until the broccoli is tender, about 5-7 minutes.


    3. Blend the soup using an immersion blender until smooth. For a chunkier texture, blend only half of the mixture.


    4. Mix in the almond milk and shredded cheddar cheese, stirring until melted and fully combined. If desired, add the shredded chicken for an additional protein boost.


    5. Season with salt, pepper, and paprika to your liking. Serve warm and relish this healthy, protein-rich delight!

  • Cream Cheese & Bacon Stufted Doritos Chicken✨️

    Cream Cheese & Bacon Stufted Doritos Chicken✨️

    Cream Cheese & Bacon Stufted Doritos Chicken✨️


    Ingredients

    • 4 boneless, skinless chicken breasts
    • Salt and pepper, to taste
    • 4 ounces cream cheese, softened
    • 1/2 cup shredded cheddar cheese
    • 4 slices bacon, cooked and crumbled
    • 1 cup crushed Doritos chips
    • 2 eggs, beaten
    • 1 tablespoon olive oil


    Directions

    Preheat the oven to 375°F (190°C). Grease a baking dish with olive oil.

    Using a sharp knife, carefully butterfly each chicken breast, creating a pocket without cutting all the way through.

    Season the inside of each chicken breast with salt and pepper.

    In a mixing bowl, combine the softened cream cheese, shredded cheddar cheese, and crumbled bacon.

    Stuff each chicken breast with the cream cheese mixture, then press the edges to seal.

    Dip each stuffed chicken breast into the beaten eggs, then coat with crushed Doritos chips, pressing gently to adhere.

    Place the coated chicken breasts in the prepared baking dish.

    Bake in the preheated oven for 25-30 minutes, or until the chicken is cooked through and the coating is golden and crispy.

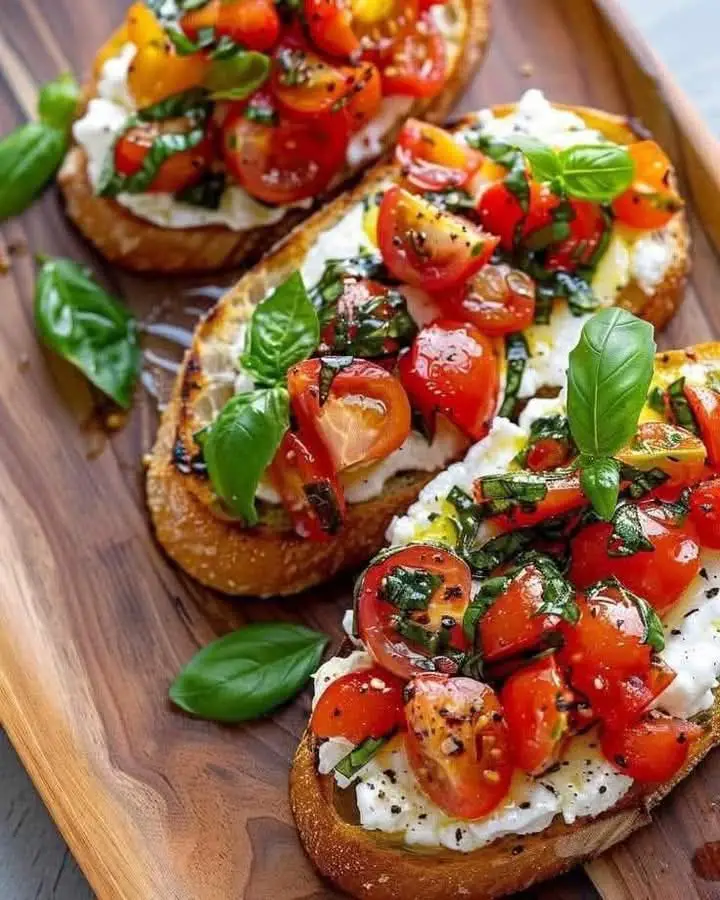
  • Burrata Bruschetta recipe—super fresh, super Mediterranean!

    Burrata Bruschetta recipe—super fresh, super Mediterranean!

    Burrata Bruschetta recipe—super fresh, super Mediterranean!


    Ingredients:


    • 1 large baguette (sliced about ½ inch thick)
    • 2 tbsp olive oil
    • 2 ripe tomatoes, diced or halved cherry tomatoes
    • 1 cup fresh basil, chopped
    • 8 oz burrata cheese
    • Salt & black pepper to taste
    • Balsamic glaze (for drizzling)

    How to make it:


    1. Toast the bread:

    Brush each slice with olive oil and toast in a skillet or bake at 180°C (350°F) until golden and crisp.


    2. Prepare the topping:

    In a bowl, mix diced tomatoes with chopped basil, a pinch of salt, pepper, and a splash of olive oil.


    3. Assemble:

    Tear the burrata and spread generously over each toast slice. Spoon the tomato-basil mix on top.


    4. Finish it off:

    Drizzle with balsamic glaze and maybe a little extra olive oil if you’re feelin’ it.

  • Soft & Fluffy Milk Buns: A Pillowy Treat for Every Occasion

    Soft & Fluffy Milk Buns: A Pillowy Treat for Every Occasion

    Soft & Fluffy Milk Buns: A Pillowy Treat for Every Occasion
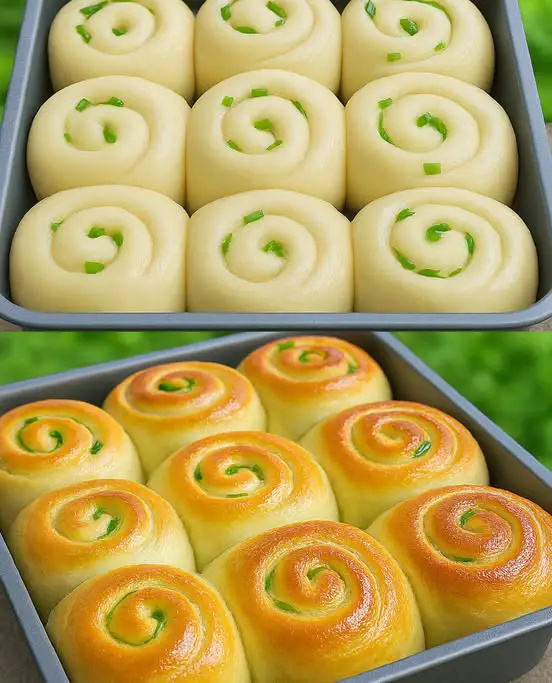
    If you’ve ever dreamed of the perfect bun — soft, fluffy, golden on the outside, and melt-in-your-mouth tender on the inside — these Milk Buns are exactly what you’re looking for. Baked to a rich golden hue and gently coiled with bits of green onion for a hint of savory goodness, they’re a true crowd-pleaser.

    Whether served as a side with soup or stew, used for sandwiches, or enjoyed warm with a pat of butter or honey, these buns never disappoint. They’re light, tender, and have that perfect balance of sweetness and richness.

    Why You’ll Love These Milk Buns
    Ultra soft and fluffy: Thanks to a mix of milk, butter, and yeast.

    Versatile: Sweet or savory — they go with everything!

    Beginner-friendly dough: Great for both novice and experienced bakers.

    Perfect for meal prep: These buns stay soft for days and freeze beautifully.

    Ingredients You’ll Need
    Let’s break down the ingredients that create that signature soft and buttery texture:

    Wet Ingredients:
    1 cup warm milk (about 110°F / 43°C) – Adds richness and moisture.

    1 cup warm water – Helps hydrate the dough.

    2 tablespoons sugar – Slightly sweetens and feeds the yeast.

    1 egg, beaten – For structure and color.

    Dry Ingredients:
    6 cups all-purpose flour – The base of your dough.

    2¼ teaspoons active dry yeast – The leavening agent.

    1½ teaspoons salt – Balances the sweetness.

    Fats:
    ½ cup unsalted butter, melted – Provides flavor and keeps the crumb tender.

    ✨ Optional add-in: Chopped green onions or chives for a savory twist (as pictured).

    Step-by-Step Instructions
    ‍ Step 1: Activate the Yeast
    In a small bowl or measuring cup:

    Mix the warm milk, warm water, sugar, and yeast.

    Stir gently and let sit for 5–10 minutes until it becomes frothy.

    If your yeast doesn’t foam, it may be expired. Always check dates before baking!

    Step 2: Mix the Dough
    In a large mixing bowl (or the bowl of a stand mixer):

    Combine the flour and salt.

    Pour in the frothy yeast mixture, followed by the melted butter and beaten egg.

    Stir with a wooden spoon or dough hook attachment until a shaggy dough forms.

    ✋ Step 3: Knead the Dough
    By hand: Turn the dough onto a lightly floured surface and knead for 10–12 minutes until smooth and elastic.

    Using a stand mixer: Knead on medium speed for 6–8 minutes until the dough pulls away from the sides and forms a smooth ball.

    The dough should be soft but not sticky. Add a tablespoon of flour at a time if too wet.

    ️ Step 4: First Rise
    Transfer the dough to a greased bowl.

    Cover with plastic wrap or a clean towel.

    Let it rise in a warm place for 1 to 1.5 hours, or until doubled in size.

    Pro tip: Preheat your oven for 2 minutes, then turn it off and place the dough inside for a warm, draft-free environment.

    Step 5: Shape the Rolls
    Punch down the risen dough to release air.

    Roll it out into a large rectangle (about ½ inch thick).

    Sprinkle with chopped green onions or herbs if desired.

    Roll the dough up tightly, like a jelly roll.

    Cut into 12 equal spiral rolls and place them in a greased or parchment-lined 9×13 baking pan.

    Make sure the rolls are spaced slightly apart — they’ll expand beautifully during baking!

    ⏳ Step 6: Second Rise
    Cover the pan with a towel and let the rolls rise again for 30–45 minutes, or until puffed and touching.

    Step 7: Bake
    Preheat your oven to 350°F (175°C).

    Brush the tops of the buns with an egg wash (1 egg + 1 tbsp milk) for a shiny, golden finish.

    Bake for 20–25 minutes, or until golden brown and the tops are lightly domed.

    Your kitchen will smell like a bakery at this point!

    Step 8: Finish & Serve
    As soon as they come out of the oven:

    Brush with melted butter for extra shine and softness.

    Let cool slightly before serving warm.

    Enjoy them as is, or serve with jam, cheese, butter, or honey!

    ️ Serving Suggestions
    These milk buns are endlessly versatile:

    Breakfast: Pair with tea or coffee.

    Lunch: Use as sandwich buns (they’re perfect for sliders).

    Dinner: Serve alongside soups, stews, or roasted meats.

    Snack: Warmed with butter or Nutella.

    Storage & Freezing
    To Store:
    Let buns cool completely.

    Store in an airtight container or ziplock bag at room temperature for up to 4 days.

    To Freeze:
    Wrap each bun individually in plastic wrap.

    Freeze in a ziplock bag for up to 2 months.

    Reheat in a microwave or oven at 300°F until warm.

    Tips for Success
    Check yeast freshness: Dead yeast means no rise — always proof it first!

    Use bread flour for chewier texture: You can substitute 1–2 cups of the all-purpose flour with bread flour.

    Avoid over-flouring: The dough should be slightly tacky. Too much flour will make the buns dry.

    Even shaping: For uniform buns, weigh each portion of dough (about 80–90g each).

    ‍ Variations to Try
    These buns are super customizable! Here are a few ideas:

    Garlic Butter Milk Buns:
    Brush with garlic-infused melted butter before and after baking.

    Cheese-Stuffed Milk Buns:
    Add a cube of mozzarella or cheddar into the center before shaping.

    Honey Butter Buns:
    Add 1 tbsp honey to the dough and brush with honey-butter glaze when done.

    Chocolate Swirl:
    Spread Nutella or chocolate ganache before rolling, then bake as usual.

    ❓ FAQ
    Can I make these dairy-free?
    Yes! Substitute with oat milk, coconut oil, or vegan butter. Just make sure it’s unsalted.

    What if I don’t have a stand mixer?
    No problem — just knead by hand for 10–12 minutes until smooth and elastic.

    Why are my buns dense?
    This can happen if the dough didn’t rise enough or if too much flour was added. Always give the dough time to double in size and be gentle when shaping.

    ✨ Final Thoughts
    Soft, fluffy, and oh-so-irresistible, these milk buns will quickly become a household favorite. Whether you’re baking for the first time or looking to master the perfect bun recipe, this one is reliable, delicious, and simple enough to become your go-to.

    Serve them warm, serve them cold — just be sure to make extra, because they disappear fast!

  • Low-Carb Pizza-Stuffed Bell Peppers: A Guilt-Free Comfort Food Favorite

    Low-Carb Pizza-Stuffed Bell Peppers: A Guilt-Free Comfort Food Favorite

    Who says you can’t enjoy pizza while eating healthy? These Pizza-Stuffed Bell Peppers bring all the flavor of your favorite pizzeria — melted mozzarella, tangy marinara, savory pepperoni — packed inside a sweet, roasted bell pepper. It’s the ultimate low-carb, gluten-free, and keto-friendly comfort food that hits all the right notes.

    Whether you’re meal-prepping for the week or hosting a game night with friends, this recipe is a guaranteed crowd-pleaser. Even picky eaters (yes, even the kids!) won’t miss the crust.

    Why You’ll Love This Recipe
    Low-carb & keto-friendly: Perfect if you’re avoiding bread or gluten.

    Customizable: Swap out pepperoni for sausage, mushrooms, olives, or any of your favorite toppings.

    Meal-prep ready: Make ahead and reheat for quick lunches or dinners.

    Family-friendly: A hit with adults and kids alike.

    Minimal ingredients, maximum flavor: Just 7-8 simple ingredients.

    Ingredients
    Here’s everything you’ll need to make these delicious pizza-stuffed bell peppers:

    Main Ingredients:
    4 large bell peppers (any color you like: red, yellow, orange work best for sweetness)

    1½ cups shredded mozzarella cheese

    1 cup marinara sauce or pizza sauce (use a low-sugar or no-sugar-added version if keto)

    1 package (about 6 oz) pepperoni slices

    ½ tsp Italian seasoning

    ¼ tsp garlic powder

    Olive oil spray or 1 tbsp olive oil

    Salt and pepper, to taste

    Optional Toppings:
    Cooked sausage crumbles

    Sliced black olives

    Diced mushrooms

    Chopped onions

    Fresh basil

    Red pepper flakes

    Grated parmesan cheese

    Equipment Needed
    Baking sheet

    Aluminum foil or parchment paper

    Sharp knife

    Cutting board

    Spoon for scooping

    Oven

    Step-by-Step Instructions
    Step 1: Prep the Peppers
    Start by preheating your oven to 375°F (190°C). Line a baking sheet with aluminum foil or parchment paper for easier cleanup.

    Wash the bell peppers and slice them in half vertically (from stem to bottom). Remove the seeds and membranes carefully using your hands or a small spoon. Try to keep the stems intact, as it makes the pepper halves look more like “pizza boats.”

    Pro tip: If your peppers are wobbly, slice a small piece off the bottom to help them lay flat on the baking sheet.

    Step 2: Lightly Roast the Peppers (Optional but Recommended)
    While technically optional, giving your peppers a quick roast before stuffing helps soften them slightly and enhances their sweetness.

    Place the pepper halves on the baking sheet, cut side up.

    Lightly brush or spray them with olive oil.

    Roast in the oven for 10-12 minutes until just starting to soften.

    Remove from the oven and let cool for a few minutes before stuffing.

    Step 3: Assemble the Pizza Peppers
    Now the fun part — assembling your pizza-stuffed peppers.

    Add Sauce: Spoon 1-2 tablespoons of marinara or pizza sauce into each pepper half. Spread evenly.

    Add Cheese: Sprinkle a generous layer of shredded mozzarella over the sauce.

    Add Pepperoni: Place 4-6 slices of pepperoni on each pepper. You can also chop up the pepperoni for a more even distribution.

    Season: Sprinkle with Italian seasoning and garlic powder for that classic pizza flavor. Add a pinch of salt and pepper if desired.

    Add Extra Toppings (Optional): Now’s your chance to get creative — add mushrooms, olives, sausage, or whatever you love on pizza.

    Step 4: Bake to Perfection
    Place the assembled peppers back in the oven and bake at 375°F (190°C) for about 15-18 minutes, or until:

    The cheese is fully melted and bubbly

    The pepperoni is slightly crisp around the edges

    The peppers are fork-tender but not mushy

    If you like crispy cheese edges, you can broil for an extra 1-2 minutes at the end — just keep a close eye to avoid burning.

    Serving Suggestions
    These Pizza-Stuffed Bell Peppers are satisfying enough to be a full meal on their own, but they also pair wonderfully with:

    Cauliflower rice

    Side salad with Italian dressing

    Zucchini noodles

    Roasted veggies

    Garlic sautéed green beans

    Or, if you’re not counting carbs, serve with a slice of garlic bread to soak up any extra sauce.

    Storage & Reheating
    To Store:
    Allow the peppers to cool completely.

    Store in an airtight container in the refrigerator for up to 4 days.

    To Reheat:
    Oven: Bake at 350°F for 10-12 minutes until warmed through.

    Microwave: Heat on high for 1-2 minutes (cover with a paper towel to avoid splatter).

    Make-Ahead & Freezer Tips
    You can absolutely make these in advance:

    Make Ahead (Unbaked): Assemble the peppers, cover tightly, and refrigerate for up to 24 hours. Then bake as directed.

    Freeze (After Baking): Let them cool, wrap individually in foil or plastic wrap, and store in a freezer-safe container. They’ll last up to 2 months. Thaw overnight in the fridge before reheating.

    Nutritional Information (Per stuffed pepper half, approx.)
    Calories: 160-200 (depending on toppings)

    Protein: 10-12g

    Carbohydrates: 6-8g

    Fat: 12-15g

    Fiber: 1-2g

    Net carbs: ~5-6g

    Note: Nutrition will vary based on the type of sauce and toppings used.

    Tips for Success
    Use colorful peppers for a naturally sweet flavor and eye-catching presentation.

    Roast the peppers first if you like a softer texture.

    Go heavy on the seasoning — since there’s no dough, spices are key to giving that classic pizza flavor.

    Double the batch — these go fast, and they reheat like a dream.

    Flavor Variations
    Pizza-stuffed peppers are ultra-adaptable. Try some of these twists:

    Supreme Style: Add olives, mushrooms, onions, and sausage with pepperoni.

    Hawaiian Style: Use ham and pineapple chunks.

    BBQ Chicken: Swap marinara for BBQ sauce, and use cooked shredded chicken and red onion.

    Veggie Lover’s: Load up with zucchini, mushrooms, tomatoes, and spinach.

    White Pizza: Use ricotta or alfredo sauce, garlic, mozzarella, and spinach.

    FAQs
    Can I use mini bell peppers instead?
    Absolutely! Mini bell peppers make great appetizers or snacks. Adjust cooking time to 10-12 minutes.

    Can I make these vegetarian?
    Yes — just skip the pepperoni and use your favorite veggies like mushrooms, spinach, and olives.

    What’s the best sauce to use?
    Go for a pizza sauce or low-sugar marinara. Rao’s and Primal Kitchen both offer keto-friendly options.

    Can I add protein?
    Sure — cooked sausage, ground beef, or shredded chicken work great. Just make sure any meat is fully cooked before adding it.

    Final Thoughts
    Pizza-Stuffed Bell Peppers are the best of both worlds: all the comforting, cheesy goodness of pizza without the guilt. Whether you’re following a low-carb lifestyle, trying to eat more veggies, or just looking for a fun new dinner idea, this recipe delivers on flavor, satisfaction, and simplicity.

    So go ahead — grab some bell peppers, load ’em up, and dig in. Pizza night just got a whole lot healthier (and maybe even tastier).
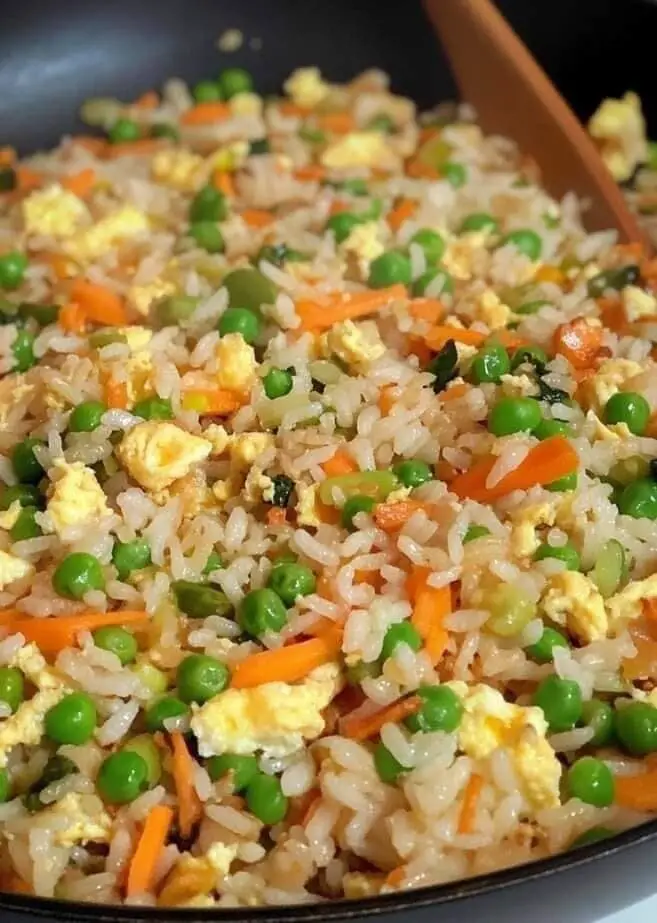
  • Fried Rice

    Fried Rice

    Fried rice is a popular and versatile dish made from cooked rice that is stir-fried in a wok or pan, often with vegetables, proteins, and seasonings. It’s quick to make and can be customized to your tastes with various ingredients. Here’s a basic recipe to get you started:

    Basic Fried Rice Recipe

    Ingredients:

    • 2 cups cooked rice (preferably day-old rice, as it’s less sticky)
    • 1 tablespoon vegetable oil (or sesame oil for extra flavor)
    • 2 eggs, beaten
    • 1/2 cup diced onion
    • 1/2 cup diced carrots (optional)
    • 1/2 cup peas (optional)
    • 1/4 cup green onions, chopped
    • 2-3 tablespoons soy sauce (adjust to taste)
    • 1 teaspoon sesame oil (optional)
    • Salt and pepper to taste
    • Protein options: cooked chicken, shrimp, pork, or tofu (optional)

    Instructions:

    1. Prepare Ingredients: If you’re using leftover rice, break it apart to make sure there are no clumps. Prep your vegetables and protein, if using.
    2. Cook the Eggs: Heat 1 tablespoon of oil in a large skillet or wok over medium-high heat. Add the beaten eggs and scramble them until they are fully cooked. Remove the eggs from the pan and set aside.
    3. Stir-Fry Vegetables: In the same skillet, add the remaining oil and sauté the onion, carrots, and peas for 3-4 minutes, or until softened.
    4. Add Rice: Add the cooked rice to the skillet with the vegetables. Stir-fry the rice, breaking up any clumps, for 2-3 minutes. Let it sit for a minute or two to get a slight crisp on the rice.
    5. Season the Rice: Add soy sauce, sesame oil (if using), and a pinch of salt and pepper. Stir well to evenly coat the rice and mix the flavors.
    6. Combine with Eggs: Add the cooked eggs back into the skillet and mix everything together. If you’re adding any protein (like chicken, shrimp, or tofu), add it at this stage.
    7. Garnish and Serve: Sprinkle with chopped green onions and serve hot!

    Tips:

    • Day-old rice works best for fried rice because it’s drier and less sticky than freshly cooked rice.
    • Feel free to add any vegetables you like, such as bell peppers, mushrooms, or corn.
    • To make the dish spicier, you can add chili paste or fresh chilies.

    Enjoy your homemade fried rice!

  • Healthy Banana Cocoa Oatmeal

    Healthy Banana Cocoa Oatmeal

    Healthy Banana Cocoa Oatmeal

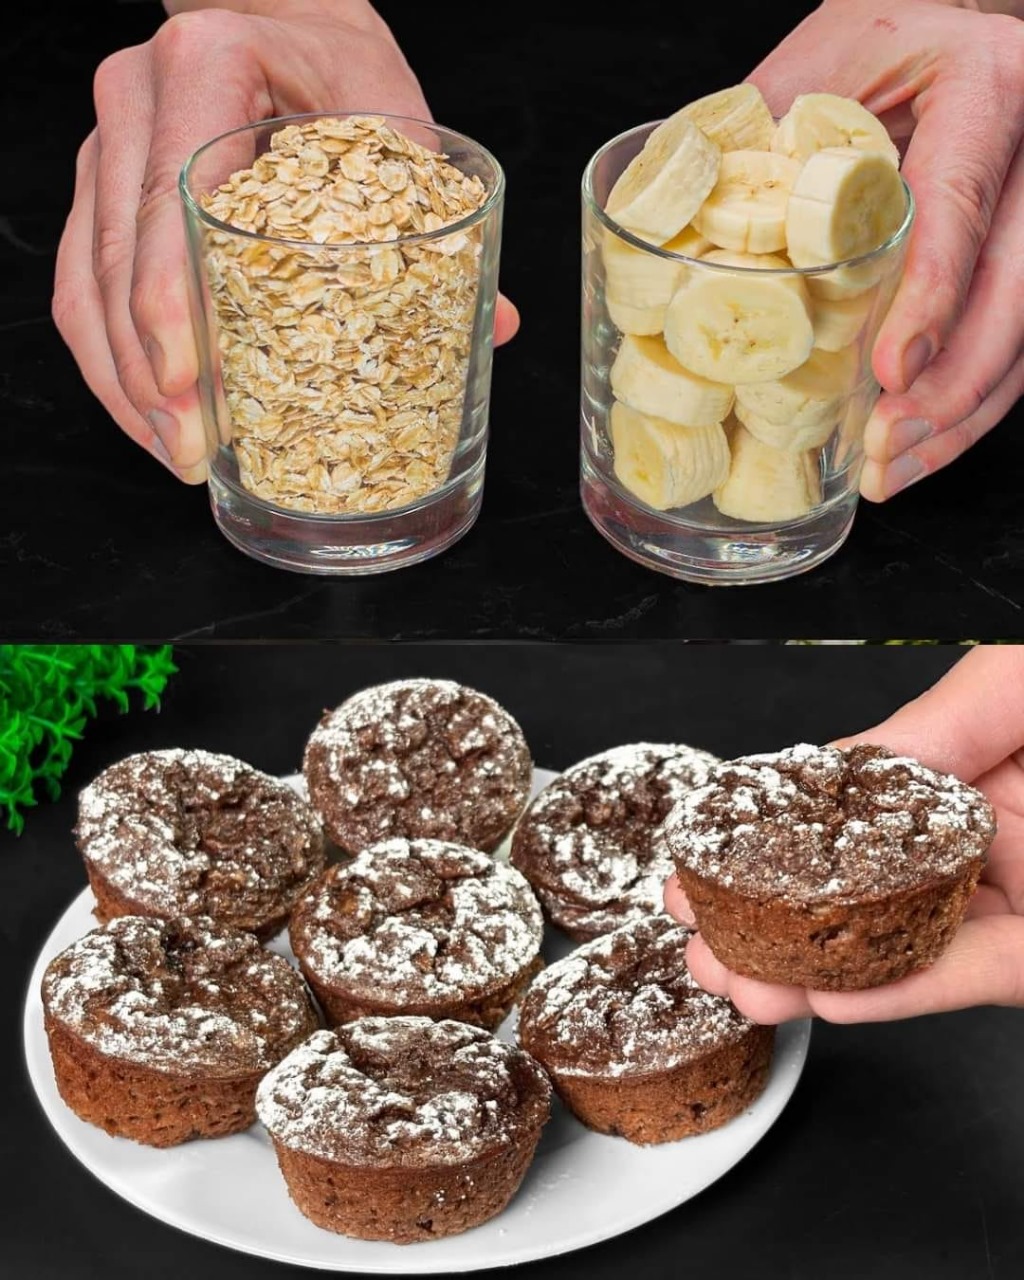
    This Healthy Banana Cocoa Oatmeal Bake is a delightful and nutritious treat that’s perfect for breakfast or as a snack. Packed with wholesome ingredients like oatmeal, bananas, and cocoa, it’s easy to make and sure to satisfy your sweet tooth without any added sugar.

    Preparation Time

    Prep Time: 10 minutes
    Cook Time: 30 minutes
    Total Time: 40 minutes
    Ingredients

    1 cup oatmeal
    240ml water
    2 eggs
    A pinch of salt
    1 tablespoon stevia sweetener
    2 bananas
    1 tablespoon cocoa powder
    1 teaspoon baking powder
    Avocado oil (for greasing)
    Directions

    Preheat Oven: Preheat your oven to 180°C (350°F). Grease a baking dish with avocado oil.
    Prepare the Mixture:
    In a large mixing bowl, combine 1 cup of oatmeal with 240ml of water. Let it sit for a few minutes to absorb the water.
    Mash the 2 bananas and add them to the oatmeal mixture.
    Add 2 eggs, a pinch of salt, 1 tablespoon of stevia sweetener, 1 tablespoon of cocoa powder, and 1 teaspoon of baking powder. Mix well until all ingredients are fully combined.
    Bake:
    Pour the mixture into the greased baking dish.
    Bake in the preheated oven for 30 minutes or until the top is firm and a toothpick inserted into the center comes out clean.
    Serve:
    Allow the bake to cool slightly before cutting into squares.
    Serve warm or at room temperature.
    Serving Suggestions

    Enjoy this oatmeal bake on its own or topped with a dollop of Greek yogurt.
    Pair with fresh berries or a drizzle of honey for extra sweetness.
    Serve with a side of almond milk or your favorite tea or coffee.
    Cooking Tips

    Ensure the bananas are ripe for the best natural sweetness.
    You can substitute the stevia with honey or maple syrup if preferred.
    Add a handful of nuts or chocolate chips to the batter for extra texture and flavor.
    Nutritional Benefits

    Oatmeal: High in fiber and provides sustained energy.
    Bananas: Rich in potassium and natural sweetness.
    Eggs: Offer high-quality protein and essential nutrients.
    Cocoa Powder: Contains antioxidants and adds a rich chocolate flavor.
    Dietary Information

    Vegetarian: Yes
    Gluten-Free: Ensure the oats are certified gluten-free.
    Dairy-Free: Yes
    No Added Sugar: Sweetened with bananas and stevia.
    Storage Tips

    Store any leftovers in an airtight container in the refrigerator for up to 5 days.
    This bake can also be frozen. Wrap individual pieces in plastic wrap and store in a freezer-safe container for up to 3 months. Thaw overnight in the refrigerator before serving.
    Why You’ll Love This Recipe

    It’s a healthy and satisfying treat perfect for any time of the day.
    Easy to make with simple ingredients.
    Naturally sweetened and packed with nutrients.
    Great for meal prep and on-the-go breakfasts.
    Conclusion

    This Healthy Banana Cocoa Oatmeal Bake is a perfect blend of taste and nutrition. It’s easy to prepare, delicious, and ideal for a healthy start to your day or a quick snack. Enjoy the rich flavors and wholesome ingredients in every bite. Bon appétit!


  • Apple Oatmeal Muffins

    Apple Oatmeal Muffins

    These delicious and nutritious Apple Oatmeal Muffins are perfect for breakfast or a healthy snack. They’re packed with hearty oats, sweet apples, and crunchy walnuts, offering a delightful blend of textures and flavors.

    Preparation Time:

    Prep Time: 15 minutes
    Cook Time: 25 minutes
    Total Time: 40 minutes
    Ingredients:

    1 cup (100 g) oatmeal
    ½ cup (120 ml) milk of your choice (e.g., almond milk, cow’s milk, etc.)
    2 apples, peeled, cored, and chopped
    1 tbsp butter
    1 tsp vanilla extract
    A pinch of salt
    2 eggs
    ¼ cup (30 g) walnuts, chopped
    Instructions:

    Prepare the Oats:
    In a bowl, combine the oatmeal with the milk of your choice. Let it sit for about 5-10 minutes, allowing the oats to absorb the milk and soften.
    Cook the Apples:
    In a medium skillet, melt 1 tablespoon of butter over medium heat.
    Add the chopped apples and sauté for about 10 minutes, or until the apples are soft and slightly caramelized. Stir in a pinch of salt and vanilla extract for added flavor.
    Prepare the Muffin Mixture:
    Preheat your oven to 360°F (180°C).
    In a large bowl, whisk the eggs. Add the softened oatmeal mixture, cooked apples, and chopped walnuts. Stir everything until well combined.
    Bake the Muffins:
    Grease a muffin tin or line it with paper liners.
    Evenly divide the muffin mixture among the prepared cups.
    Bake in the preheated oven for 20-25 minutes, or until the muffins are golden brown and a toothpick inserted into the center comes out clean.
    Cool and Serve:
    Let the muffins cool in the tin for a few minutes before transferring them to a wire rack to cool completely.
    Serving Suggestions:
    They make a great on-the-go breakfast or snack option.
    Cooking Tips:

    For added flavor, sprinkle cinnamon or nutmeg into the muffin batter.
    You can substitute walnuts with other nuts like almonds or pecans.
    Make these muffins dairy-free by using plant-based butter and milk.
    Nutritional Benefits:

    Oatmeal is a great source of fiber, which aids digestion.
    Apples are rich in vitamins and antioxidants.
    Walnuts provide healthy fats and protein, adding a satisfying crunch.
    Dietary Information:

    This recipe is naturally vegetarian.
    To make it gluten-free, use certified gluten-free oats.
    Storage Information:

    Refrigerator: Store any leftover muffins in an airtight container in the fridge for up to 3 days.
    Freezing: You can freeze these muffins for up to 1 month. Simply reheat in the oven or microwave when ready to eat.
    Frequently Asked Questions (FAQ)
    Can I use instant oats instead of rolled oats?
    Yes, instant oats will work, but the texture may be slightly softer. Rolled oats are recommended for a heartier muffin.
    Can I use other fruits instead of apples?
    Absolutely! You can substitute apples with pears, peaches, or even berries for a different flavor profile.
    What can I use instead of butter?
    You can replace the butter with coconut oil, margarine, or any plant-based butter for a dairy-free option.
    Can I add sweeteners like honey or maple syrup?
    Yes, you can add 1-2 tablespoons of honey or maple syrup if you prefer a sweeter muffin.
    Can I omit the walnuts?
    Yes, if you prefer or are allergic to nuts, you can omit the walnuts or replace them with seeds like sunflower or pumpkin seeds.
    How can I make this recipe egg-free?
    You can substitute the eggs with flax eggs (1 tablespoon ground flaxseed + 3 tablespoons water per egg) to make this recipe egg-free.
    Can I use other types of milk?
    Yes, feel free to use any milk you prefer, including almond milk, soy milk, or oat milk.
    What’s the best way to store these muffins?
    Store them in an airtight container at room temperature for up to 2 days or in the fridge for up to 3 days.
    Can I freeze these muffins?
    Yes, you can freeze the muffins for up to 1 month. Thaw them overnight in the refrigerator or reheat in the microwave.
    How can I make the muffins gluten-free?
    Simply use certified gluten-free oats to make these muffins suitable for a gluten-free diet.


  • 3-Ingredient No-Sugar Low-Calorie Dessert (Fluffy Mango Mousse Style)

    3-Ingredient No-Sugar Low-Calorie Dessert (Fluffy Mango Mousse Style)

     Description:

    This airy, guilt-free dessert is light, refreshing, and naturally sweet from fruit — no added sugar at all! It’s creamy, melts in your mouth, and perfect for hot days or light after-meal cravings. Great for those watching calories, sugar intake, or just love an easy dessert win.

     Ingredients:

    1. 1 large ripe mango (or 1 cup mango puree – fresh or canned, no sugar added)
    2. 1/2 cup plain low-fat Greek yogurt (or any unsweetened thick yogurt)
    3. 1 tablespoon unflavored gelatin (or agar-agar for vegetarian option)

    Optional: A few drops of vanilla extract or a pinch of cardamom for flavor boost

     Instructions:

    1. Prep the Mango:
      Peel, chop, and blend the mango into a smooth puree. If using canned puree, make sure it’s unsweetened.
    2. Bloom the Gelatin:
      In a small bowl, mix gelatin with 2–3 tbsp of warm water. Let it sit for 5–10 mins to bloom. Then gently heat until fully dissolved (microwave or stovetop, do not boil).
    3. Mix the Base:
      In a bowl, combine the mango puree and yogurt. Mix well until smooth and creamy.
    4. Add the Gelatin:
      Stir the dissolved gelatin into the mango-yogurt mixture while mixing constantly.
    5. Set the Dessert:
      Pour the mixture into serving glasses or bowls. Refrigerate for 2–3 hours until fully set and jiggly.
    6. Serve & Enjoy:
      Serve chilled. You can garnish with mint, mango chunks, or a dollop of yogurt if you like.

    ‍ Notes & Tips:

    • Fruit options: Swap mango with papaya, banana, or blended strawberries — just make sure it’s sweet and thick enough.
    • For vegan version: Use plant-based yogurt and agar-agar (1 tsp powder = 1 tbsp gelatin).
    • Make it extra fluffy: Whip the yogurt before mixing for more airiness!
    • Texture check: Use more or less gelatin based on how firm you want it.

    ️ Servings:

    2–3 servings, depending on portion size.

     Nutritional Info (Per Serving – Estimate):

    • Calories: ~100–120 kcal
    • Protein: 5–6g
    • Fat: 1–2g
    • Carbs: 15–18g (natural fruit sugar)
    • Added Sugar: 0g
    • Fiber: 1–2g

     Health Benefits:

    • Naturally sweet: No processed sugar, just the fruit’s goodness.
    • High in Vitamin C (especially with mango).
    • Good source of probiotics (from yogurt).
    • Low-calorie and satisfying with protein and fiber.
    • Kid-friendly and diabetic-friendly (with suitable fruit choices).

    ❓Q&A:

    Q: Can I make it without gelatin?

    A: Yes! Use agar-agar for a plant-based version. It sets more firmly, so adjust to your texture preference.

    Q: Can I freeze it?

    A: Not recommended. Freezing changes the texture and makes it icy instead of mousse-like.

    Q: Is it keto-friendly?

    A: Not quite — mango is high in natural sugar. Use avocado or berries with full-fat yogurt and a keto sweetener instead.

    Q: Can I add sweetener if needed?

    A: Absolutely. Add a little stevia, erythritol, or honey (if not sugar-free) to adjust sweetness.

  • drink is perfect for summer days,

    drink is perfect for summer days,

    A delicious tropical-flavored rum cocktail that brings the taste of the islands to your glass! This fruity and refreshing drink is perfect for summer days, beach vibes, or just relaxing at home. 1f34d☀️

    Ingredients:

    1 cup crushed ice
    1 fl oz orange juice
    1 fl oz pineapple juice
    ½ fl oz rum
    ½ fl oz coconut-flavored rum
    Instructions:

    Blend & Mix:
    Fill a cocktail shaker or blender with crushed ice. Pour in the orange juice, pineapple juice, rum, and coconut-flavored rum.

    Shake or Blend:
    If using a shaker, shake vigorously for about 10-15 seconds. If using a blender, blend until smooth.

    Serve & Enjoy:
    Pour into a chilled glass and garnish with a pineapple slice or a cherry for a fun tropical touch. Enjoy your island escape in a glass! 1f33a1f379

    1f379 Prep Time: 5 minutes | Total Time: 5 minutes
    1f379 Sip, relax, and enjoy the tropical vibes! 1f30a✨

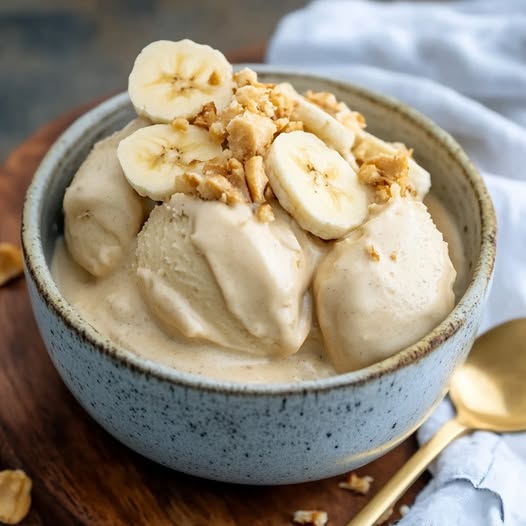
  • Peanut Butter Ice Cream with Banana Chunks

    Peanut Butter Ice Cream with Banana Chunks

    Peanut Butter Ice Cream with Banana Chunks 1f34c1f95c
    Ingredients
    – 2 ripe bananas
    – 1 cup of peanut butter
    – 2 cups of heavy cream
    – 1 cup of sweetened condensed milk
    – 1 teaspoon of vanilla extract
    – 1/2 cup of chopped bananas (for mixing in)
    Directions:
    1. In a blender, combine ripe bananas, peanut butter, heavy cream, sweetened condensed milk, and vanilla extract. Blend until smooth.
    2. Pour the mixture into a bowl and fold in the chopped bananas.
    3. Transfer to an ice cream maker and churn according to the manufacturer’s instructions.
    4. Once churned, transfer the ice cream to a container and freeze for at least 4 hours until firm.
    5. Serve and enjoy your Peanut Butter Ice Cream with Banana Chunks!
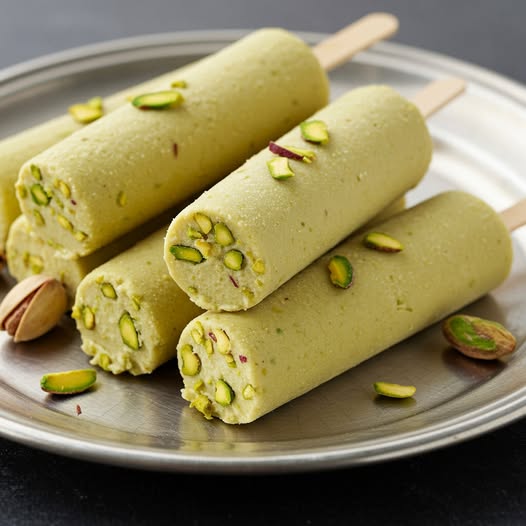
  • Pista Kulfi Recipe

    Pista Kulfi Recipe

    Pista Kulfi Recipe
    Ingredients:
    Full-fat milk – 1 liter
    Sugar – 1/3 cup (adjust to taste)
    Pistachios (unsalted, shelled) – 1/3 cup (roughly chopped or ground)
    Cardamom powder – 1/2 tsp
    Condensed milk – 1/4 cup (optional, for richness)
    Cornflour – 1 tsp (mixed with 2 tbsp milk) – optional
    Saffron strands – a few (optional)
    Green food color – 1–2 drops (optional, for the classic pista look)
    Rose water or kewra essence – 1/2 tsp (optional)
    ‍ Instructions:
    Boil & reduce the milk:
    Heat milk in a heavy-bottomed pan. Bring it to a boil, then simmer on low heat until it reduces to about half, stirring frequently.
    Add sweetness & thickness:
    Add sugar and condensed milk. Stir well.
    If using cornflour, mix it with a bit of cold milk and add it in. Cook for another 5–7 minutes, stirring constantly to avoid lumps.
    Flavor it:
    Add cardamom powder, saffron (if using), and rose/kewra essence. Mix well.
    Add pistachios:
    Stir in the chopped or ground pistachios. If you like a smooth kulfi, you can blend the mixture before freezing.
    For color, add a drop or two of green food coloring.
    Cool & freeze:
    Let the mixture cool down. Pour into kulfi molds or small cups. Cover and freeze for 6–8 hours or overnight.
    Serve:
    To unmold easily, dip the molds in warm water for a few seconds. Garnish with a few slivers of pistachios before serving.
  • Crispy Cheddar Baked Chicken ✨

    Crispy Cheddar Baked Chicken ✨

    Crispy Cheddar Baked Chicken 1f357✨
    Juicy chicken breasts coated in a golden, crunchy crust of cheddar, Parmesan, and panko—no frying needed! Ready in 35 minutes.
    1f4dd Ingredients
    For the Chicken:
    4 boneless, skinless chicken breasts (~6 oz each)
    ¼ cup (60g) melted butter (or olive oil)
    For the Crust:
    1 cup (115g) shredded cheddar cheese
    ½ cup (50g) grated Parmesan
    1 cup (50g) panko breadcrumbs
    1 tsp garlic powder
    1 tsp onion powder
    ½ tsp smoked paprika
    ½ tsp salt
    ¼ tsp black pepper
    For Garnish:
    2 tbsp fresh parsley, chopped
    ‍ Instructions
    1️⃣ Prep & Coat
    Preheat oven to 375°F (190°C). Grease a baking dish.
    Mix crust ingredients: In a bowl, combine cheddar, Parmesan, panko, and spices.
    Dip chicken in melted butter, then press into crumb mix to coat evenly.
    2️⃣ Bake
    Place chicken in dish. Bake 25-30 mins until internal temp reaches 165°F (75°C).
    Optional: Broil 1-2 mins for extra crispiness.
    3️⃣ Serve
    Rest 5 mins, garnish with parsley.
    Pair with mashed potatoes or a fresh salad.
    1f4a1 Pro Tips
    ✅ Even cooking: Pound thicker breasts to ½-inch uniform thickness.
    ✅ Extra crunch: Toast panko in a dry pan for 2-3 mins before mixing.
    ✅ Cheese swaps: Try pepper Jack for spice or Gruyère for nuttiness.
    ✅ Make ahead: Prep coated chicken and refrigerate up to 24 hours before baking.