Category: Recipes

  • Festive Meat and Cheese Puff Pastry Roll: A Holiday Table Showstopper

    Festive Meat and Cheese Puff Pastry Roll: A Holiday Table Showstopper

    Festive Meat and Cheese Puff Pastry Roll: A Holiday Table Showstopper

    Ingredients

    For the Meat Filling

    • 500g (1.1 lbs) ground meat (beef or beef/pork mix)
    • 2 large eggs
    • 70g (½ cup) all-purpose flour
    • 30ml (2 tablespoons) tomato sauce
    • Seasonings:
    • 5g (1 teaspoon) salt
    • 2.5g (½ teaspoon) black pepper
    • 5g (1 teaspoon) paprika
    • 5g (1 teaspoon) ground dried garlic

    Vegetables and Herbs

    • 1 large onion, finely chopped
    • ½ additional onion for sautéing
    • 1 carrot, grated
    • 1 red bell pepper, finely diced
    • 1 bunch fresh dill, chopped
    • 1 bunch fresh parsley, chopped

    Fats and Oils

    • 30ml (2 tablespoons) olive oil
    • 50g (3.5 tablespoons) butter for vegetables
    • 120g (8.5 tablespoons) butter, melted for pastry

    For the Pastry Layer

    • 450g (1 lb) puff pastry
    • 100g (1 cup) cheese, grated
    • 30ml (2 tablespoons) mayonnaise
    • Seasonings:
    • 2.5g (½ teaspoon) salt
    • 2.5g (½ teaspoon) black pepper

    For the Glaze

    • 1 large egg
    • 15ml (1 tablespoon) tomato sauce
    • 15ml (1 tablespoon) mayonnaise
    • 1 clove garlic, minced
    • 2.5g (½ teaspoon) salt
    • 5g (1 teaspoon) sugar

    Detailed Instructions

    Preparing the Meat Filling

    1. Create the meat base:
    • Combine ground meat with eggs in a large bowl
    • Add salt, pepper, paprika, and dried garlic
    • Mix in flour and tomato sauce thoroughly
    • Set aside
    1. Prepare the vegetables:
    • Heat olive oil in a large pan
    • Sauté chopped onions until translucent
    • Add grated carrots and diced pepper
    • Cook until vegetables are softened
    • Cool completely
    1. Finish the filling:
    • Mix cooled vegetables into meat mixture
    • Fold in chopped herbs
    • Ensure even distribution of ingredients

    Pastry Preparation

    1. Prepare garlic butter:
    • Melt butter in small pan
    • Add minced garlic
    • Cook until fragrant
    • Strain and cool slightly
    1. Prepare cheese mixture:
    • Combine grated cheese with mayonnaise
    • Season with salt and pepper
    • Mix until well combined

    Assembly Process

    1. Prepare work surface:
    • Roll out puff pastry on floured surface
    • Brush with garlic butter thoroughly
    1. Layer ingredients:
    • Spread cheese mixture evenly
    • Leave 1-inch border on all sides
    • Spread meat mixture along one long edge
    1. Rolling technique:
    • Start from meat edge
    • Roll tightly using parchment paper
    • Seal edges with water
    • Place seam-side down

    Glazing and Baking

    1. Prepare glaze:
    • Whisk egg with salt and sugar
    • Add tomato sauce and mayonnaise
    • Mix in minced garlic
    1. Final preparation:
    • Brush entire roll with glaze
    • Score top decoratively
    • Apply second layer of glaze
    1. Baking process:
    • Preheat oven to 200°C (400°F)
    • Bake 35-40 minutes until golden
    • Rest 10 minutes before slicing

    Pro Tips for Success

    1. Keep ingredients cold for best pastry results
    2. Ensure filling is completely cool before assembly
    3. Double glaze for extra shine
    4. Rest before cutting to set filling
    5. Use sharp knife for clean slices

    Nutrition Information

    Per serving (10 servings):

    • Calories: 485
    • Total Fat: 32g
    • Saturated Fat: 15g
    • Protein: 23g
    • Carbohydrates: 28g
    • Fiber: 2g
    • Sodium: 680mg

    Storage and Serving

    • Best served warm
    • Can be prepared ahead and reheated
    • Stores in refrigerator up to 3 days
    • Freezes well up to 1 month

    This elegant pastry roll combines the comfort of home cooking with the sophistication of fine dining, making it perfect for holiday entertaining. Its impressive appearance belies its straightforward preparation, allowing you to create a show-stopping dish that will become a treasured part of your holiday traditions.

  • Breakfast Muffins

    Breakfast Muffins

    Breakfast Muffins
    Ingredients:
    1 1/2 cups all-purpose flour
    1/2 cup sugar
    2 tsp baking powder
    1/2 tsp baking soda
    1/4 tsp salt
    1/2 cup milk
    1/4 cup vegetable oil
    1 large egg
    1 tsp vanilla extract
    1/2 cup rolled oats
    1/2 cup fruit (blueberries, bananas, or apples)
    Preparation:

    Preheat oven to 350°F (175°C) and grease a muffin tin.
    In a bowl, mix flour, sugar, baking powder, baking soda, and salt.
    In another bowl, whisk together milk, oil, egg, and vanilla.
    Combine wet and dry ingredients, then fold in oats and fruit.

    Spoon batter into muffin tin and bake for 18-20 minutes, or until a toothpick comes out clean.
    Let cool and enjoy your delicious breakfast muffins!

  • Homemade pizza recipe

    Homemade pizza recipe

    Ingredients
    For the Dough
    – 2 1/2 cups all-purpose flour
    – 1 tsp sugar
    – 1 tsp salt
    – 2 1/4 tsp active dry yeast
    – 1 cup warm water
    – 2 tbsp oil
    For the Toppings:
    – 1/2 cup pizza sauce
    – 2 cups shredded mozzarella cheese
    – Toppings of your choice (pepperoni, mushrooms, bell peppers, onions, sausage, etc.)
    Instructions

    – In a large bowl, combine warm water, sugar, and yeast. Let it sit for about 5 minutes until foamy.
    – Add the flour, salt, and oil. Mix until a dough forms.
    – Knead the dough on a floured surface for about 10 minutes, until smooth and elastic.
    – Place the dough in a greased bowl, cover, and let it rise in a warm place until doubled in size (about 1 hour).
    Preheat your oven to 475°F (245°C). If you have a pizza stone, place it in the oven to heat up.
    – Punch down the dough and roll it out on a floured surface to your desired thickness.

    – Transfer the rolled-out dough to a baking sheet or pizza peel.
    4. **Add Toppings:**
    – Spread the pizza sauce evenly over the dough.
    – Sprinkle the shredded mozzarella cheese on top.
    – Add your favorite toppings.
    -Bake for 10-12 minutes, or until the crust is golden and the cheese is bubbly and slightly browned.
    Let the pizza cool for a few minutes before slicing. Enjoy!


  • Tender Chicken Delight

    Tender Chicken Delight

    Ingredients
    4 boneless chicken breasts approximately 1 lb. or 450g
    1 cup mayonnaise or Greek yogurt
    1 tsp garlic powder
    1 cup Parmesan cheese divided
    1 tsp seasoning salt
    ½ tsp black pepper
    How To Make Tender Chicken Delight

    How To Make Tender Chicken Delight

    Begin by cutting each chicken breast into three equal pieces.
    Place the chicken pieces in a bowl and let them marinate in the refrigerator overnight.
    Preheat your oven to 375°F (190°C).
    In a small bowl, combine mayonnaise (or Greek yogurt), half of the Parmesan cheese, garlic powder, seasoning salt, and black pepper. Mix until well combined.
    Take a baking dish and arrange the marinated chicken pieces evenly.
    Spread the mayonnaise mixture over each chicken breast, ensuring they are evenly coated.
    Sprinkle the tops of the chicken breasts with the remaining Parmesan cheese.
    Bake in the preheated oven for 40 to 45 minutes or until the chicken is cooked through.
    Once cooked, remove from the oven and serve this delightful dish to your eagerly awaiting guests or family members.


  • Deli-Style Chicken Salad

    Deli-Style Chicken Salad

    When it comes to making the best chicken salad, the star of the show should always be the chicken. With that being said there are many additions you can make to this classic recipe that will make it just the way you like it.

    This homemade chicken salad is the perfect deli-style recipe to make at home. Learn how to make a flavorful and easy chicken salad recipe!

    Chicken salad is the most typical warm-weather picnic food, isn’t it? I have it every summer, and everyone else I know does, too. In fact, I think I’ve been eating it since I was a kid! It’s THAT much of a staple. I feel like if you live here in the States, you’re into chicken salad, no matter who you are!

    Ingredients

    • 500 grams.Of chicken breast boneless – diced.
    • 300 grams.Of chicken thigh boneless – diced.
    • 2 Tbsp.Of olive oil.
    • ½ Tsp.Of sea salt.
    • ¼ Tsp.Of black pepper.
    • ½ Tsp.Of granulated onion.
    • ⅔ Cup.Of mayonnaise.
    • 3 stalks.Of celery – diced.
    • Sea salt and black pepper.

    How To Make Deli-Style Chicken Salad

    Step 1:

    Prepare the chicken breasts and thighs by lightly coating them in oil. Add some granulated onion, cracked black pepper, and salt from the sea.

    Step 2:

    Put in a baking dish and cover with aluminum foil in a loose manner. Bake at 350 degrees Fahrenheit for 25 to 30 minutes, or until the internal temperature of the breast, as measured in the thickest portion, reaches at least 165 degrees.

    Step 3:

    The chicken should be allowed to cool for at least ten minutes before being placed in the refrigerator for at least an hour. When the chicken has had time to cool, dice the breasts and thighs into pieces that are 1/4 of an inch long and approximately 1/2 an inch wide. Place the diced chicken, celery, and mayonnaise in a large bowl and stir well.

    Step 4:

    Make sure that all of the ingredients are well combined, then cover and place them in the refrigerator for at least one to two hours, or perhaps overnight. Since all of the flavors will have had more time to combine, the chicken salad will taste far better the next day.

    Step 5:

    To adjust the seasoning, taste the dish and add more salt and pepper as necessary. Serve and enjoy!

  • Lose Belly and Hip Fat Naturally in 7 Days with Dates!

    Lose Belly and Hip Fat Naturally in 7 Days with Dates!

    Losing weight, especially around the stomach and hips, can feel like a challenge. But what if there was a natural and delicious way to support your weight loss journey? The answer might surprise you—dates! These small, sweet fruits are packed with nutrients that can help you shed unwanted fat while keeping your body energized.

    Why Dates?
    Dates are a powerhouse of fiber, natural sugars, and essential vitamins. They help with digestion, curb cravings, and provide a steady source of energy without causing sugar crashes. Instead of reaching for processed snacks, adding dates to your diet can help you stay full longer and support your metabolism.

    How to Use Dates for Weight Loss
    For best results, try this simple 7-day routine:

    Morning Boost: Start your day with 2-3 dates and a glass of warm water. This helps digestion and kickstarts your metabolism.

    Healthy Snacks: Replace unhealthy snacks with a handful of dates and some nuts like almonds or walnuts. This combination provides protein, healthy fats, and fiber to keep you full.
    Meal Enhancement: Add chopped dates to oatmeal, yogurt, or salads for natural sweetness and extra nutrients.
    Hydration Matters: Drink plenty of water throughout the day. Dates work best when your body is well-hydrated.
    Light Dinner: Have a balanced meal with lean protein, vegetables, and a small serving of dates for a touch of natural sweetness.
    Other Helpful Tips
    Stay Active: Combine this diet with light physical activity, like walking or stretching, to boost fat loss.
    Avoid Processed Foods: Stick to whole, natural foods for the best results.
    Get Enough Sleep: Rest is crucial for metabolism and overall health.
    The Results
    By the end of seven days, you may notice less bloating, a flatter stomach, and a lighter feeling overall. While long-term weight loss takes time, this simple plan can help you get started on a healthier path—without drastic diets or unhealthy ingredients.

    Give it a try and enjoy the natural benefits of dates!


  • Oatmeal Apple Bake

    Oatmeal Apple Bake

    Wholesome oats, juicy apples, and crunchy almonds come together in perfect harmony in this savory oatmeal apple bake. This baked dish may be enjoyed as a healthy snack or a filling breakfast because to its high fiber, healthy fat, and sugar content. The entire family can enjoy it, and it’s simple to cook.

    10-Minute Prep Time
    Cooking Time: Half an hour
    Time Required: forty minutes
    Serves four to six people

    Zoological Components:
    One cup (90 grams) of oatmeal
    The recipe calls for 150 milliliters, or around 3/4 cup, of warm milk.
    Peel and slice two apples.
    Twenty grams (1 and 3/4 teaspoons) of melted butter
    Half a teaspoon of vanillin (or vanilla essence)
    Two big eggs
    Half a cup of chopped nuts, such as walnuts, almonds, or pecans, weigh 50 grams.
    To grease the baking dish, use ezoic avocado oil.
    What to do:

    Heat oven to preheating temperature. Turn the oven on to 180 degrees Celsius (360 degrees Fahrenheit). Set aside a baking dish and coat it with avocado oil.
    Get the OatMixture Ready: Warm the milk and mix in the oats in a medium bowl. For the oats to soften, just let it aside for a few minutes.
    Combine the Substances: Melt the butter in a separate dish and whisk in the eggs and vanillin. Add the chopped apple and nut mixture and stir.
    Incorporate: After the oatmeal has loosened, add the egg mixture and stir until everything is fully incorporated.
    To bake, evenly distribute the mixture onto a prepared baking dish. Cook for 30 minutes in a preheated oven, or until the center is set and the edges are golden brown.

    Rest for a Bit Before Serving: Give it a little rest before cutting. Warm it up before serving.
    For an additional sweet touch, try serving it drizzled with maple syrup or honey.

    Make it a complete breakfast by serving with some fresh fruit and a dollop of Greek yogurt.

    Advice from an Ezoic Chef:

    For added crunch and taste, feel free to use whatever kind of nuts you choose, such hazelnuts, pecans, or almonds.
    Toss in some dried fruits, such as cranberries or raisins, for a sweet and textural boost.
    If you’d rather not have dairy, you may substitute almond, oat, or coconut milk for the milk.

    Nutritionally, oats are beneficial because they help keep blood sugar levels steady and because they are high in fiber.
    Vitamins, antioxidants, and extra fiber are all benefits of eating apples.
    This recipe is both healthful and filling because of the nuts, which provide protein and good fats.
    Information Regarding the Ezoic Diet:
    Has Dairy in it: Made with milk and butter.
    Has Nuts and Eggs in It: Try using flax eggs or seeds instead if you’re allergic.
    Is doable No Dairy: Substitute oil for butter and a dairy-free milk alternative.

    Put in the fridge: Any leftovers may be kept for up to three days in an airtight container.

    Warm through: Prior to serving, reheat in the oven or microwave.
    Why This Recipe Is Sure to Be a Hit:
    Eating well: Oats, apples, and nuts are just a few of the nutritious components.
    Simple to Create: Ezoic Easy to follow instructions requiring little to no prior work.
    Flexible: Great for any time of day, whether it’s breakfast, a snack, or dessert.
    In conclusion, the sweetness and sourness of apples and the creaminess of baked oats come together in this baked oatmeal apple dish, making it the ideal combination of healthy components. For a fast, nutritious, and flavorful dinner that you can easily tailor to your tastes, this is the perfect dish.

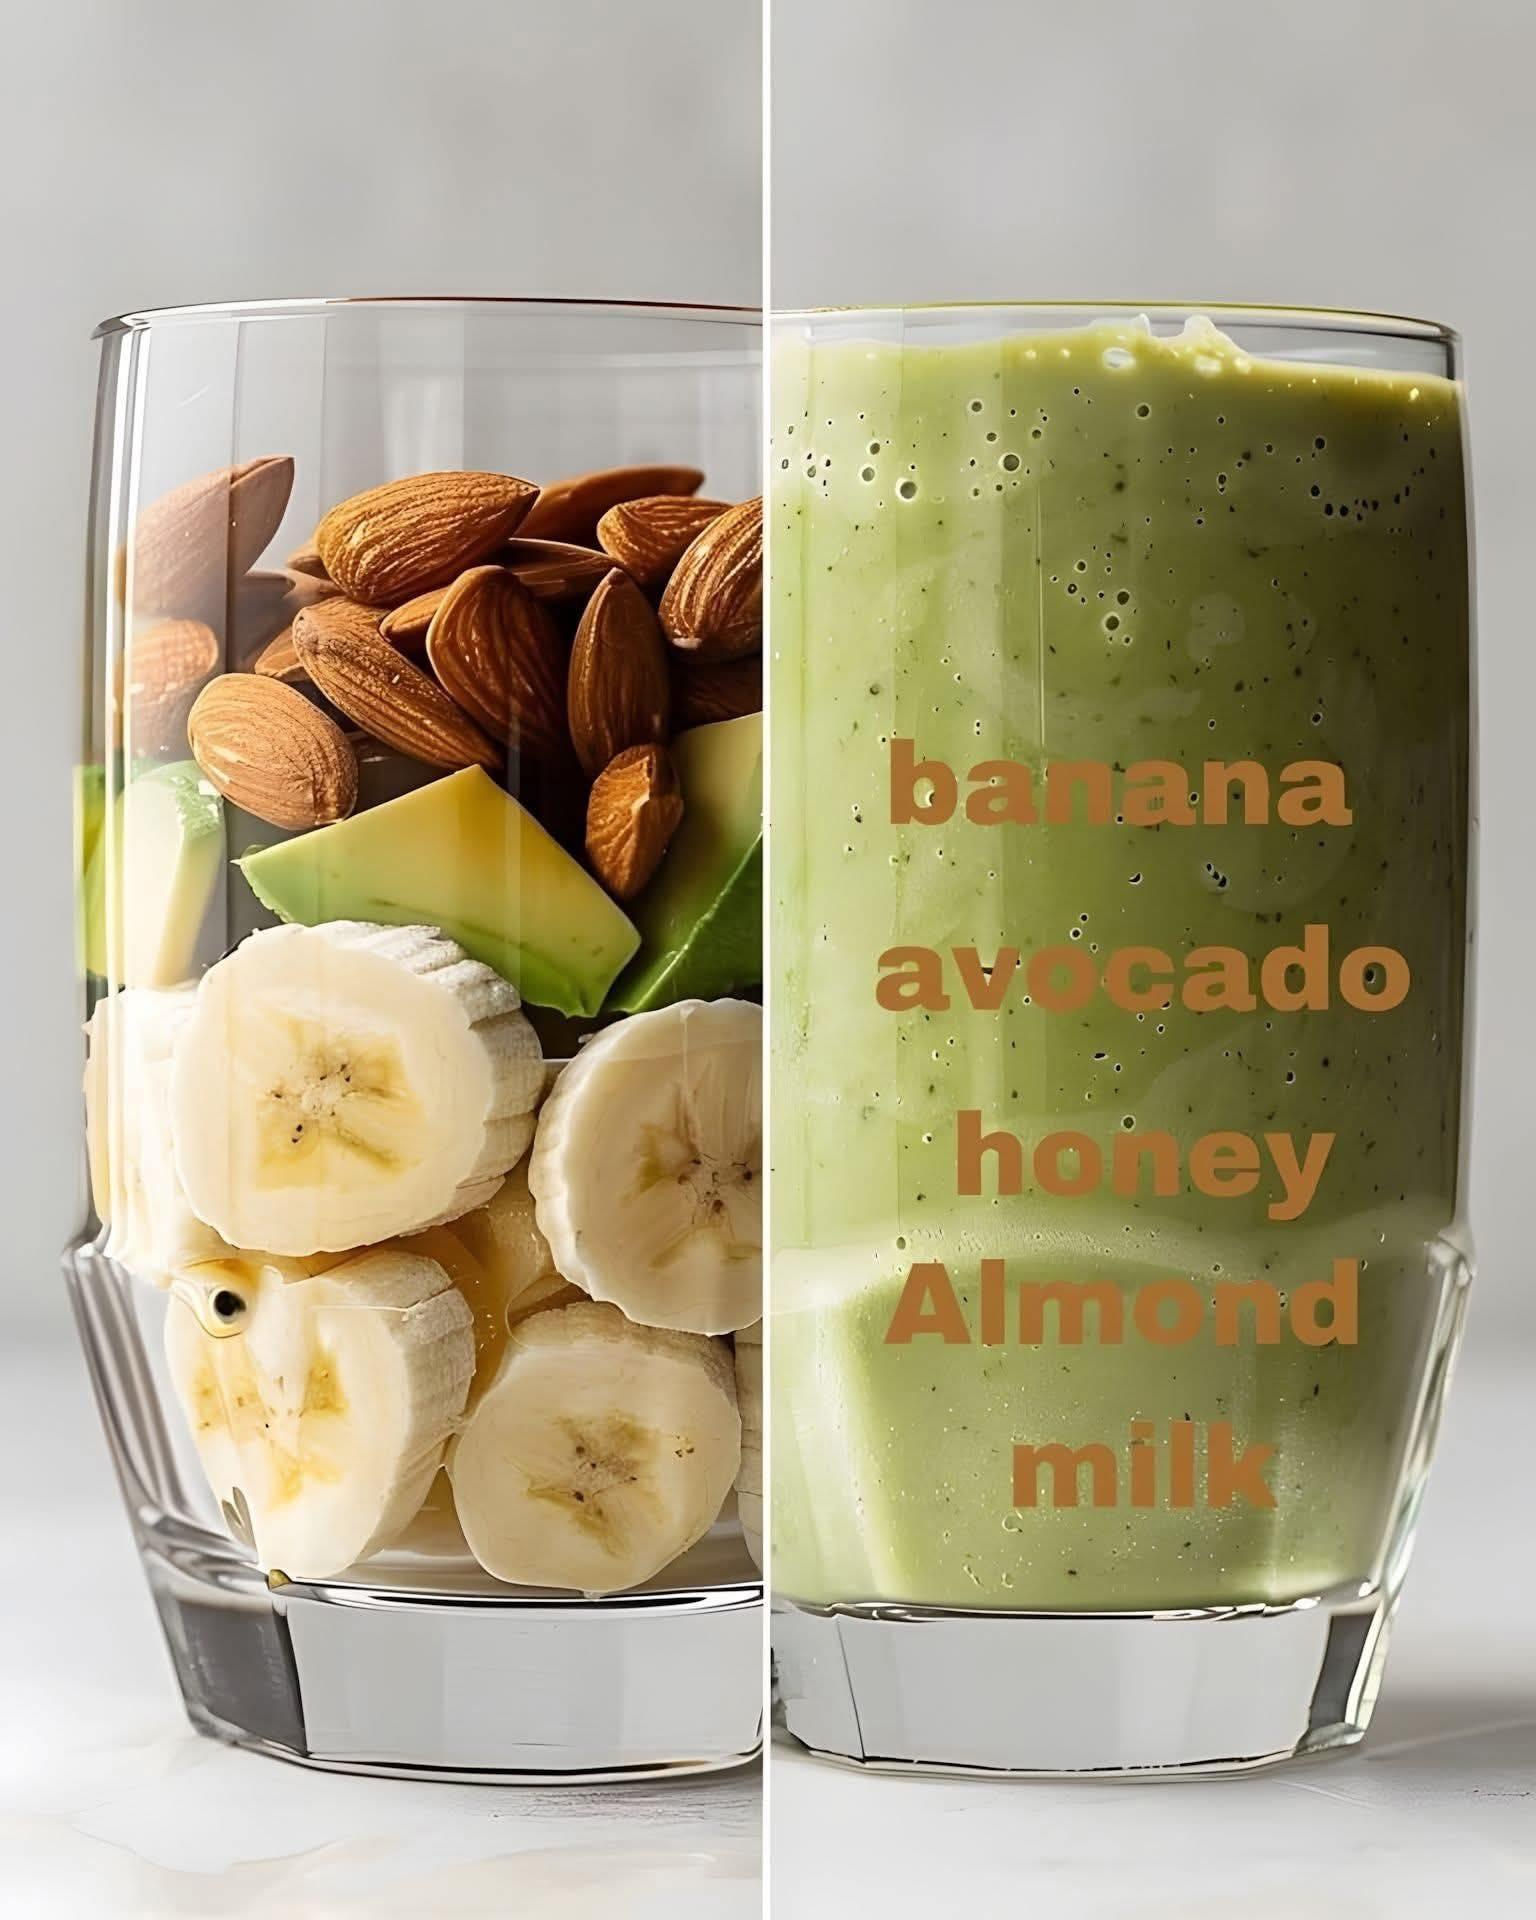
  • 4 Smoothies recipes ❤

    4 Smoothies recipes ❤

    1⃣ Avocado Almond:
    1 banana
    1 avocado
    1/4 cup almond nuts
    1 cup milk
    Ice cubes

    2⃣ Strawberry Walnuts:
    1 banana
    1 cup strawberry
    1/4 cup walnuts
    1 tablespoon vanilla yoghurt
    1 cup almond milk
    Ice cubes

    3⃣ Mango Pistachio:
    1 banana
    1 mango
    1/4 cup pistachio
    1 cup almond milk
    Ice cubes

    4⃣ Blueberry Cashew:
    1 banana
    1/2 cup blueberries
    1/2 cup pineapple
    1/4 cup cashews
    1 cup almond milk
    Ice cubes1f4471f4471f4471f447
    Barbara O’Neill health tibs

  • Banana Pudding Ice Cream

    Banana Pudding Ice Cream

    Ingredients:
    – 2 ripe bananas, mashed
    – 1 cup heavy cream
    – 1 cup milk
    – 3/4 cup sugar
    – 1 teaspoon vanilla extract
    – 1/2 cup crushed vanilla wafers
    – 1/2 cup mini marshmallows

    Directions:
    1. Grab a mixing bowl and toss in those mashed bananas, heavy cream, milk, sugar, and vanilla extract. Give it a good mix until everything is nicely blended.
    2. Now, pour that lovely mixture into your ice cream maker and churn it according to the manufacturer’s instructions until it reaches that perfect soft-serve consistency.
    3. Time to add some fun! Gently fold in the crushed vanilla wafers and mini marshmallows. This is where the magic happens!
    4. Once that’s done, transfer your creamy delight into a loaf pan and pop it in the freezer for at least 4 hours, or until it’s nice and firm.
    5. Finally, scoop yourself a generous portion of your homemade banana pudding ice cream and enjoy!

  • Homemade Butter Pecan Ice Cream

    Homemade Butter Pecan Ice Cream

    Ingredients:
    – 1 cup pecans
    – 1 cup heavy cream
    – 1 cup whole milk
    – 3/4 cup granulated sugar
    – 1 teaspoon vanilla extract
    – 1/2 teaspoon salt
    – 3/4 cup butter
    – 4 large egg yolks

    Directions:
    1. Start by toasting the pecans in a skillet over medium heat for about 5 minutes until they become fragrant. Once done, let them cool off a bit.
    2. In a saucepan, combine the heavy cream, whole milk, granulated sugar, and salt. Gently heat the mixture over medium heat, stirring until the sugar dissolves.
    3. While that’s warming up, whisk the egg yolks in a separate bowl until smooth. Next, slowly pour the warm cream mixture into the yolks while whisking constantly to avoid scrambling the eggs.
    4. Pour this mixture back into the saucepan and cook over low heat, stirring frequently until it thickens. Make sure it doesn’t boil!
    5. Once thickened, remove it from the heat and stir in the vanilla extract and butter until everything is well combined and melted.
    6. Allow the mixture to cool down, then pop it in the refrigerator for at least 2 hours, or even better, overnight.
    7. When you’re ready, churn the mixture in an ice cream maker according to the manufacturer’s instructions.
    8. After that, fold in the toasted pecans and churn a little more until they are evenly distributed.
    9. Finally, transfer the ice cream to a container and freeze until it’s nice and firm.

  • Crispy Chicken Strips

    Crispy Chicken Strips

    Crispy Chicken Stripson Crispy Chicken Strips

    Ingredients To prepare these delicious crispy chicken strips, you will need the following ingredients:1 pound of chicken breast tenders1 cup of buttermilk1 teaspoon of garlic powder1 teaspoon of onion powder1 teaspoon of paprika1/2 teaspoon of salt1/2 teaspoon of black pepper2 cups of crushed cornflakes1 cup of all-purpose flour2 large eggsVegetable oil for fryingInstructionsMarinate the Chicken:In a large bowl, combine the buttermilk, garlic powder, onion powder, paprika, salt, and black pepper.Add the chicken tenders and ensure they are well-coated with the marinade.Cover and refrigerate for at least 30 minutes, or up to 2 hours for maximum flavor.Prepare the Coating:In a shallow dish, place the crushed cornflakes.In another shallow dish, place the flour. In a third shallow dish, beat the eggs.Coat the Chicken:Remove the chicken tenders from the buttermilk marinade, allowing any excess to drip off.Dredge each piece in the flour, shaking off any excess. Dip into the beaten eggs, then coat with the crushed cornflakes, pressing lightly to adhere.Heat the Oil:In a large skillet, heat about 1 inch of vegetable oil over medium-high heat until it reaches 350°F (175°C).Fry the Chicken:Working in batches, carefully place the coated chicken strips into the hot oil.Fry for 4-5 minutes on each side, or until golden brown and cooked through.Use a slotted spoon to transfer the chicken to a paper towel-lined plate to drain.Serve and Enjoy:Serve the crispy chicken strips hot with your favorite dipping sauces, such as honey mustard, barbecue sauce, or ranch dressing.Tips and VariationsOven-Baked Option: For a healthier version, bake the chicken strips in a preheated oven at 400°F (200°C) for 20-25 minutes, or until golden brown and cooked through.Spicy Kick: Add a teaspoon of cayenne pepper or hot sauce to the buttermilk marinade for an extra spicy version.Different Coatings: Try using panko breadcrumbs or crushed pretzels for a different texture and flavor.

    Crispy chicken strips are a popular snack or meal option, offering several benefits depending on how they are prepared. Here are some key advantages:

    1. High in Protein

    Chicken is a great source of lean protein, which helps with muscle growth, repair, and overall body function.

    2. Quick & Convenient

    They are easy to prepare, whether homemade or store-bought, making them a great option for a quick meal or snack.

    3. Versatile

    Crispy chicken strips can be paired with various dips, salads, sandwiches, or wraps, making them a flexible meal choice.

    4. Satisfying & Flavorful

    The crispy coating and juicy chicken inside make them a delicious and satisfying option, especially when well-seasoned.

    5. Kid-Friendly

    Many children (and adults) enjoy chicken strips, making them a go-to meal for picky eaters.

    6. Can Be Made Healthier

    By baking or air-frying instead of deep-frying, and using whole-grain or alternative coatings (like almond flour), you can make them a healthier option.

    Would you like a recipe or suggestions for healthier versions? 

  • Mocha Noir Dream Ice Cream

    Mocha Noir Dream Ice Cream

    Ingredients:

    2 cups heavy cream
    1 cup whole milk
    1 cup brewed coffee (chilled)
    3/4 cup sugar
    1 teaspoon vanilla extract
    1/2 cup dark chocolate, finely chopped

    Instructions:

    In a large mixing bowl, whisk together the heavy cream, whole milk, chilled brewed coffee, sugar, and vanilla extract until the sugar is completely dissolved.
    Pour the mixture into your ice cream maker and churn according to the manufacturer’s instructions until the ice cream reaches a smooth, creamy consistency.
    During the final minutes of churning, sprinkle in the finely chopped dark chocolate, ensuring it’s evenly distributed.
    Transfer the churned ice cream to an airtight container and freeze for at least 4 hours until firm.

    Scoop, Serve and Enjoy your Mocha Noir Dream Ice Cream1f60b1f4951f60a

  • 3 BEST SMOOTHIE

    3 BEST SMOOTHIE

    1. Orange Glow Smoothie
    1f34a1f9551f34d

    Ingredients:

    1 orange, peeled
    1/2 cup pineapple chunks
    1 small carrot, peeled and chopped
    1 banana
    1/2 cup water or orange juice
    1 tsp chia seeds for garnish
    Ice cubes
    Steps:

    Blend orange, pineapple, carrot, banana, water, and ice until smooth.
    Pour into a glass and garnish with chia seeds and a sprig of mint.
    2. Berry Bliss Smoothie
    1f3531f34c1f347

    Ingredients:

    1/2 cup mixed berries (raspberries, blueberries, strawberries)
    1 banana
    1/2 cup almond milk or yogurt
    1 tsp honey (optional)
    Pomegranate seeds and mint leaves for garnish
    Steps:

    Blend berries, banana, almond milk, and honey until creamy.
    Pour into a glass and garnish with pomegranate seeds and mint.
    3. Green Power Smoothie
    1f96c1f9521f34c

    Ingredients:

    1 cup spinach or lettuce
    1/2 cucumber, sliced
    1 banana
    1/2 cup coconut water or regular water
    1 tsp chia seeds for garnish
    Ice cubes
    Steps:

    Blend spinach, cucumber, banana, coconut water, and ice until smooth.
    Pour into a glass and top with chia seeds

  • Strawberry Cheesecake Banana Pudding

    Strawberry Cheesecake Banana Pudding

    Ingredients
    Cream Cheese Layer:
    1 (8 oz) package cream cheese, softened
    1 cup heavy whipping cream
    1/2 cup powdered sugar
    1 teaspoon vanilla extract
    Pudding Layer:
    1 (5.1 oz) box vanilla instant pudding mix
    2 cups cold milk
    Dessert Assembly:
    1 box vanilla wafers (or other cookies of choice)
    2 bananas, sliced
    1 cup fresh strawberries, chopped
    Directions
    Prepare the Cream Cheese Layer:
    In a mixing bowl, beat the softened cream cheese until smooth. Add the heavy whipping cream, powdered sugar, and vanilla extract. Continue beating until the mixture becomes light, fluffy, and well combined. Set aside.

    Make the Pudding:
    In another bowl, whisk together the vanilla instant pudding mix and cold milk for about 2 minutes until it thickens. Let it sit for a few minutes to fully set.

    Assemble the Dessert:

    In a serving dish or individual cups, create a layer of vanilla wafers.
    Add a layer of sliced bananas and chopped strawberries.
    Spread a portion of the prepared pudding mixture over the fruit.
    Next, spread a layer of the whipped cream cheese mixture.
    Repeat the layers until all ingredients are used, finishing with a layer of cream cheese topping.
    Chill & Serve:
    Cover the dessert and refrigerate for at least 2 hours to allow the flavors to meld together. Before serving, garnish with additional banana slices, strawberries, and crumbled wafers if desired.

    ⏱ Prep Time: 15 mins | 1f36e Chilling Time: 2 hrs | ⏳ Total Time: 2 hrs 15 mins
    1f525 Calories: ~280 kcal per serving | 1f37d Servings: 6-8
    Enjoy this creamy, fruity, and decadent twist on classic banana pudding! 1f3701f3531f34c

  • My mom’s grandma used to make these.

    My mom’s grandma used to make these.

    This tasty and simple sweet bread is full of a cozy cinnamon and sugar taste.

    List of ingredients:

    About Bread:

    Amount of Ingredients

    2 cups of regular flour

    1 cup of sugar

    1 teaspoon of baking powder

    1 teaspoon of baking soda

    Add half a teaspoon of salt.

    1 teaspoon of cinnamon

    Butter without salt (melted) 1/2 cup

    2 big eggs

    1 cup of whole milk or buttermilk

    1 teaspoon of vanilla extract

    For the Sugar and Cinnamon Mixture:

    Amount of Ingredients

    Butter without salt (melted) 2 tablespoons

    1/4 cup of sugar

    1 teaspoon of cinnamon

    Directions:

    Heat the oven: Heat the oven to 350°F (175°C). Prepare a 9×5 inch loaf pan by greasing or lining it.

    Ezoic
    Mix the following dry ingredients in a big bowl: flour, sugar, baking powder, baking soda, salt, and cinnamon.

    Mix the liquid ingredients: In another bowl, stir together melted butter, eggs, milk, and vanilla extract.

    Ezoic

    Mix the wet and dry ingredients together slowly, adding the wet ones to the dry ones while stirring until they are just mixed.

    Put the mixture in the pan: Put the batter into the loaf pan that has been prepared.

    Ezoic
    Baking instructions: Bake for 50-60 minutes or until a toothpick inserted in the middle comes out clean. If it gets too brown, cover it with foil.

    To make it even tastier, add a topping of cinnamon sugar: Once the bread is out of the oven and still warm, brush it with melted butter and sprinkle it with a mix of cinnamon and sugar.

    Let the bread cool down in the pan for 10-15 minutes before moving it to a wire rack to finish cooling. Cut and savor!

    Enjoy your tasty cinnamon sugar donut!