Category: healthy food

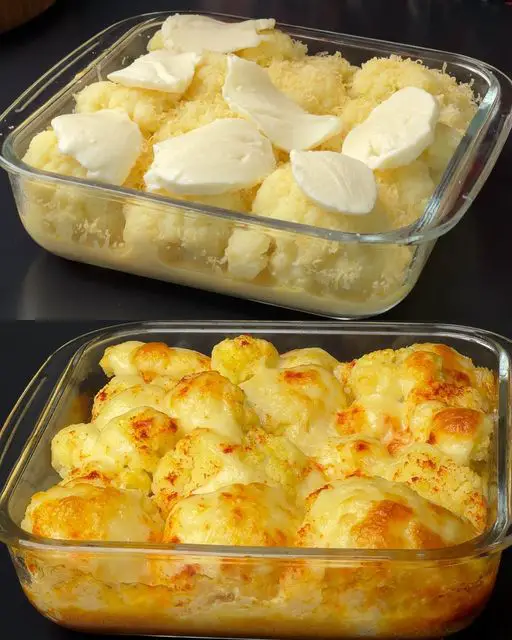
  • Easy and Cheesy Cauliflower with Garlic Butter Potatoes

    Easy and Cheesy Cauliflower with Garlic Butter Potatoes

    Ingredients

    For the Cauliflower:
    1 cauliflower
    1 teaspoon salt
    Olive oil
    2 eggs
    30 ml cream
    Black pepper, to taste
    Parmesan cheese, to taste
    Soft mozzarella
    Paprika, to taste
    For the Garlic Butter Potatoes:
    1 kg potatoes, cut into cubes
    Salt, to taste
    50 g butter
    2 cloves garlic, minced
    1 onion, chopped
    1 bell pepper, chopped
    Young spring onions, chopped
    Black pepper, to taste

    Instructions

    Prepare the Cauliflower:
    Cut the cauliflower into florets.
    Add the cauliflower to a pot of water with 1 teaspoon of salt and cook for 5 minutes. Drain and set aside.
    Preheat the oven to 180°C (350°F).
    Drizzle olive oil over the cauliflower and place it in a baking dish.

    Make the Egg Mixture:
    In a bowl, beat 2 eggs with a little salt, 30 ml of cream, and black pepper to taste.
    Pour the egg mixture over the cauliflower.

    Add the Cheeses:
    Sprinkle Parmesan cheese to taste over the cauliflower.
    Add pieces of soft mozzarella on top.
    Sprinkle paprika over the cheese.

    Ezoic

    Bake the Cauliflower:
    Bake in the oven for 20 minutes until the cheese is melted and golden.

    Prepare the Potatoes:
    Cut 1 kg of potatoes into cubes and add salt to taste.
    Cook the potatoes in boiling water for 10 minutes, then drain.

    » MORE:  Pizza Burger Pâté

    Make the Garlic Butter:
    Melt 50 g of butter in a pan.
    Add 2 cloves of garlic, minced, and fry for 2 minutes until fragrant.
    Add the cooked potatoes to the pan and fry for 2 minutes.
    Add Vegetables:

    Ezoic

    Add the chopped onion and bell pepper to the potatoes.
    Season with salt and black pepper to taste.
    Continue to cook until the vegetables are tender.

    Serve:
    Garnish the potatoes with chopped young spring onions.
    Serve the baked cauliflower alongside the garlic butter potatoes.

    More Information
    This easy and cheesy cauliflower is a delightful way to enjoy this versatile vegetable. The creamy egg mixture and melted cheese create a rich and satisfying dish that pairs perfectly with the buttery, garlicky potatoes. Both recipes are simple to prepare, making them ideal for a quick yet impressive meal. The addition of fresh spring onions and bell peppers adds a burst of flavor and color to the dish.

    Ezoic

    Conclusion
    Discover the joy of cooking cauliflower in a new and delicious way with this easy and cheesy recipe. Paired with garlic butter potatoes, this meal is sure to become a family favorite. Enjoy the creamy, cheesy goodness of baked cauliflower and the rich, savory flavors of garlic potatoes for a comforting and satisfying dining experience. Try this recipe today and make your next meal unforgettable!

  • Quick and Easy No-Oven Yogurt Pancakes

    Quick and Easy No-Oven Yogurt Pancakes

    Quick and Easy No-Oven Yogurt Pancakes

    Table of Contents

    Ingredients

      • Egg: 1 large (room temperature is best for even mixing)
      • Sugar: 3 tablespoons (this adds sweetness to the pancakes)
      • Vanilla Sugar: 8g (for an aromatic touch)
      • Oil: 2 tablespoons (plus extra for cooking; can use vegetable or coconut oil)
      • Yogurt: 125g (preferably plain or Greek yogurt for added creaminess)
      • Milk: 80ml (to adjust the batter consistency)
      • Flour: 180g (all-purpose flour is ideal, but whole wheat can be substituted for a healthier option)
      • Baking Powder: 10g (this is what gives the pancakes their light and airy texture)
    • Caster Sugar: (for sprinkling on top, optional)

    Instructions

    1. Prepare the Batter:
        • Whisk Ingredients Together: Begin by cracking the egg into a mixing bowl. Whisk in 3 tablespoons of regular sugar and 8g of vanilla sugar until the mixture is well combined and slightly frothy. This helps to incorporate air into the batter, resulting in fluffier pancakes.
        • Add Wet Ingredients: Next, introduce 2 tablespoons of oil, 125g of yogurt, and 80ml of milk into the egg mixture. Use a whisk or spatula to mix everything until smooth and well blended. The yogurt not only adds flavor but also contributes to the pancakes’ moistness.


      • Incorporate Dry Ingredients: Sift in 180g of flour and 10g of baking powder into the wet mixture. Sifting helps to prevent lumps and ensures even distribution of the baking powder. Stir gently until the batter is smooth and free of lumps. Be careful not to overmix, as this can lead to tough pancakes—just mix until combined!
    2. Cook the Pancakes:
        • Heat Your Pan: Place a non-stick skillet or frying pan over medium heat. Once heated, lightly grease the pan with a bit of oil. This will help the pancakes cook evenly and prevent sticking.


        • Pour the Batter: Using a ladle or measuring cup, pour a small amount of batter into the pan to form a pancake. You can choose to make them small or large depending on your preference—just keep in mind that smaller pancakes cook faster.
        • Watch for Bubbles: Cook the pancake until bubbles form on the surface and the edges begin to set, which usually takes about 2-3 minutes. This is an indication that it’s time to flip.
        • Flip and Finish Cooking: Carefully flip the pancake using a spatula and cook the other side until it turns golden brown, approximately 1-2 more minutes. Repeat this process with the remaining batter, adding more oil to the pan as necessary to keep things non-stick.


    3. Serve:
        • Add Sweetness: Once the pancakes are cooked, sprinkle them lightly with caster sugar for an added touch of sweetness. This will enhance their flavor and give them a lovely finish.
        • Presentation: Serve the pancakes warm, stacked on a plate, and consider adding a few toppings for extra flair. Fresh fruits like strawberries, blueberries, or banana slices can add color and freshness. A drizzle of honey or maple syrup complements the pancakes perfectly, adding a delightful sweetness. You might even consider a dollop of whipped cream or yogurt for a rich, creamy contrast.


      • Experiment with Flavors: Feel free to experiment with different flavors! You can add chocolate chips, chopped nuts, or even spices like cinnamon or nutmeg directly into the batter for a unique twist.

    Additional Tips:

      • Make Ahead: If you’re short on time, you can prepare the batter the night before. Store it in the refrigerator and give it a good stir before cooking. The flavors will develop nicely overnight!
    • Leftovers Storage: These pancakes are best enjoyed fresh but can be stored in an airtight container in the refrigerator for up to 2 days. Reheat them in a skillet or microwave for a quick breakfast on the go.
    • Freezing for Later: If you make a large batch, consider freezing the pancakes. Let them cool completely, then place them in a single layer on a baking sheet until frozen solid. Transfer them to a freezer bag or container for up to 2 months. To reheat, just pop them in the toaster or microwave.
  • BANG BANG CHICKEN WINGS RECIPE

    BANG BANG CHICKEN WINGS RECIPE

    WINGS RECIPE

    The ideal balance of savory, sweet, and spicy tastes combine in Bang Bang Chicken Wings to create an enticing feast for any occasion. The intense Asian tastes included in Bang Bang sauce—a sauce renowned for its creamy, tangy, and spicy taste—serve as the basis for this recipe. It started out as a sauce for shrimp but has gained popularity as a spin on chicken wings, introducing this delicious taste to the world of party dishes and appetizers. We’ll go over all the little things in this comprehensive guide to make sure that every mouthful of Bang Bang Chicken Wings is bursting with flavor and zest.

    The cooking method and taste balance are crucial to making this meal shine. The chicken wings are marinated, baked, or fried, and then they’re tossed in that irresistible trademark sauce. Bang Bang Chicken Wings guarantee to satisfy whether you’re throwing a party, need a fresh snack for game day, or just want to treat yourself to something delectably unique. From preparation to presentation, we’ll walk you through every step so you can master this delicious meal.

    Ingredients and Preparation

    For the Chicken Wings:

    • 2 pounds of chicken wings, tips removed and separated at the joint
    • 1 teaspoon garlic powder
    • 1 teaspoon onion powder
    • 1 teaspoon smoked paprika
    • Salt and pepper to taste
    • Oil, for frying

    For the Bang Bang Sauce:

    • 1/2 cup mayonnaise
    • 2 tablespoons sweet chili sauce
    • 1 tablespoon honey
    • 2 teaspoons hot sauce (adjust based on your spice preference)
    • 1 teaspoon lime juice
    • Salt to taste

    For the Garnish:

    • Chopped scallions
    • Sesame seeds

    Preparation:

    1. Clean and pat dry the chicken wings first. This will make the skin when baked or fried beautiful and crisp.
    2. Garlic powder, onion powder, smoked paprika, salt, and pepper are used to season the wings. Make sure you cover every wing equally. Allow them to marinade in the refrigerator for at least 30 minutes or, better yet, overnight.
    3. To make the Bang Bang sauce, combine mayonnaise, lime juice, hot sauce, honey, sweet chili sauce, and a small amount of salt in a bowl and whisk until smooth. To suit your taste, modify the amount of heat or the spice. The sauce should have a bit of sweetness, a burst of spice, and a creamy texture.

    Warming Up the Wings

    1. Wings of chicken may be baked or fried. These are the two approaches:
    2. Baking:
    3. Set oven temperature to 400°F, or 200°C.
    4. To avoid sticking, line a baking sheet with parchment paper or give it a little oil.
    5. Place the wings that have been marinated in a single layer on the baking sheet.
    6. Bake the wings for 40 to 45 minutes in a preheated oven, turning them once throughout the baking process, or until they are crispy and golden brown.

    Frying

    1. Heat the oil in a deep fryer or big saucepan to 375°F (190°C).
      To prevent the oil from being too cold and producing soggy wings, fry the wings in batches.
    2. Cook each batch for 8 to 10 minutes, or until crisp and golden brown.

    Complete Assembly

    1. When the wings are done, quickly throw them in the Bang Bang sauce that has been made. This will facilitate the sauce’s better adhesion and absorption into the crispy skin.
    2. Add some sesame seeds and sliced scallions as garnish and serve right away.
    3. By following these instructions, you can be sure that your Bang Bang Chicken Wings will not only taste amazing but also turn heads at any dinner table. Would you want to get more details and a thorough analysis on how to serve and eat these wings, along with some matching recommendations?
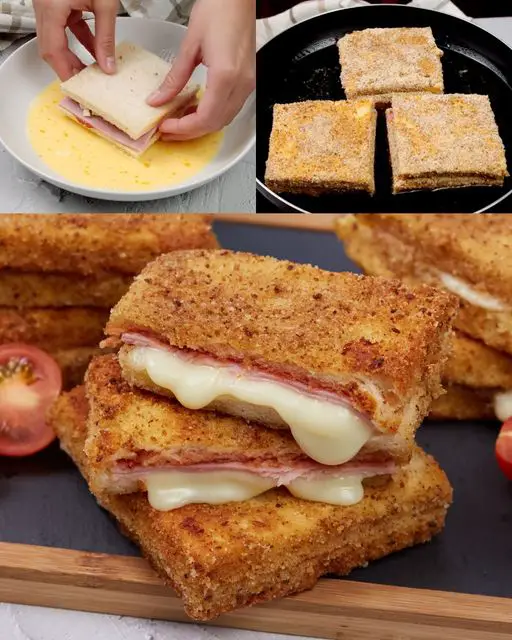
  • Fried toast: how to make them super cheesy and super tasty!

    Fried toast: how to make them super cheesy and super tasty!

    Crispy outside and so delicious and cheesy inside, this recipe is a show-stopper! 
    INGREDIENTS
    120 ml (½ cup) milk;
    3 eggs;
    60 g (1 cup) breadcrumbs;
    12 slices sandwich bread;
    6 slices ham;
    170g (2 cups) cheese;
    120 ml (½ cup) tomato sauce.
    METHOD
    1. Remove crusts from the sandwich bread slices.
    2. Cover 6 pieces of bread with tomato sauce, top with ham and cheese, cover with a second slice of bread.
    3. Whisk eggs with milk and cover each sandwich with an egg mixture.
    4. Cover each sandwich in breadcrumbs from all sides, then transfer onto a pan placed over medium heat.
    5. Cook for 2-3 minutes per side and serve right away.
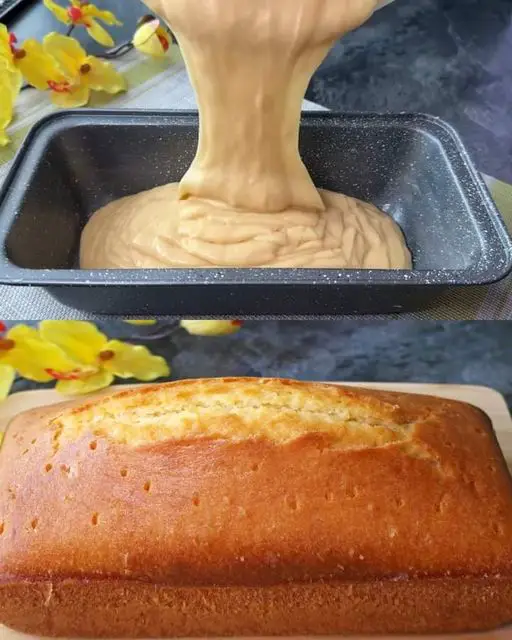
  • Tasty Lemon Zest Cake

    Tasty Lemon Zest Cake

    Tasty Lemon Zest Cake

    Table of Contents

    Ingredients:

    • For the Cake:
        • 3 large eggs
        • 90 g (3 oz, 1/2 cup) sugar


        • A pinch of salt
        • Zest of two lemons
        • 170 g (6 oz, 8 tablespoons) melted butter


        • 200 g (7 oz, 1 cup + 1/3 cup) flour
        • 15 g (0.5 oz, 3 teaspoons) baking powder
        • 2 tablespoons milk


    • For the Lemon Soak:
        • 75 ml (2.5 fl oz, juice of two lemons)
        • 100 g (3.5 oz) powdered sugar


    Directions:

      1. Prepare the Batter:
          • Preheat your oven to 160°C (320°F).
          • In a large mixing bowl, beat the eggs with the sugar and a pinch of salt until the mixture is light and fluffy.


          • Add the zest of two lemons and the melted butter. Mix well.
          • Sift together the flour and baking powder, then fold into the egg mixture.
          • Add the milk and mix until the batter is smooth.


      2. Bake:
          • Pour the batter into a greased and floured cake pan.
          • Bake in the preheated oven for 50 minutes, or until a toothpick inserted into the center comes out clean.


      3. Prepare the Lemon Soak:
        • While the cake is baking, mix the lemon juice with the powdered sugar until fully dissolved.
    1. Soak the Cake:
        • Once the cake is done baking, remove it from the oven and immediately poke small holes all over the top with a toothpick.
        • Pour the lemon soak over the hot cake, allowing it to absorb fully.
        • Cover the cake with cling film and leave it to cool completely.


    Serving Suggestions:

      • Serve the cake with a dollop of whipped cream or a scoop of vanilla ice cream.
      • Garnish with fresh berries or a sprinkle of extra lemon zest for a burst of color.

    Cooking Tips:

    • Ensure the butter is fully melted and slightly cooled before mixing it into the batter.
    • For an extra lemony flavor, add a bit of lemon extract to the batter.

    Nutritional Benefits:

      • Lemons: Provide vitamin C and antioxidants.
    • Eggs: Add protein and structure to the cake.

    Dietary Information:

      • Vegetarian: Yes
      • Nut-Free: Yes

    Nutritional Facts (per slice):

      • Calories: 220
      • Protein: 3g
      • Carbohydrates: 30g
    • Fat: 10g
    • Fiber: 1g

    Storage:

      • Store the cake in an airtight container at room temperature for up to 3 days.
    • Can be refrigerated for up to 5 days. Bring to room temperature before serving.
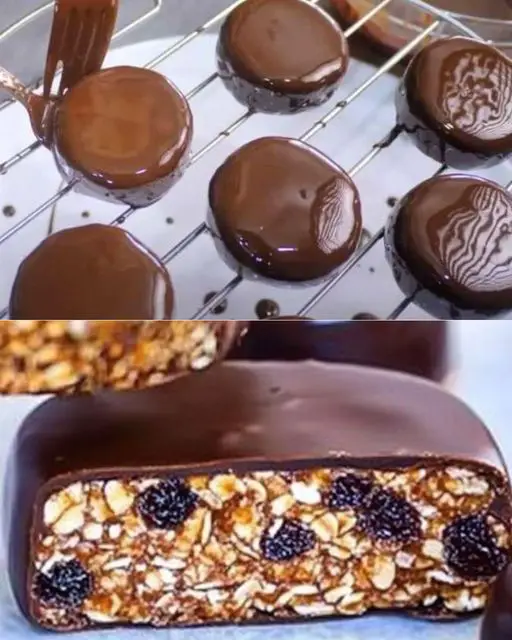
  • Homemade Oatmeal and Dried Fruit Sweets Recipe

    Homemade Oatmeal and Dried Fruit Sweets Recipe

    Homemade Oatmeal and Dried Fruit Sweets Recipe

    Table of Contents

    Ingredients

    For the Base:

    • 80 g (2.8 oz) oat flakes
    • 100 g (3.5 oz) walnuts
    • 150 g (5.3 oz) dates (pitted)
    • 15 g (0.5 oz) cocoa powder
    • 80 g (2.8 oz) honey

    For the Icing:

    • 100 g (3.5 oz) dark chocolate
    • 1 tbsp oil (15 ml) or butter

    Step-by-Step Instructions

    1. Create Oatmeal Flour

    To begin, we need to turn the oat flakes into a fine flour. Place 80 g of oat flakes into a blender or food processor and grind them until they reach a flour-like consistency. This oat flour will provide the structure for your sweets, offering a light yet chewy texture.

    2. Add Walnuts for a Nutty Twist

    Next, add 100 g of walnuts to the blender with the oatmeal flour. Blend until the walnuts are finely chopped, but make sure to leave a few small pieces for added texture. The walnuts will introduce a rich, nutty flavor and provide a pleasant crunch in every bite.

    3. Prepare the Dried Fruit Mix

    Now, it’s time to work with the dates. Remove the pits from the 150 g of dates and add them to the blender. The dates are naturally sweet and sticky, making them the perfect binding agent for the mixture. Add 15 g of cocoa powder and a pinch of salt to balance the sweetness with a touch of richness. Blend the mixture until it’s fully combined and has a thick, dough-like consistency.

    See also  Flourless Bread: A Tasty, Gluten-Free Option for Your Diet

    4. Combine and Sweeten

    Transfer the crushed fruit, walnut, and cocoa mixture to a large bowl. Drizzle the honey over the top. If your honey has hardened, gently warm it in a bain-marie (double boiler) until it becomes runny. Once all the ingredients are in the bowl, use your hands to knead the mixture until it forms a cohesive, moldable mass. The combination of honey and dates will ensure the sweets hold their shape.

    5. Shape Your Candies

    Now that your base is ready, it’s time to shape the candies. Shape the mixture into your desired forms—you can create small round balls, oval shapes, or even form them into bar-like pieces. Let your creativity flow! Each candy should be bite-sized for easy snacking.

    6. Apply the Icing

    To prepare the icing, break the dark chocolate into small pieces and place them in a microwave-safe bowl. Add 1 tablespoon of oil or butter to the chocolate. Microwave for about 35 seconds, then stir until the chocolate has completely melted and is smooth. The oil will give the chocolate a glossy finish and prevent it from cracking when set.

    Using two forks or your hands, dip each candy into the melted chocolate, ensuring that they are fully coated. Once coated, place the candies on a wire rack or a piece of parchment paper to allow the excess  chocolate to drip off and dry evenly.

    7. Chill and Enjoy

    After coating all the candies, place them in the refrigerator for about 20 minutes to allow the chocolate icing to set. Once the chocolate is firm, your homemade oatmeal and dried fruit sweets are ready to be enjoyed!

    See also  The Most Delicious Oatmeal Cookies: A Simple and Delicious Recipe

    These treats maintain their shape beautifully, and the chocolate coating remains intact when sliced or bitten into. Inside, you’ll find a delightful mix of crunchy walnuts and chewy oats, with a rich sweetness from the dates and honey.

    Tips for Success

    • Customizations: Feel free to add other dried fruits like cranberries or apricots to the mixture for a fruity twist. You can also experiment with different types of nuts, such as almonds or pecans.
    • Storage: Store these sweets in an airtight container in the refrigerator. They will stay fresh for up to 1 week.
    • Decoration: If you want to make them extra special, sprinkle the tops of the chocolates with crushed nuts or a pinch of sea salt before the chocolate sets.

    Nutrition Information (Per Serving)

    • Servings: 12-15 candies
    • Calories: 120 kcal
    • Protein: 3 g
    • Fat: 8 g
      • Saturated Fat: 2 g
    • Carbohydrates: 15 g
      • Sugars: 10 g
      • Fiber: 2 g
    • Sodium: 15 mg
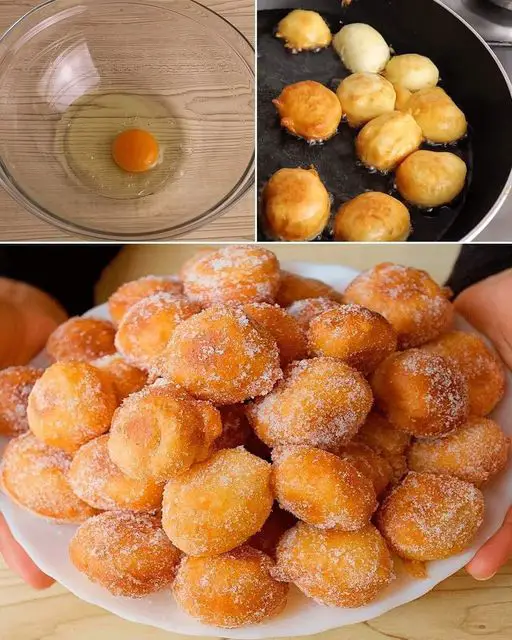
  • Perfectly Mini Doughnuts

    Perfectly Mini Doughnuts

    Perfectly Mini Doughnuts

    Table of Contents

    Ingredients :

    Making mini donuts is fun! Here’s a simple recipe:
    Ingredients:
    – 1 cup all-purpose flour
    – 1/4 cup granulated sugar
    – 1 teaspoon baking powder
    – 1/4 teaspoon salt
    – 1/2 cup milk
    – 1 egg
    – 1 tablespoon melted butter
    – 1/2 teaspoon vanilla extract
    – Oil for frying

    Instructions:

    1. In a bowl, whisk together the flour, sugar, baking powder, and salt.
    2. In another bowl, mix together the milk, egg, melted butter, and vanilla extract.
    3. Combine the wet and dry ingredients until just combined. Be careful not to overmix.
    4. Heat oil in a pot or deep fryer to 350°F (175°C).
    5. Using a mini donut pan or a piping bag, carefully pipe small circles of batter into the hot oil.
    6. Fry the mini donuts for about 1-2 minutes on each side, until golden brown.
    7. Remove the mini donuts from the oil and drain on paper towels.
    8. Optionally, toss the warm donuts in cinnamon sugar or powdered sugar.
    9. Enjoy your delicious homemade mini donuts!
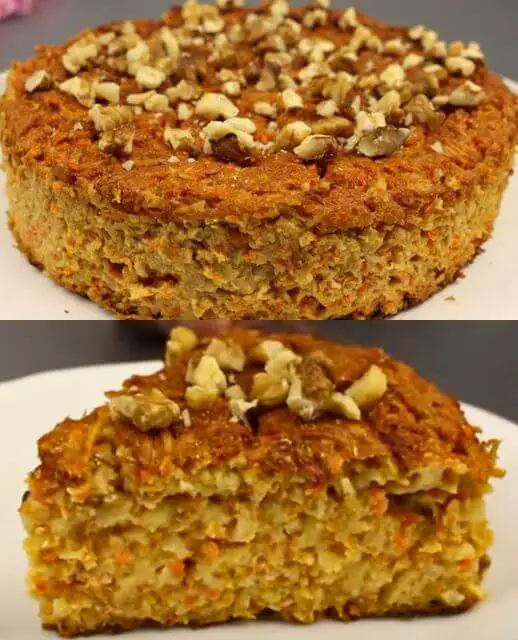
  • How to Make a Flourless Oatmeal and Carrot Pie – A Healthy Delight

    How to Make a Flourless Oatmeal and Carrot Pie – A Healthy Delight

    How to Make a Flourless Oatmeal and Carrot Pie 

    Table of Contents

    Are you looking for a delicious and healthy dessert option that doesn’t require flour, white sugar, or butter? Look no further! In this article, we will guide you through the steps to create a mouthwatering Flourless Oatmeal and Carrot Pie that’s both nutritious and satisfying. This recipe is perfect for those who want to indulge their sweet tooth while maintaining a wholesome diet.

    Ingredients

    1. 1 cup of Oats (approximately 130 g): Oats are rich in fiber and provide a hearty base for our pie.
    2. 1 cup of natural yogurt (250 ml): Natural yogurt adds creaminess and a tangy flavor to the pie.
    3. 2 units of Egg: Eggs act as a binding agent and contribute to the pie’s structure.
    4. 2 tablespoons of honey or syrup (about 50 g): Sweeten your pie naturally with honey or syrup for that irresistible taste.
    5. 2 units of Carrots (approximately 300 g): Carrots not only add a beautiful orange hue but also provide vitamins and antioxidants.
    6. 2 units of Apples (approximately 320 g): Apples bring a hint of sweetness and additional nutrients to the mix.
    7. Walnuts (amount to taste to decorate): Walnuts will be used to decorate and add a delightful crunch to your pie.

    Procedure

    Prepare the Oat and Yogurt Mixture

    In a bowl, combine the oats and natural yogurt, allowing them to rest together for about 5 minutes. This will help soften the oats and create a creamy base.

    See also  Chocolate Banana Oat Loaf Recipe
    Add the Eggs and Sweetener

    Next, add the eggs and your chosen sweetener (honey or syrup) to the oat and yogurt mixture. Ensure thorough mixing to incorporate all the ingredients.

    Grate the Carrots

    Finely grate the carrots and add them to the mixture. Carrots bring a natural sweetness and a pop of color to the pie.

    Peel and Grate the Apples

    Peel and grate the apples, then add them to the mixture. Apples contribute moisture and a fruity flavor to our pie.

    Pour the Mixture into a Mold

    Grease a pie mold or line it with parchment paper. Pour the prepared mixture into the mold, spreading it evenly.

    Decorate with Walnuts

    To add an extra layer of flavor and texture, sprinkle some walnuts on top of the pie. This will create a delightful crunch when you bite into it.

    Bake to Perfection

    Preheat your oven to 180°C (350°F) and bake the pie for approximately 40 to 45 minutes. You’ll know it’s done when a toothpick inserted into the pie comes out clean.

    Let It Cool

    Allow the pie to cool before serving. This will ensure that it sets properly and is easier to slice.

    Conclusion

    Congratulations! You’ve just created a scrumptious Flourless Oatmeal and Carrot Pie that’s both nutritious and indulgent. This dessert is perfect for those with dietary restrictions and anyone who appreciates a guilt-free treat.

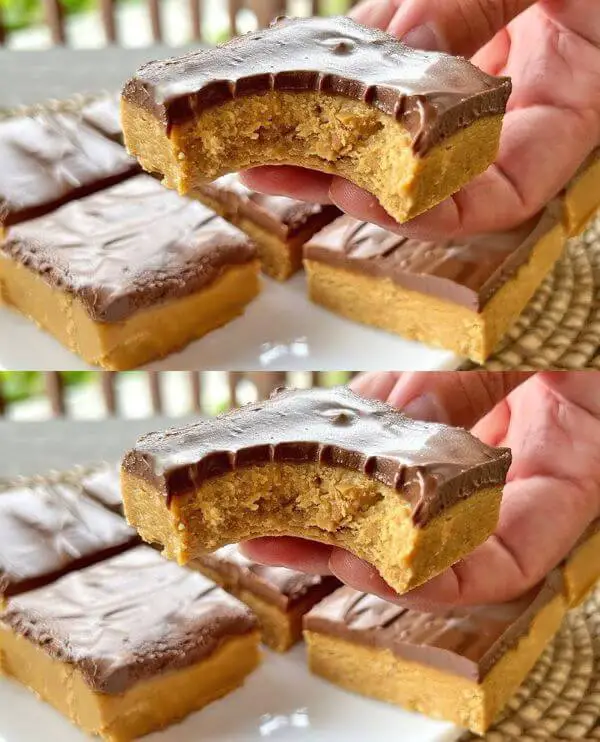
  • Protein Bars: A Tastier and Healthier Snickers Alternative in Just 5 Minutes

    Protein Bars: A Tastier and Healthier Snickers Alternative in Just 5 Minutes

    Protein Bars: A Tastier and Healthier Snickers Alternative in Just 5 Minutes

    Table of Contents

    In today’s fast-paced world, finding a nutritious yet delicious snack can be quite a challenge. Most of the readily available options are loaded with sugar and unhealthy additives. However, there’s a fantastic alternative that you can make at home in just five minutes – protein bars! These bars not only satisfy your sweet cravings but also provide a healthy dose of protein without the guilt. In this article, we’ll show you how to create your own protein bars that are not only tastier than Snickers but also free from sugar and baking. Let’s dive into the details.

    Ingredients You’ll Need:

    For the Base:

    • 8.8 ounces (250 grams) of peanut butter
    • 3.5-5.3 ounces (100-150 grams) of coconut flour (depending on the desired consistency)
    • 1.8 ounces (50 grams) of sweetener (choose from honey, maple syrup, or stevia)

    For the Glazing:

    • 1.8 ounces (50 grams) of cocoa powder
    • Coconut milk and sweetener to taste

    The Simple Preparation Process:

     Mixing the Dough
    1. Start by taking a bowl and adding 250 grams of peanut paste (butter) into it. You can easily make peanut paste at home if you prefer the homemade touch.
    2. Gradually add 100 grams of coconut flour into the bowl and mix it with the peanut paste. Depending on the desired consistency of your mixture, you can add the remaining 50 grams of coconut flour if necessary.
    3. Now, it’s time to sweeten the mixture. You have options here – you can use honey, stevia, or maple syrup as a natural sweetener. Add it to the bowl and mix everything thoroughly. The mixture should be thick but still easy to pour into a mold.
    See also  No frying! Eggplants that drive everyone crazy! Simple and cheap recipe
    Ricette di Alina 3 1
     Molding and Chilling
    1. Take a mold with a flexible rim; it should be smaller in size since this recipe makes a smaller batch. If you desire more, simply double the ingredients.
    2. Pour the prepared mixture into the mold and use a spatula to pat it down and level it nicely.
    3. Cover the mold with cling film and place it in the refrigerator for 2-3 hours to let it cool.
    Preparing the Glaze
    1. While your protein bar mixture is cooling in the fridge, you can prepare the glaze. Take 50 grams of cocoa and gradually add a little coconut milk until it forms a runny glaze.
    2. Adjust the sweetness of the glaze to your liking by adding sweetener. Mix it well.
    The Final Touch
    1. Once the protein bar mixture has cooled, remove it from the refrigerator.
    2. Pour the prepared glaze evenly over the top of the mixture.
    3. Cut the bars into cubes, and they are ready to be served immediately.

    These homemade protein bars not only taste amazing but also provide you with a nutritious snack option. Some even say they are tastier than Snickers! Plus, they are sugar-free and require no baking. What more could you ask for?

    Conclusion

    In a world filled with unhealthy snacking options, making your own protein bars is a game-changer. They are easy to prepare, healthier than traditional candy bars, and customizable to your taste preferences. Next time you’re craving a sweet treat, whip up a batch of these protein bars and enjoy guilt-free snacking.

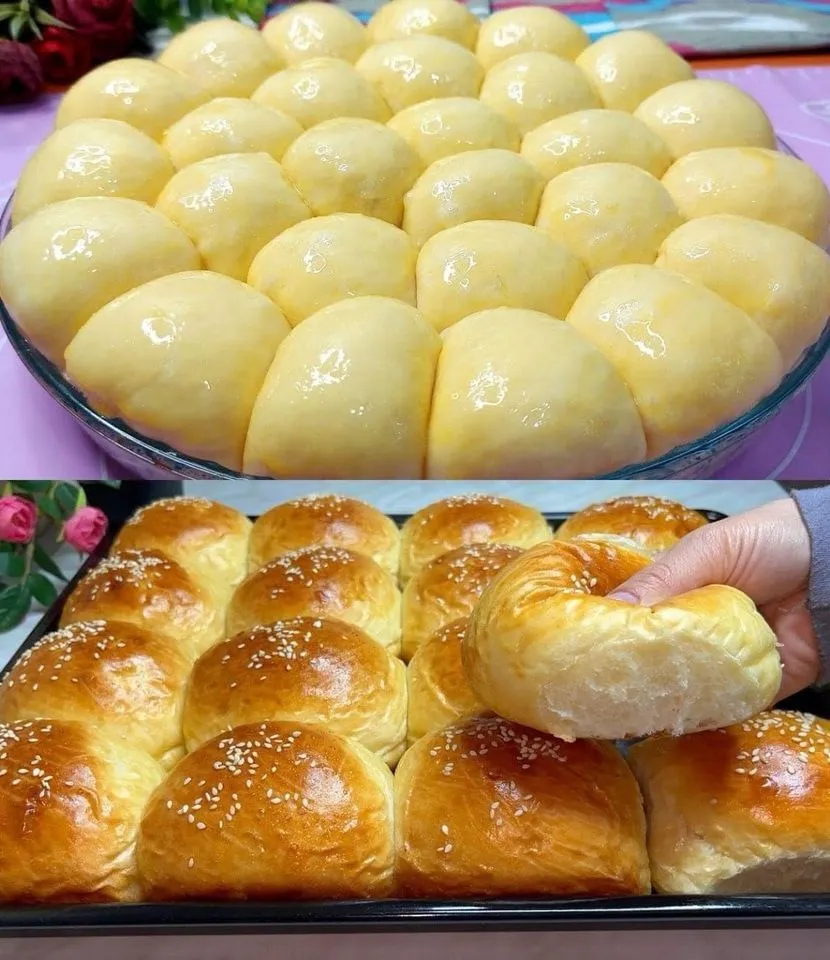
  • FLUFFY CONDENSED MILK BREAD EASY RECIPE

    FLUFFY CONDENSED MILK BREAD EASY RECIPE

    Have you ever wished for soft, flavorful bread that you could eat all day? Don’t look any further than Fluffy Condensed Milk Bread, a delicious treat that will make you a better baker. This post will talk about a simple but delicious recipe that is great for both new and experienced cooks.

    TO MAKE FLUFFY CONDENSED MILK BREAD YOU’LL NEED :

    • Warm milk, 240 ml (1 cup).
    • 1 egg
    • Condensed milk, 75 g (1/4 cup).
    • 30 g (2 tbsp) sugar
    • 7 g (2 ¼ tsp) dry yeast
    • 520 g (4 ¼ cup) flour
    • 1 tsp salt
    • 50 g (1/4 cup) softened butter
    • 45 g (3 tbsp) butter
    • 45 g (3 tbsp) condensed milk

    HOW TO MAKE IT :

    Whisk together sugar and condensed milk with warm milk. Add yeast and an egg, then whisk again.

    Combine wet and dry ingredients, including flour and salt.

    Work the dough until it comes together using dough hooks. Add the butter and knead the dough for ten minutes.

    Allow the dough to rest for one hour.

    ⅔  of the dough is divided and rolled into a 25×40 centimeter rectangle.

    The dough is rolled into a log and then cut into pieces. Place dough pieces in a preheated baking dish and set aside.

    To make smaller buns, repeat the procedure with the remaining 1/3 of the dough.

    Allow the rolls to rest for one hour.

    Before baking, brush the top of each bun with egg wash.

    Bake at 180C/350F for twenty-five to thirty minutes. For smaller buns, twenty minutes will suffice.

    Butter and condensed milk are whisked in equal proportions. Apply this mixture to warm buns while they are still warm.

    When completely cooled, remove the baked goods from the baking pans.

    TIPS FOR SUCCESS

    Here are some important things you should do to make the best Fluffy Condensed Milk Bread:

    Ingredients That Are Fresh: For the best effects, use ingredients that are truly fresh.

    Room Temperature: To make sure the mixing goes smoothly, make sure that things like eggs and butter are at room temperature.

    Correct Kneading: Give the dough enough time to be kneaded all the way through to make it fluffy.

    Recipe source: cookist

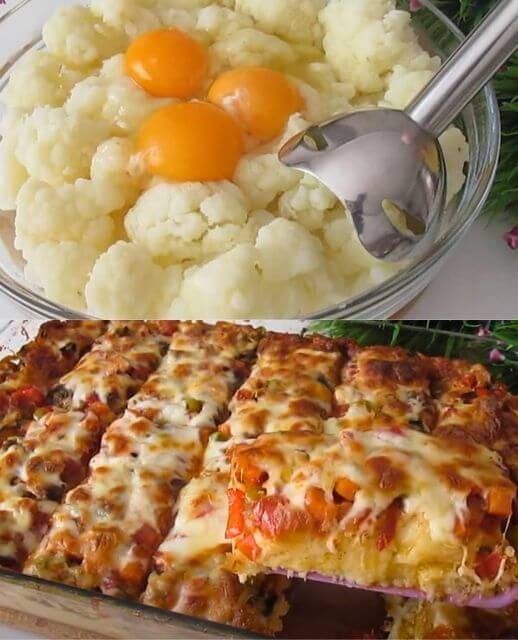
  • This Is Cauliflower: Why Didn’t I Know This Recipe Before? Better Than Meat! No Frying

    This Is Cauliflower: Why Didn’t I Know This Recipe Before? Better Than Meat! No Frying

    This Is Cauliflower: Why Didn’t I Know This Recipe Before? Better Than Meat! No Frying

    Table of Contents

    Cauliflower, often overlooked in the realm of vegetables, is about to take center stage in your kitchen. With just a few simple ingredients and easy steps, you can create a dish that’s not only delicious but also nutritious. Let’s dive into the recipe and uncover the magic of cauliflower!

    Ingredients

    To embark on this culinary adventure, gather the following ingredients:

    • Cauliflower: 1.5 kg (3.5 lbs approximately)
    • Water: 1.5 l (6.5 cups)
    • Salt: 1 tsp
    • Milk: 2 tbsp
    • Eggs: 3
    • Oil: 3 tbsp
    • Flour: 3 tbsp
    • Mushrooms: 100 g (3.5 oz)
    • Green peppers: 4
    • Red peppers: 2
    • Carrot: 1
    • Onion: 1
    • Tomatoes: 2
    • Salt: 1 tsp
    • Mint: 1 tsp
    • Red pepper: 1 tsp
    • Pepper: 1 tsp
    • Oil: 4 tbsp
    • Cheese: 150 g (5.5 oz)

    Step-by-Step Instructions

     Preparing the Cauliflower Base

    • Cut the cauliflower into florets and simmer in water with salt and milk until soft.
    • Blend the cauliflower with eggs to create a smooth puree consistency.

    Cooking the Vegetables

    • Dice mushrooms, peppers, onion, carrot, and tomatoes.
    • Sauté onions, carrots, and mushrooms until tender.
    • Add tomatoes and seasonings, then cook until flavors meld.

    Assembling and Baking

    • Grease a baking dish with oil and spread cauliflower puree.
    • Top with sautéed vegetables and grated cheese.
    • Bake until golden and bubbly.
    Benefits of Cauliflower

    Cauliflower is more than just a bland vegetable. It’s packed with nutrients like vitamin C, vitamin K, and folate. Plus, it’s low in calories and high in fiber, making it a great choice for weight management and digestive health.

    See also  Hawaiian Banana Bread
    Nutritional Value

    A single serving of this cauliflower dish provides a hefty dose of vitamins, minerals, and antioxidants. It’s a wholesome meal that nourishes your body from the inside out.

    Variations

    Get creative with your cauliflower dish by experimenting with different seasonings, toppings, and mix-ins. From spicy buffalo cauliflower to cheesy cauliflower gratin, the possibilities are endless.

    Tips and Tricks
    • Don’t overcook the cauliflower to avoid a mushy texture.
    • Customize the dish with your favorite vegetables and cheeses.
    • Serve with a side of fresh salad or crusty bread for a complete meal.
    Serving Suggestions

    This cauliflower creation pairs perfectly with a crisp green salad and a glass of chilled white wine. Whether you’re hosting a dinner party or enjoying a cozy night in, it’s sure to impress even the most discerning palates.

    Conclusion

    Say goodbye to boring cauliflower and hello to a world of flavor and possibility. With this recipe in your repertoire, you’ll never look at cauliflower the same way again. So roll up your sleeves, preheat your oven, and get ready to embark on a culinary adventure that’s truly cauliflower-licious!

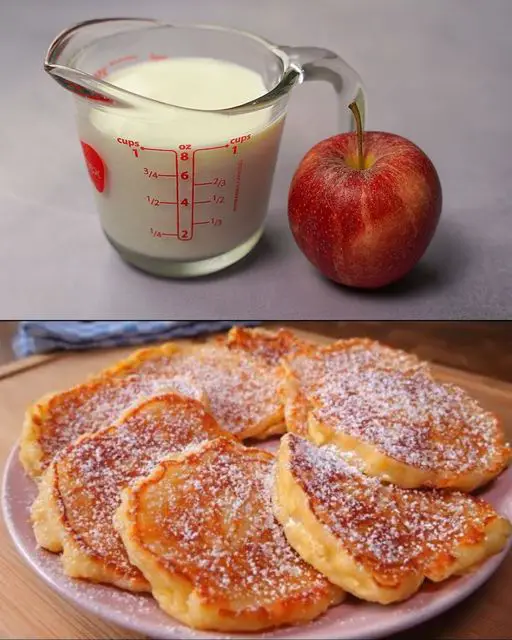
  • Apple Pancakes Recipe

    Apple Pancakes Recipe

    Apple Pancakes Recipe

    Table of Contents

    Ingredients:

    1 large apple
    Lime or lemon juice
    1 egg
    1 tablespoon sugar
    1/2 teaspoon vanilla sugar
    100 grams (3.5 ounces) yogurt
    100 ml (3.5 fl oz) milk
    1 teaspoon baking powder
    1 teaspoon rum
    1/2 teaspoon salt
    160 grams (1 cup) all-purpose flour

    Oil for frying

    Instructions:

    Prepare the Apple:
    Peel and grate the apple. Add a splash of lime or lemon juice to prevent browning.

    Make the Batter:
    In a mixing bowl, break the egg and add the sugar and vanilla sugar. Mix well until combined.
    Stir in the yogurt and milk until the mixture is smooth.
    Add the baking powder, rum, and salt. Mix well.
    Gradually add the flour, stirring until the batter is smooth and free of lumps.
    Fold in the grated apple.
    Let the batter rest for 10 minutes.

    Cook the Pancakes:
    Heat a pan over medium heat and lightly oil it.
    Spoon about 1 tablespoon of batter onto the pan for each pancake.
    Cook until bubbles form on the surface and the edges are set, then flip and cook until golden brown on the other side.

    Serve:
    Serve the pancakes warm, and enjoy the soft, delicious apple pancakes!
    Serving Suggestions:

    Serve with a drizzle of maple syrup or honey.
    Add a sprinkle of powdered sugar for extra sweetness.
    Pair with a dollop of whipped cream or a scoop of vanilla ice cream for a decadent treat.
    Fresh fruit or a fruit compote makes a lovely topping.
    Cooking Tips:

    Make sure to let the batter rest for 10 minutes to allow the flour to hydrate, resulting in fluffier pancakes.
    Use a non-stick pan or a well-seasoned cast iron skillet for best results.
    Adjust the heat as needed to prevent the pancakes from burning.
    Nutritional Benefits:

    See also  Quick and Simple Spanish Recipe: Fried Anise-Infused Doughnuts

    Apples: Add fiber and vitamin C to the pancakes.
    Yogurt: Provides a good source of protein and probiotics.
    Minimal Oil: Using minimal oil for frying helps keep the pancakes light and not overly greasy.

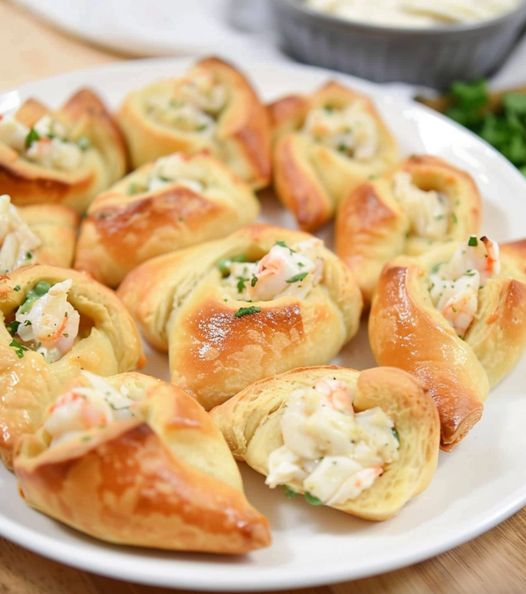
  • Creamy Crab Snacks

    Creamy Crab Snacks

    Ingredients

    • 3 ounces softened cream cheese
    • Salt and pepper to taste
    • ¾ cup fully cooked crabmeat
    • 2 chopped green onions
    • ¼ cup mayonnaise
    • 8 ounce roll of crescent roll dough
    • Light pinch of cayenne pepper

    Instructions

      1. Preheat oven to 375*
      2. Spray baking sheet with cooking spray
    1. Unroll the dough on a lightly floured area, pinch seams together to form rectangles
    2. Cut into 4 columns with 6 rows.
    3. In a mixing bowl combine mayo, onion, cream cheese, cayenne pepper and crab meat. Mix well.
    4. Spoon one spoonful into the top corner of each square you made.
    5. Fold the dough over the filling starting at the same corner. Make sure to tuck the corner under the filling.
    6. When you almost reach the opposite corner, stop. Grab the opposite corner and bring it back over the roll you made.
    7. Press lightly to seal
    8. You can brush egg white over the tops if desired.
    9. Bake for 10 to 15 minutes, until golden brown.
    Nutrition Information:

    Serving Size: 1 piece
    Amount Per Serving: Calories: 120Total Fat: 26gCholesterol: 220mgSodium: 44mgProtein: 20g

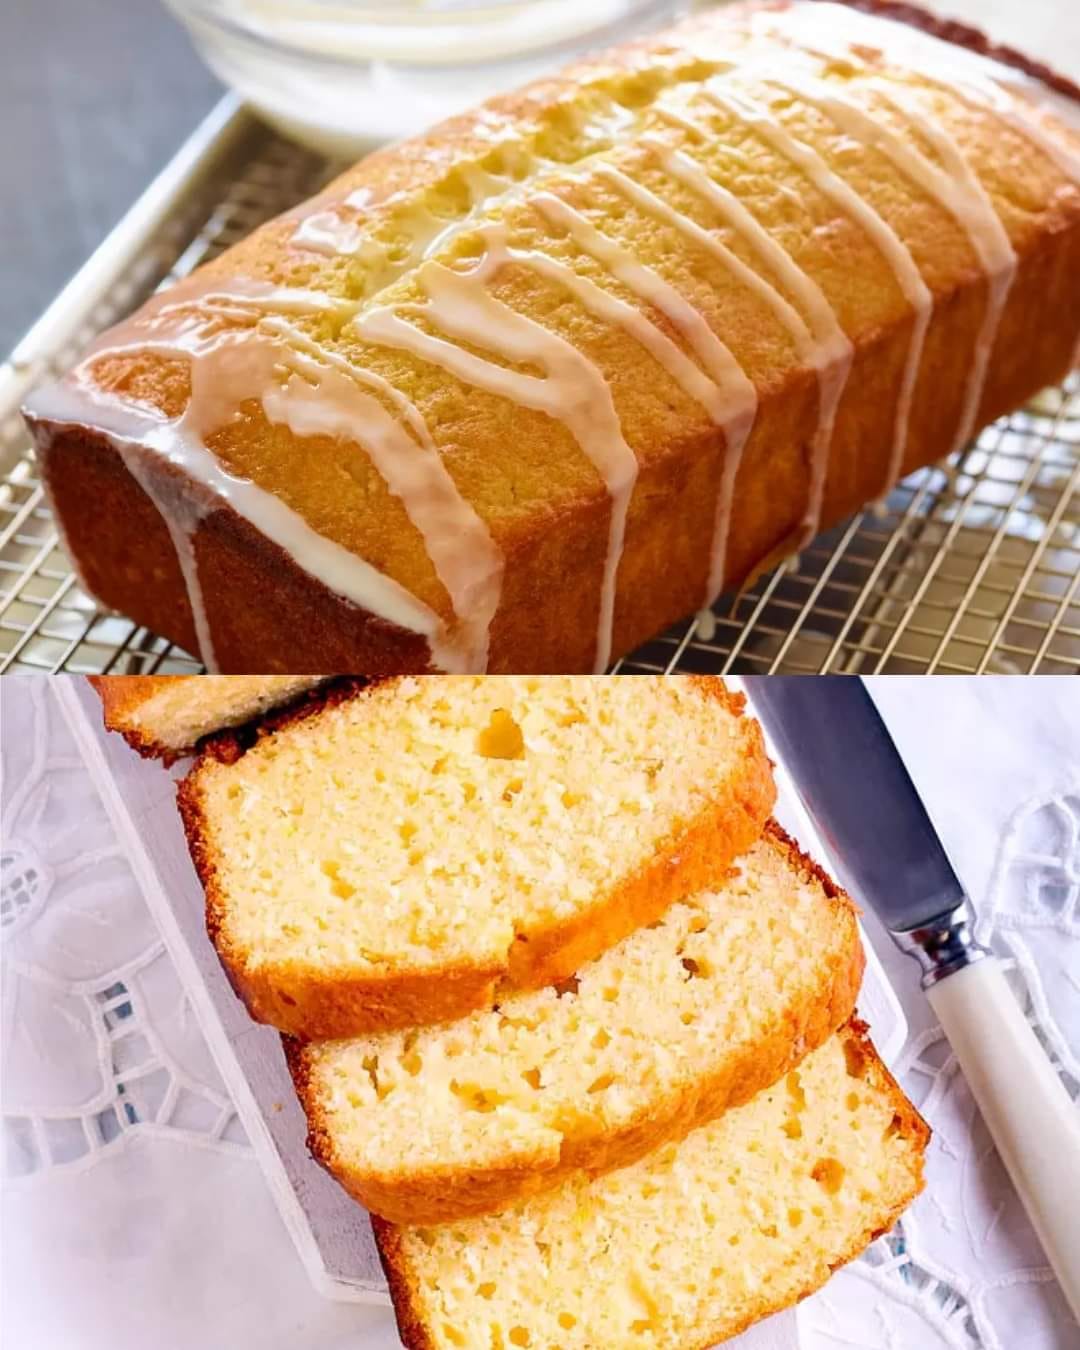
  • Lemon Ginger Loaf Cake

    Lemon Ginger Loaf Cake

    Lemon Ginger Loaf Cake

    Table of Contents

    Ingredients:

      • 1 ½ cups (190g) all-purpose flour
      • 1 ¼ teaspoons baking powder
      • ¾ teaspoon ground ginger
      • ¼ teaspoon salt
      • 1 cup (200g) granulated sugar
      • Zest of 1 lemon
      • 6 ounces (170g) butter, softened
      • 3 ounces (85g) cream cheese, softened
      • 2 large eggs
    • 8 ounces (225g) lemon yogurt

    For the Glaze:

      • Confectioner’s sugar (to taste)
    • Fresh lemon juice (enough to achieve desired consistency)

    Directions:

      1. Prepare the Pan:
        Preheat your oven to 325℉ (160℃). Grease an 8 1/2 x 4 1/2 inch loaf pan and dust it lightly with flour.
      1. Mix Dry Ingredients:
        In a medium bowl, sift together the flour, baking powder, ginger, and salt. Set aside.
      2. Prepare Lemon Sugar:
        Sprinkle a few tablespoons of granulated sugar on a cutting board. Add the lemon zest and chop it as finely as possible. Transfer to a large mixing bowl.
      3. Cream the Butter and Sugar:
        Add the remaining granulated sugar, softened butter, and cream cheese to the bowl with the lemon sugar. Beat on high speed until the mixture is light and fluffy, about 3 minutes.
      1. Add Eggs and Yogurt:
        Add the eggs, one at a time, mixing well after each addition. Then, add the lemon yogurt and mix until well combined.
      2. Combine Wet and Dry Ingredients:
        Stop the mixer and add the sifted dry ingredients to the wet mixture. Mix on low speed just until combined, being careful not to overmix.
      3. Bake:
        Transfer the batter to the prepared loaf pan. Bake in the preheated oven for 60-70 minutes, or until a toothpick inserted in the center comes out clean.
    1. Cool:
      Allow the cake to cool in the pan for 5 minutes, then invert it onto a wire rack to cool completely.
    2. Prepare the Glaze:
      In a small bowl, mix confectioner’s sugar with enough fresh lemon juice to achieve a smooth, pourable consistency. Pour the glaze over the warm cake.
    See also  Quick and Easy Bread Substitute with Just 3 Ingredients

    Serving Suggestions:

    • Serve the cake with a dollop of whipped cream or a scoop of vanilla ice cream.
    • Garnish with fresh lemon slices or a sprinkle of candied ginger for an extra touch.

    Cooking Tips:

    • Make sure the butter and cream cheese are softened to ensure a smooth batter.
    • For a stronger ginger flavor, add an extra pinch of ground ginger or use fresh grated ginger.

    Nutritional Benefits:

      • Lemon: High in vitamin C and adds a refreshing flavor.
      • Ginger: Known for its anti-inflammatory properties and digestive benefits.
      • Yogurt: Adds moisture and a slight tang while providing calcium and probiotics.

    Dietary Information:

      • Vegetarian-friendly.
      • Can be made gluten-free by substituting the flour with a gluten-free flour blend.

    Nutritional Facts (Per Serving):

      • Calories: 300
      • Carbohydrates: 40g
      • Protein: 5g
      • Fat: 14g
      • Fiber: 1g

    Storage:

    • Store any leftovers in an airtight container at room temperature for up to 3 days.
    • The cake can also be frozen for up to 1 month. Thaw at room temperature before serving.
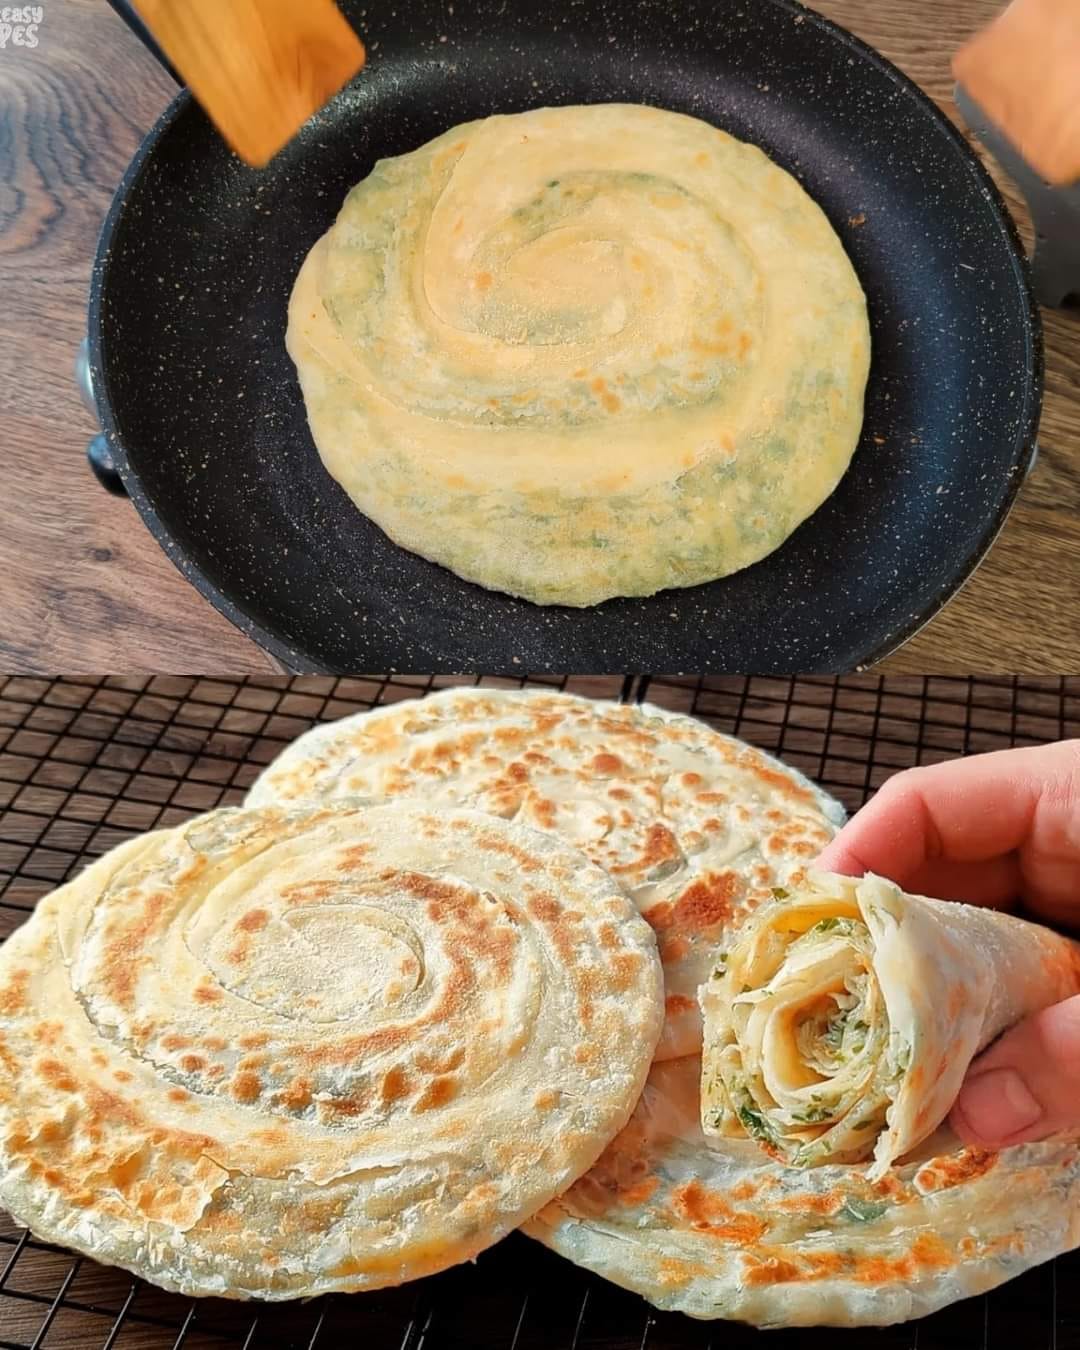
  • Cheesy Herb Bread

    Cheesy Herb Bread

    Cheesy Herb Bread

    Table of Contents

    Ingredients:

    For the Dough:

      • 240 grams all-purpose flour (about 1 1/2 cups)
      • 1 teaspoon salt
    • 150 milliliters warm milk (about 3/5 cup)

    For the Filling:

      • 150 grams grated cheddar cheese (or your favorite cheese)
    • Bunch of parsley, chopped
    • Small bunch of dill, chopped

    For Cooking:

    • 60 grams butter, melted

    Instructions:

      1. Create the Dough:
          • In a large mixing bowl, combine the flour and salt.


        • Gradually add the warm milk while stirring with a spoon or spatula.
        • Once all the milk is incorporated, use your hands to knead the dough on a lightly floured surface for a few minutes until it becomes smooth and elastic.
    1. Prepare the Filling:
      • In a separate bowl, combine the grated cheddar cheese, chopped parsley, and chopped dill. This mixture will add bursts of flavor and color to your bread.
    2. Assemble and Fill:
        • Divide the dough into two equal portions.


        • On a lightly floured surface, roll out one portion of dough into a thin circle.
        • Brush the rolled-out dough with half of the melted butter.
        • Evenly spread the cheese and herb mixture over the buttered dough, leaving a small border around the edge.


    3. Double the Doughy Goodness:
        • Roll out the second portion of dough to a similar size as the first.
        • Carefully place this dough round on top of the filling, pressing down gently to seal the edges and enclose the cheesy goodness inside.


    4. Pan-Frying Perfection:
        • Heat a large frying pan over medium heat.
        • Add a bit of the remaining melted butter to coat the bottom of the pan.


      • Once hot, carefully transfer the assembled cheese bread to the pan.
    5. Golden Goodness:
        • Cook the bread for 5-7 minutes per side, or until golden brown and cooked through.


      • The cheese should be melted and bubbly.
    6. Slice and Savor:
        • Carefully transfer the cooked bread to a cutting board and slice it into wedges.


      • Serve immediately and enjoy your delicious homemade Cheese Bread!

    Serving Suggestions:

    • This bread pairs perfectly with soups, salads, or as an appetizer.
    • Serve with a dipping sauce such as marinara or garlic butter for an extra treat.

    Cooking Tips:

    • Ensure the dough is rolled out thinly for a crispier crust.
    • Adjust the herbs to your taste or try adding other favorite herbs.

    Nutritional Benefits:

    • Cheddar Cheese: Provides protein and calcium.
    • Parsley and Dill: Rich in vitamins A and C, and antioxidants.

    Dietary Information:

    • This recipe is vegetarian.
    • To make it gluten-free, use a gluten-free flour blend.

    Storage Tips:

    • Store any leftovers in an airtight container in the refrigerator for up to 2 days.
    • Reheat in a frying pan or oven before serving.