Author: Admin

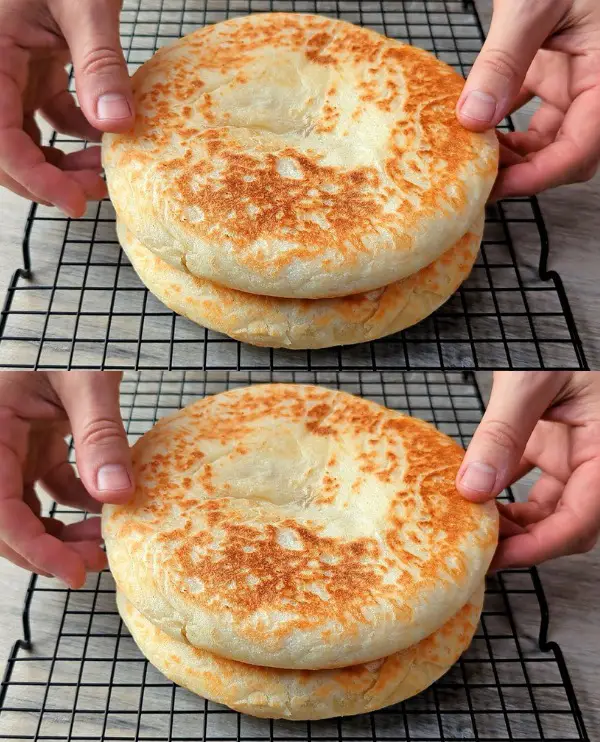
  • Meal Prep Recipe: Homemade Bread Stuffed with Ham and Cheese

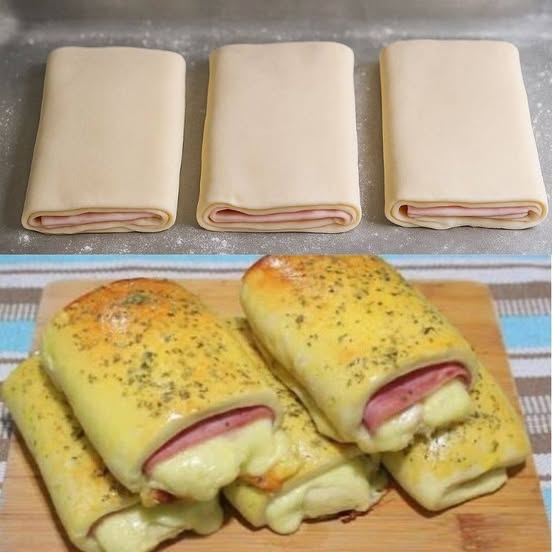
    Meal Prep Recipe: Homemade Bread Stuffed with Ham and Cheese

    Skip the takeout — this easy, delicious stuffed bread is all you need!

    Hello everyone! Welcome back to our food blog — your go-to destination for irresistible recipes you can whip up at home. Whether you’re looking for decadent desserts, quick breakfasts, craveable snacks, or refreshing salads, we’ve got you covered.

    Today, we’re sharing a homemade snack that’s comforting, budget-friendly, and absolutely delicious: Bread Stuffed with Ham and Cheese. Think of it as the perfect hybrid between a sandwich and a soft roll — ideal for meal prep, lunchboxes, or any-time snacking!


    Ingredients

    Dough:

    • 500 g all-purpose flour (about 17.6 oz or 4 cups)

    • 10 g dry yeast (or 30 g fresh yeast) (0.35 oz / 1.05 oz)

    • 1 large egg

    • 1 tablespoon granulated sugar

    • 1 teaspoon salt

    • 2 tablespoons vegetable oil

    • 250 ml warm milk (8.5 fl oz)

    Filling:

    • 300 g sliced ham (10.5 oz)

    • 300 g sliced mozzarella cheese (10.5 oz)

    To Finish:

    • 1 egg yolk (for brushing)

    • Dried oregano to taste


    ‍ Instructions

    1. Activate the Yeast
      In a large mixing bowl, combine the dry yeast, sugar, and warm milk. Let it sit for about 5 minutes until frothy. This means your yeast is alive and ready to go!

    2. Make the Dough
      Add the egg, oil, and salt to the yeast mixture and stir to combine.
      Gradually add the flour, mixing until a soft dough forms. It should be slightly tacky, but not sticky enough to cling to your hands.

    3. Knead and Let Rise
      Transfer the dough to a lightly floured surface and knead for 8–10 minutes until smooth and elastic.
      Shape into a ball, place in a lightly oiled bowl, cover with a kitchen towel, and let it rise in a warm place for about 1 hour, or until doubled in size.

    4. Shape the Rolls
      Once risen, roll the dough out on a floured surface into a large rectangle about ½ cm (¼ inch) thick.
      Cut into smaller rectangles (approx. 10×15 cm or 4×6 inches).
      Place a slice of ham and a slice of mozzarella in the center of each. Fold the edges inward like a parcel or envelope and pinch to seal.

    5. Prepare for Baking
      Arrange the stuffed rolls on a greased or parchment-lined baking tray.
      Beat the egg yolk and brush the tops of the rolls. Sprinkle with dried oregano for a burst of herby flavor.

    6. Bake
      Preheat the oven to 180°C (350°F).
      Bake the rolls for 20–25 minutes, or until golden brown and puffed up. Let them cool slightly before serving.


    Serving Ideas

    • Serve warm with a side of tomato sauce or garlic dip.

    • Pair with a fresh green salad for a light lunch.

    • Great for picnics, parties, or even a savory breakfast.


    Storage & Meal Prep Tips

    • Store leftovers in an airtight container in the refrigerator for up to 3 days.

    • To reheat, pop them in the oven or air fryer for a few minutes to crisp up the outside.

    • These freeze beautifully! Wrap individually and freeze for up to 1 month. Thaw overnight and reheat before serving.


    Let Us Know!

    Have you tried this recipe? Share your experience in the comments below or tag us on social media! We love seeing your creations.

  • Cheddar Bacon Ranch Pinwheels

    Cheddar Bacon Ranch Pinwheels

    The Ultimate No-Bake Party Appetizer

    Whether you’re throwing a game day bash, prepping a party platter, or just want a crave-worthy snack that’s quick and satisfying, these Cheddar Bacon Ranch Pinwheels have you covered. Creamy, cheesy, savory, and loaded with flavor, these pinwheels are always a hit—and they take just minutes to put together.


    Total Time: 20 minutes (plus 1 hour chill time)

    Yield: ~30 pinwheels (serves 6–8 as an appetizer)


    Ingredients

    • 4 large flour tortillas (10-inch size)

    • 8 oz (225g) cream cheese, softened to room temperature

    • 1 tablespoon ranch seasoning mix (store-bought or homemade)

    • 1 cup shredded sharp cheddar cheese

    • 1/2 cup cooked and crumbled bacon (about 6 slices)

    • Optional: 2 tablespoons chopped green onions (for extra flavor and freshness)


    Instructions

    1. Prepare the Filling

    In a medium bowl, combine:

    • 8 oz cream cheese

    • 1 tablespoon ranch seasoning mix

    Mix thoroughly with a rubber spatula or hand mixer until smooth and well blended.

    Tip: Let the cream cheese sit at room temperature for 10–15 minutes before mixing to make this easier and fluffier.


    2. Add the Mix-ins

    Fold in:

    • 1 cup shredded cheddar cheese

    • 1/2 cup crumbled bacon

    • Optional: chopped green onions

    Stir until evenly distributed throughout the cream cheese mixture.


    3. Assemble the Pinwheels

    • Lay out the four tortillas on a clean work surface.

    • Spread a generous layer of the filling evenly across each tortilla, going all the way to the edges for a consistent roll.

    ✍️ Pro Tip: Use the back of a spoon or an offset spatula to spread evenly without tearing the tortilla.


    4. Roll and Wrap

    • Roll each tortilla tightly from one edge to the other, creating a firm log shape.

    • Wrap each roll individually in plastic wrap to help it hold its shape.


    5. Chill

    Refrigerate the wrapped rolls for at least 1 hour. This firms the filling and makes slicing easier and neater.

    Make-Ahead Friendly: You can chill overnight—just slice before serving.


    6. Slice and Serve

    • Remove the plastic wrap.

    • Use a sharp serrated knife to slice each roll into 1-inch pinwheels (you’ll get about 7–8 slices per roll).

    • Arrange on a platter and serve cold for the best texture and taste.


    Variations

    • Spicy Kick: Add a dash of hot sauce or mix in finely chopped jalapeños.

    • Low-Carb Option: Use large romaine or iceberg lettuce leaves instead of tortillas.

    • Cheese Swap: Try pepper jack, smoked gouda, or mozzarella for a different flavor.

    • Veggie Boost: Add diced bell peppers, shredded carrots, or baby spinach.


    Tips for Success

    • Even Slicing: Chill thoroughly and use a serrated knife for the cleanest cuts.

    • Double the Batch: This recipe scales well—double everything for larger gatherings.

    • Keep Wrapped Until Serving: This keeps them moist and prevents the edges from drying.

    • Serve With Dip: Pair with extra ranch dressing, BBQ sauce, or chipotle mayo for dipping.


    Serving Ideas

    These pinwheels are perfect for:

    • Game day snack platters

    • Birthday parties and potlucks

    • Packed lunches

    • Picnics or road trip bites

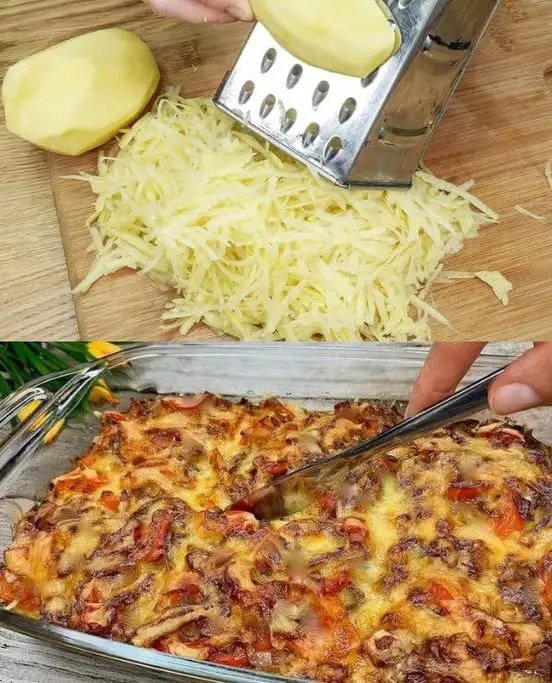
  • Easy and Delicious Potato Bake Recipe: A Budget-Friendly Delight

    Easy and Delicious Potato Bake Recipe: A Budget-Friendly Delight

    Easy and Delicious Potato Bake Recipe: A Budget-Friendly Delight

    Ingredients:

    • 3 large potatoes
    • 2 eggs
    • 1 onion
    • 1 red pepper
    • 1 teaspoon of salt
    • 1 pinch of marjoram
    • 1 pinch of nutmeg
    • 1 pinch of ground red pepper
    • 2 tablespoons of oil

    Method of Preparation:

    Prepare the Potatoes

    1. Peel the potatoes and grate them using a coarse grater.
    2. Place the grated potatoes in a large bowl and cover them with water. Mix well by hand and set aside.
    Prepare the Onion and Pepper Mixture
    1. Peel and dice the onion.
    2. Wash and clean the red pepper, removing the stalks and seeds, and cut it into pieces.
    3. Heat the oil in a pan over medium heat. Once hot, add the diced onion and cook for 3-4 minutes.
    4. Add the chopped red pepper to the pan and mix well. Simmer for 5-7 minutes, then remove from heat.
    Prepare the Potato Mixture
    1. Drain the water from the grated potatoes and squeeze out any remaining water with your hands. Place the potatoes in a bowl.
    2. Add the eggs, salt, marjoram, black pepper, and nutmeg to the bowl with the potatoes. Stir well to combine.
    Assemble and Bake
    1. Preheat your oven to 180 degrees Celsius (350 degrees Fahrenheit).
    2. Brush a baking dish with 1 tablespoon of oil.
    3. Pour the potato mixture into the baking dish, spreading it out evenly.
    4. Top the potatoes with the onion and pepper mixture, spreading it evenly over the top.
    5. Grate cheese over the dish, if desired.
    6. Place the baking dish in the preheated oven and bake for 50 minutes, or until the potatoes are cooked through and the top is golden brown.
  • Potato and Ground Beef Bake Recipe

    Potato and Ground Beef Bake Recipe

    This potato and ground beef bake is the ultimate comfort food, combining tender, crispy potatoes with savory ground beef, fresh vegetables, and a rich blend of spices. Topped with melted cheese and baked to perfection, this dish is sure to become a family favorite. It’s perfect for busy weeknights or a cozy weekend dinner, offering a wholesome and filling meal that everyone will love.

    Preparation Time:

    Prep Time: 15 minutes
    Cook Time: 30 minutes
    Total Time: 45 minutes
    Ingredients:
    1 kg (2 lb 4 oz) potatoes, peeled and chopped into bite-sized pieces
    Salt, black pepper, rosemary (to taste)
    4 eggs
    Parsley, chopped (for garnish)
    1 onion, chopped
    1 clove of garlic, minced
    1/2 bell pepper, chopped
    4 small tomatoes, chopped
    350 g (12 oz) ground beef
    Chili pepper (to taste)
    100 g (4 oz) cheese, grated
    Instructions:

    Prepare the Potatoes:
    Peel and chop the potatoes into bite-sized pieces.
    Season the potatoes with salt, pepper, and rosemary.
    Cook in a large skillet over medium heat until the potatoes are cooked through and browned, stirring occasionally.
    Prepare the Eggs:
    In a bowl, crack the eggs and season with salt and pepper.
    Beat the eggs until well mixed and set aside.
    Prepare the Vegetables:
    Chop the onion and bell pepper, and mince the garlic.
    Chop the tomatoes and set aside.
    Cook the Vegetables and Ground Beef:
    In the same skillet, heat a bit of oil and add the onion, garlic, and bell pepper. Cook for about 5 minutes until softened.
    Add the ground beef to the skillet. Season with salt, pepper, and chili pepper. Cook until the beef is browned.
    Assemble the Bake:
    Preheat your oven to 180°C (360°F).
    In a baking dish, layer half of the cooked potatoes.
    Spread the ground beef and vegetable mixture over the potatoes.
    Pour the beaten eggs over the top.
    Layer the remaining potatoes on top.
    Sprinkle the grated cheese evenly over the top.
    Bake:
    Bake in the preheated oven for 30 minutes until the top is golden and the cheese is melted.
    Serve:

    Remove from the oven and let it cool for a few minutes.
    Garnish with chopped parsley and serve warm.
    Serving Suggestions:
    Serve with a side salad for a balanced meal.
    Pair with a glass of red wine for an elegant touch.
    Cooking Tips:
    Cook the potatoes until they are nicely browned for extra flavor.
    Adjust the seasoning according to your taste preference.
    For a spicier dish, add more chili pepper.
    Nutritional Benefits:
    Potatoes are a great source of vitamin C, potassium, and fiber.
    Ground beef provides protein and essential vitamins like B12 and iron.
    Eggs add additional protein and healthy fats.
    Dietary Information:
    Gluten-Free: This dish can be adapted to be gluten-free by ensuring all ingredients used are gluten-free.
    Dairy-Free: Can be made dairy-free by using a dairy-free cheese alternative.
    Why You’ll Love This Recipe:
    Comforting: It’s a satisfying meal that’s perfect for any occasion.
    Nutritious: Packed with healthy ingredients and delicious flavors.
    Easy to Make: Simple to prepare and can be made ahead of time.
    Conclusion:
    I hope you enjoy this hearty potato and ground beef bake as much as I do. It’s a wonderful dish that brings warmth and satisfaction to your table. Don’t forget to share your thoughts in the comments and let me know from which country you’re watching my channel. Bon Appetit, friends!

    Frequently Asked Questions (FAQ):
    Can I use sweet potatoes instead of regular potatoes?
    Yes, sweet potatoes can be a delicious alternative, adding a hint of sweetness to the dish.
    What type of cheese works best for this recipe?
    Cheddar, mozzarella, or a mix of both work great for a melty, flavorful topping.
    Can I make this dish ahead of time?
    Yes, you can assemble the bake ahead of time, refrigerate it, and then bake it when ready to serve.
    Is there a vegetarian version of this dish?
    Substitute the ground beef with a plant-based meat alternative or lentils for a vegetarian version.
    Can I add more vegetables to the bake?
    Absolutely! Zucchini, mushrooms, or spinach would be great additions.
    How do I know when the bake is done?
    The bake is done when the cheese is melted and the top is golden brown.
    Can I freeze the leftovers?
    Yes, you can freeze the baked dish in individual portions and reheat them when needed.
    What can I serve with this dish?
    A fresh green salad, steamed vegetables, or garlic bread would complement this dish well.
    How long will leftovers keep in the fridge?
    Leftovers can be stored in the fridge for up to 3 days in an airtight container.
    Is it necessary to cook the potatoes before baking?
    Yes, cooking the potatoes first ensures they are fully cooked and have a nice crispy texture.

  • Chicken Roulade with Creamy Filling and Roasted Potatoes

    Chicken Roulade with Creamy Filling and Roasted Potatoes

    Ingredients

    For the Chicken Roulade:

    • 2 chicken breasts (approximately 450g/1 lb)
    • 100g (3.5 oz) quark cheese
    • 1 hard-boiled egg
    • 1 boiled carrot
    • 1 pickled cucumber
    • 2 tablespoons (30ml) sour cream
    • 30g (1 oz) cheese, grated
    • Large cabbage leaves for wrapping
    • Salt and black pepper to taste
    • 1 teaspoon dried oregano
    • 1 teaspoon sweet paprika
    • 1 teaspoon dried garlic powder

    For the Roasted Potatoes:

    • 500g (1.1 lb) potatoes
    • 2 tablespoons (30ml) vegetable oil
    • 1 teaspoon dried basil
    • 1 teaspoon dried oregano
    • Salt and black pepper to taste
    • 1 teaspoon sweet paprika
    • 1 teaspoon dried garlic powder

    For the Fresh Salad:

    • 1/2 cucumber, sliced
    • 1 bell pepper, chopped
    • For the Dressing:
    • 1 tablespoon (15ml) mayonnaise
    • 1 tablespoon (15ml) sour cream
    • 1 teaspoon (5ml) mustard
    • Fresh lemon juice to taste
    • Salt and black pepper to taste

    Instructions

    Preparation Time: 45 minutes

    Cooking Time: 30-35 minutes

    Total Time: 1 hour 15 minutes

    1. Preheat the oven to 180°C (350°F).
    2. Prepare the filling:
    • Finely chop the boiled egg, carrot, and pickled cucumber
    • Mix with quark cheese, sour cream, and grated cheese
    • Season with salt and dried garlic
    • Set aside
    1. Prepare the chicken:
    • Place chicken breasts between plastic wrap
    • Pound until approximately 1/4 inch thick
    • Season with salt, pepper, oregano, paprika, and garlic powder
    1. Assemble the roulades:
    • Blanch cabbage leaves in boiling water until pliable
    • Place seasoned chicken on cabbage leaf
    • Spread filling mixture evenly
    • Roll tightly, securing with toothpicks if needed
    1. Cook the roulades:
    • Place in preheated oven
    • Bake for 15-20 minutes until internal temperature reaches 165°F (74°C)
    1. Meanwhile, prepare potatoes:
    • Cut potatoes into even-sized pieces
    • Toss with oil and seasonings
    • Roast at 200°C (400°F) for 30 minutes until golden


  • Homemade Spinach and Cheese Pies: A Delicious Treat for Every Occasion

    Homemade Spinach and Cheese Pies: A Delicious Treat for Every Occasion

    Ingredients
    • 1 cup warm water
    • 1/2 cup yogurt
    • 1/2 cup oil
    • 1 teaspoon salt
    • 1/2 packet dry yeast
    • 2 teaspoons sugar
    • 3.5 cups flour
    • Melted butter or oil for coating
    • 2.2 pounds spinach
    • 1 onion
    • 3-4 tablespoons oil
    • Cheese (amount as desired)
    • Salt, chili pepper, and ground pepper to taste
    Dough Preparation
    1. Activate the Yeast: Begin by mixing warm water, sugar, and dry yeast in a bowl. Let it sit for a few minutes until the yeast activates and becomes frothy.
    2. Combine Ingredients: Add oil and yogurt to the yeast mixture and continue mixing until well combined.
    3. Knead the Dough: Gradually add flour and salt, kneading the mixture until it forms a soft, non-sticky dough. If needed, sprinkle some extra flour to achieve the right consistency.
    4. Fermentation: Cover the dough and let it ferment for about an hour, allowing it to rise and develop flavor.
    Filling Preparation
    1. Prepare the Spinach: Wash and chop the spinach finely. Dice the onion as well.
    2. Create the Filling: In a bowl, mix together the chopped spinach, diced onion, oil, cheese, salt, chili pepper, and ground pepper until well combined. Adjust seasoning to taste.
    See also  Classic Apple Pie
    Rolling Out the Dough
    1. Divide the Dough: After fermentation, gently knead the dough and divide it into 7 equal portions.
    2. Shape the Dough Balls: Roll each portion into a ball and place them on a floured surface. Cover and let them rest for 5-10 minutes.
    Filling and Shaping
    1. Roll Out the Dough: Take one dough ball and roll it into a thin crust, approximately 60 cm in diameter. Use flour as needed to prevent sticking.
    2. Add the Filling: Brush the rolled-out dough with melted butter or oil. Then, cut it into 4 parts and place 2 tablespoons of the prepared filling on each piece. Roll them up into a spiral shape.
    Baking
    1. Preparation: Preheat your oven to 200 degrees Celsius and line a baking tray with parchment paper.
    2. Coat and Bake: Brush the prepared pies with egg yolk for a golden finish. Place them on the baking tray and bake for about 20-25 minutes or until golden brown.
    Serving Suggestions

    Once baked to perfection, serve these delightful pies hot or at room temperature. Pair them with a side salad or your favorite dipping sauce for a complete meal. They also make great finger foods for parties and gatherings.

    Health Benefits

    Homemade spinach and cheese pies are not just delicious; they also offer a plethora of health benefits. Spinach is rich in iron, vitamins, and antioxidants, while cheese provides calcium and protein. Together, they make a nutritious combination that supports overall well-being.

    Conclusion

    In conclusion, indulging in homemade pies filled with spinach and cheese is a delightful experience for the senses. With a simple procedure and wholesome ingredients, you can create these savory treats to enjoy with family and friends. So, roll up your sleeves, gather your ingredients, and let the aroma of freshly baked pies fill your kitchen with warmth and happiness.

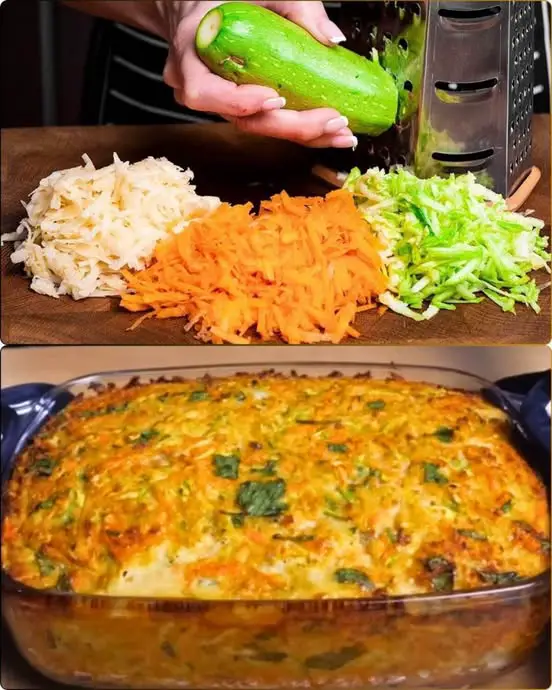
  • I CAN’T Stop Making It! NO FRYING OR FUSSING. Tastier than MEAT!

    I CAN’T Stop Making It! NO FRYING OR FUSSING. Tastier than MEAT!

    I CAN’T Stop Making It! NO FRYING OR FUSSING. Tastier than MEAT!

     Ingredients

    Gather these simple ingredients to get started:

    • 12 ounces (about 0.8 pounds) of carrots, potatoes, and zucchini
    • 5.5 ounces of onions
    • 3 eggs
    • 2-3 cloves of garlic
    • 2 tablespoons of vegetable oil
    • 1 teaspoon of salt
    • Pepper to taste
    • Fresh herbs (e.g., parsley)
    • 3 tablespoons of ready-made breadcrumbs or 2 slices of bran bread

    3. Preparation

    • Wash and Peel: Clean and peel all vegetables (except garlic), then grate them on a coarse grater.
    • Preheat Oven: Set your oven to 200 degrees Celsius.
    • Grease Baking Dish: Prepare a baking dish by greasing its bottom and walls with oil.

    4. Breading

    If using bread for breading:

    • Prepare Bread Crumbs: Blend 2 slices of bran bread into crumbs.
    • Bake Crumbs: Spread crumbs on a baking sheet and bake for about 5 minutes at 200 degrees Celsius.

    5. Mixing it up

    • Combine Ingredients: Mix grated vegetables, breadcrumbs (or ready-made breadcrumbs), squeezed garlic, and finely chopped fresh herbs in a bowl.
    • Beat Eggs: In a separate bowl, beat 3 eggs and season with salt, pepper, and oil.
    • Mix Well: Combine the egg mixture with the vegetable mixture until smooth.

    6. Baking the Dish

    • Assemble: Spread the vegetable mixture into the prepared baking dish, compacting it slightly and leveling the top.
    • Bake: Place the dish in the preheated oven at 180 degrees Celsius for 50 minutes or until golden brown.

    7. Serving Suggestions

    Once baked, you can serve this dish hot or cold, as a main course or a side dish. It pairs perfectly with a fresh salad or some crusty bread. Get creative with your toppings or sauces to enhance the flavor even more!

    8. Nutritional Benefits

    Not only is this dish incredibly tasty, but it’s also packed with nutrients. Carrots, potatoes, and zucchini are rich in vitamins and minerals, while eggs provide protein. Plus, with no frying involved, you’ll save on unnecessary calories and fat.

    9. Variations

    Feel free to customize this recipe to suit your taste preferences. You can swap out the vegetables for your favorites or add in extra ingredients like cheese or diced ham for an extra burst of flavor. The possibilities are endless!

    10. Tips and Tricks

    • Use Fresh Ingredients: Opt for fresh, locally sourced ingredients for the best flavor.
    • Experiment with Seasonings: Don’t be afraid to get creative with your seasonings. Try adding different herbs and spices to customize the flavor.
    • Double the Recipe: This dish freezes well, so why not make a double batch and save some for later? Simply reheat in the oven for a quick and easy meal.

    11. Conclusion

    In conclusion, this recipe is a game-changer for anyone looking to simplify their cooking routine without sacrificing flavor. With simple ingredients and easy preparation, you can whip up a dish that’s not only delicious but also nutritious. So why wait? Give it a try today and see for yourself!

    12. FAQs

    Q1. Can I substitute any vegetables in this recipe? Yes, feel free to use your favorite vegetables or whatever you have on hand. Just make sure to adjust the cooking time accordingly.

    Q2. Can I make this dish ahead of time? Absolutely! This dish can be prepared in advance and reheated when needed. It’s perfect for meal prep or entertaining guests.

    Q3. Can I make this recipe gluten-free? Yes, simply use gluten-free breadcrumbs or skip the breading altogether for a gluten-free option.

    Q4. Can I freeze leftovers? Yes, this dish freezes well. Just be sure to store it in an airtight container and reheat it in the oven when ready to eat.

    Q5. Can I add meat to this dish? Certainly! Feel free to add cooked chicken, turkey, or even bacon for a meaty twist on this vegetarian dish.

  • I lost 15 kg in JUST 2 WEEKS! THE STRONGEST DRINK for burning fat

    I lost 15 kg in JUST 2 WEEKS! THE STRONGEST DRINK for burning fat

    Looking for a natural, powerful way to drop weight fast? Well, the secret might just be in your very own kitchen cabinet. This incredible fat-burning drink made from bay leaves and lemon has been praised for its ability to melt belly fatreduce bloating, and speed up metabolism. Some people even claim to have lost up to 15 kg in just 2 weeks when combined with a lighter diet and staying hydrated!

    You may be familiar with using bay leaves in your cooking, but did you know that they also contain natural compounds that offer various health benefits? These include:

    ✅ Supporting digestion
    ✅ Reducing water retention
    ✅ Cleansing the body of toxins
    ✅ Calming the nervous system and reducing cravings

    As for lemons, they are rich in vitamin C, boost fat metabolism, and aid in detoxifying the liver, which is essential for burning fat efficiently.

    Ingredients:

    • 3 dried bay leaves
    • 1 cinnamon stick (optional for an added metabolism boost)
    • Juice of 1 fresh lemon
    • 3 cups of water

    Instructions:

    1. Boil the water.
    2. Add the bay leaves (and cinnamon, if using).
    3. Let it simmer for 5-7 minutes.
    4. Turn off the heat, strain, and add the lemon juice.
    5. Drink it warm or cool.

    Drink this powerful fat-burning drink at the following times to maximize its benefits:

    ✅ Morning (on an empty stomach)
    Jumpstart fat burning and digestion.

    ✅ Before lunch and dinner
    Help reduce appetite and boost metabolism.

    For optimal results, aim to consume 2-3 cups of this drink per day consistently for 10-14 days.

    To further enhance your weight loss journey, here are some additional tips:

    • Stay well-hydrated throughout the day with plain water.
    • Opt for light, whole foods, including plenty of vegetables and lean proteins.
    • Avoid consuming excessive sugar, fried foods, and processed snacks.
    • Engage in light exercise or take daily walks.

    While this drink is a powerful natural booster, it’s important to remember that it won’t work miracles overnight. Results vary from person to person. For the best and safest results, it should be paired with a healthy lifestyle. Always consult your doctor if you have any health conditions or are taking medications.

    Don’t underestimate the power of this bay leaf and lemon drink! It is one of the strongest natural blends for melting belly fatslimming the body, and cleansing your system. Give it a try for two weeks and see the transformation happen—naturally, powerfully, and safely!

  • Delicious Breakfast Bread – A 20-Year Tradition That Never Disappoints

    Delicious Breakfast Bread – A 20-Year Tradition That Never Disappoints

    There’s something deeply comforting about the aroma of freshly baked bread in the morning. This Delicious Breakfast Bread recipe has been lovingly passed down and perfected over the course of two decades—a testament to its reliability and irresistible flavor. The soft, fluffy rolls, brushed with melted butter and baked to golden perfection, are ideal for family breakfasts, brunch gatherings, or just a quiet morning with coffee.

    Prep Time: 15 minutes
    ⏳ Rising Time: 1.5 to 2 hours
    Bake Time: 20–25 minutes
    Yield: About 12–16 rolls (depending on size)
    Ingredients
    1 cup warm water (200 ml) — ideally around 40–45°C (104–113°F)

    1 tbsp active dry yeast (10 grams)

    4 tsp sugar — helps activate the yeast and adds a touch of sweetness

    1/3 cup vegetable oil (60 ml) — can substitute with canola or sunflower oil

    1 cup warm milk (200 ml) — whole milk gives the richest result

    1/2 tsp salt — balances the flavors

    5 cups all-purpose flour (600 grams) — start with this base, then adjust

    30–50 grams additional flour — for dusting and kneading

    100 grams butter — melted, for brushing the rolls before and/or after baking

    Instructions
    1. Activate the Yeast
    In a large mixing bowl, combine:

    1 cup warm water

    1 tbsp yeast

    4 tsp sugar

    Stir gently and let sit for 10 minutes. You should see a frothy layer form on top, indicating the yeast is active. If not, the water may have been too hot or your yeast may be expired.

    Tip: Warm, not hot water is key. If the water is too cold, the yeast won’t activate; too hot, and it could die.

    2. Mix Wet Ingredients
    Once the yeast is frothy, add:

    1/3 cup vegetable oil

    1 cup warm milk

    1/2 tsp salt

    Stir to combine evenly.

    3. Add Flour Gradually
    Start mixing in the flour, one cup at a time:

    Add 5 cups (600 grams) of flour gradually, stirring with a wooden spoon or using a stand mixer with a dough hook attachment.

    As the dough begins to come together, it should be slightly tacky but not overly sticky.

    Note: The amount of flour may vary slightly depending on humidity and your flour type. Add just enough to form a soft dough that pulls away from the sides of the bowl.

    4. Knead the Dough
    Transfer the dough to a lightly floured surface and knead for 5–7 minutes by hand (or 4–5 minutes in a mixer).

    The dough should become smooth, elastic, and slightly springy.

    If it sticks too much, sprinkle a little more flour (from the additional 30–50 grams) as needed.

    Tip: Kneading develops the gluten, which gives the bread its structure and chew.

    5. First Rise (Proofing)
    Place the kneaded dough in a greased bowl. Cover with a clean kitchen towel or plastic wrap and let it rise in a warm, draft-free place for 1 to 2 hours, or until doubled in size.

    ️ Tip: If your kitchen is cool, place the bowl inside your (off) oven with the oven light on for gentle warmth.

    6. Shape the Rolls
    Once risen:

    Punch down the dough gently to release air.

    Turn it out onto a floured surface and divide into 12–16 equal portions, depending on your preferred roll size.

    Shape each piece into a smooth ball, tucking the dough underneath to form a tight surface.

    Place the shaped rolls into a greased baking dish or pan, leaving just a little room between them so they can rise and touch slightly while baking (which keeps the sides soft).

    7. Brush with Butter
    Melt 100 grams of butter and brush over the tops of the rolls.

    You can reserve some butter to brush on again right after baking for added flavor and a glossy finish.

    Optional: Sprinkle a little flaky sea salt or sesame seeds on top for added texture.

    8. Bake
    Preheat your oven to 180°C (356°F). Once heated:

    Bake the rolls for 20–25 minutes, or until they are golden brown on top and sound hollow when tapped on the bottom.

    If your oven heats unevenly, rotate the pan halfway through baking.

    9. Final Touch
    Right after baking, brush the tops of the rolls with any remaining melted butter for an extra soft and flavorful finish.

    Let the rolls cool slightly before serving.

    Serving Suggestions
    These breakfast rolls are wonderfully versatile! Try them:

    Warm with jam, honey, or butter

    Sliced with cheese and eggs

    As a side for soups or stews

    Stuffed with breakfast sausage and a fried egg

    They’re great for freezing too—just wrap tightly and reheat in the oven or microwave.

    Variations & Add-ins
    Sweet Version: Add an extra tablespoon of sugar and a pinch of cinnamon.

    Savory Version: Mix in shredded cheese or herbs like rosemary or thyme into the dough.

    Whole Wheat: Swap out 1–2 cups of the all-purpose flour for whole wheat for a heartier bread.

    Stuffed Rolls: Place a cube of cheese or spoonful of sautéed onions inside each dough ball before baking.

    Storage Tips
    Room Temperature: Store cooled rolls in an airtight container for 2–3 days.

    Freezer: Freeze in a zip-top bag for up to 1 month. Reheat in a 160°C (320°F) oven for 10 minutes.

    Final Thoughts
    This Delicious Breakfast Bread is more than just a recipe—it’s a part of a morning tradition that brings comfort, warmth, and a bit of joy to the day. With its simple ingredients and dependable method, it’s easy to see why this has remained a family favorite for 20 years and counting.

  • Lose Weight Naturally: A Refreshing Drink for Effortless Weight Loss!

    Lose Weight Naturally: A Refreshing Drink for Effortless Weight Loss!

    Losing weight can seem daunting, but it doesn’t have to be! You might think you need to follow strict diets or intense workout routines to see results, but sometimes, simplicity is key. I found a natural drink that helped me shed a remarkable 10 kg in just one month, without the need for extreme measures!

    The Magic of Carrot and Turmeric

    Carrots are more than just a crunchy snack – they are packed with fiber and essential nutrients that keep you feeling full longer, helping you curb cravings and prevent overeating. Additionally, they support digestion and promote gut health, both crucial aspects of managing weight effectively.

    Turmeric, a vibrant spice, is renowned for its anti-inflammatory properties. It aids in boosting metabolism, enhancing the body’s fat-burning abilities, and supporting digestion. This wonder spice also combats bloating, leaving you feeling lighter and more vibrant throughout the day.

    Crafting Your Simple Weight Loss Elixir

    Creating this potent weight-loss drink is a breeze. You don’t need fancy ingredients or complex recipes – just a few wholesome components and a blender!

    Ingredients:

    • 2 medium carrots
    • 1/2 teaspoon turmeric powder (or a small piece of fresh turmeric)
    • 1 cup warm water
    • Juice of half a lemon
    • 1 teaspoon honey (optional)

    Instructions:

    • Peel and chop the carrots, then blend with warm water until smooth.
    • For a lighter texture, strain the juice.
    • Add turmeric, lemon juice, and honey, stirring thoroughly.
    • Enjoy the drink in the morning before breakfast and in the evening before bedtime.

    The Secret to Success

    This revitalizing drink aids digestion, reduces inflammation, and revs up your metabolism naturally. It keeps you hydrated and supplies essential vitamins and minerals for overall well-being. Unlike crash diets, this approach is gentle and sustainable, allowing you to lose weight gradually while savoring your favorite foods in moderation.

    If you’re seeking an effortless and efficient way to shed those extra pounds without any added stress, why not give this incredible drink a shot? Stay committed, stay active, and relish in the journey to a healthier and happier you!

  • Strawberry Banana Swirl Smoothie

    Strawberry Banana Swirl Smoothie

    Strawberry Banana Swirl Smoothie

    Ingredients:

    For the Strawberry Layer:
    • 1 cup frozen strawberries

    • 1/2 banana

    • 1/2 cup Greek yogurt or any yogurt of choice

    • 1/4 cup milk (or as needed to blend)

    • 1 tablespoon honey or maple syrup (optional)

    For the Banana Layer:
    • 1.5 bananas (ripe)

    • 1/2 cup vanilla yogurt (or plain)

    • 1/4 cup milk (adjust to consistency)

    • 1 tablespoon honey or maple syrup (optional)

    Toppings (Optional):

    • Banana slices

    • Fresh strawberries

    • Granola or chia seeds


    Instructions:

    1. Make the Strawberry Layer:

      • In a blender, add strawberries, banana, yogurt, milk, and sweetener if using.

      • Blend until smooth and creamy. Set aside.

    2. Make the Banana Layer:

      • Rinse the blender and add bananas, yogurt, milk, and optional sweetener.

      • Blend until smooth.

    3. Assemble:

      • In a tall glass, alternate spoonfuls of each smoothie mixture to create a swirl effect.

      • Use a skewer or straw to gently swirl the layers if desired.

      • Top with banana slices or strawberries for garnish.

    4. Serve immediately and enjoy!

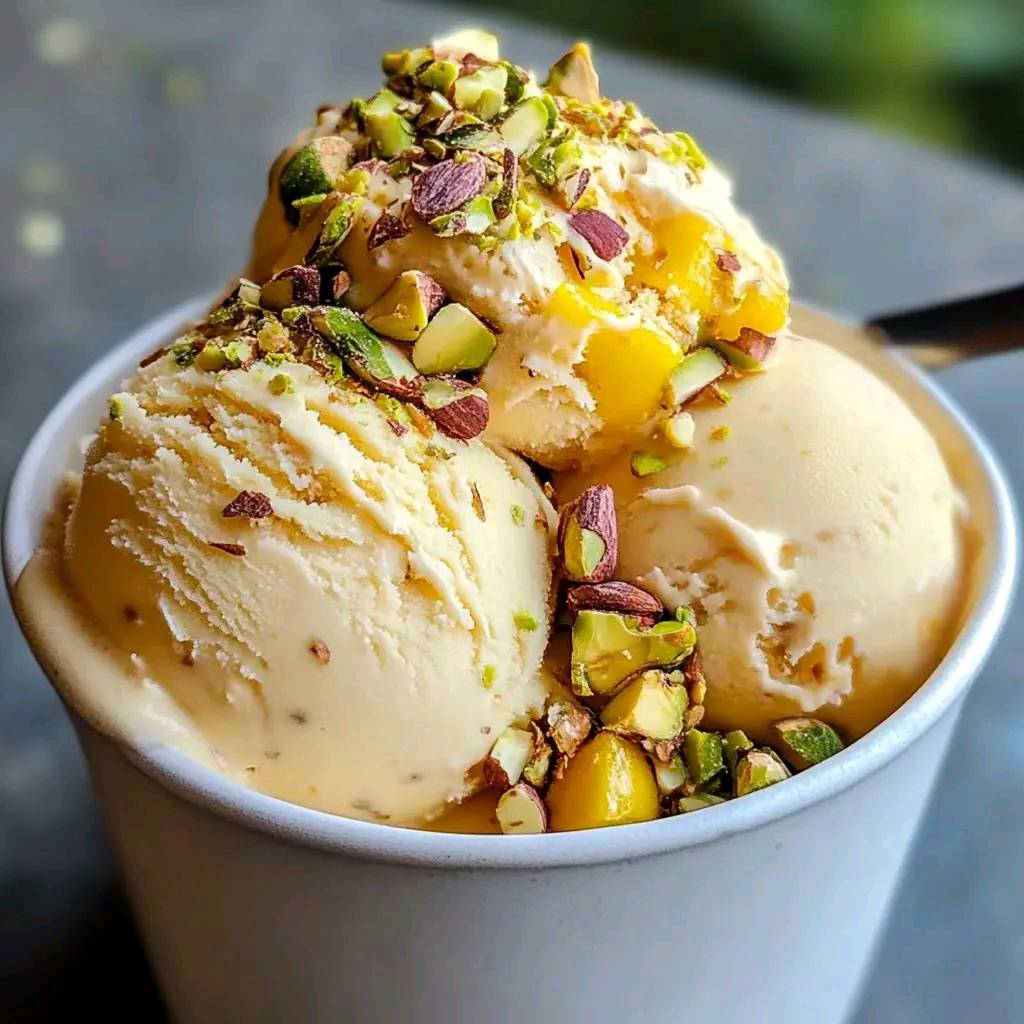
  • Pistachio Mango Ice Cream

    Pistachio Mango Ice Cream

    Pistachio Mango Ice Cream 1f96d1f366

    Ingredients
    – 1 cup pistachios, shelled
    – 2 ripe mangoes, peeled and diced
    – 1 cup heavy cream
    – 1 cup sweetened condensed milk
    – 1 teaspoon vanilla extract
    – Pinch of salt

    Directions:
    1. Start by soaking your pistachios in water for a few hours. This helps to soften them up for blending. Once they’re soaked, drain them and blend them until you achieve a fine paste.
    2. In a mixing bowl, combine the heavy cream, sweetened condensed milk, vanilla extract, and a pinch of salt. Mix them together until well combined.
    3. Now it’s time to add that delicious pistachio paste and the diced mangoes to the bowl. Gently fold everything together, ensuring the flavors meld nicely.
    4. Pour the creamy mixture into your ice cream maker and churn according to the manufacturer’s instructions. This is where the magic happens!
    5. After churning, transfer the ice cream to an airtight container and pop it in the freezer for at least 4 hours, or until it’s firm enough to scoop.

  • Layered Strawberry Lemonade Drink

    Layered Strawberry Lemonade Drink

    Layered Strawberry Lemonade Drink

    Ingredients:

    For the Strawberry Layer:

    • 1 cup strawberries (fresh or frozen, hulled)

    • 1/4 cup sugar (adjust to taste)

    • 1/4 cup water

    For the Lemonade Layer:

    • 1 cup freshly squeezed lemon juice (about 4–6 lemons)

    • 3/4 cup sugar

    • 4 cups cold water

    For the Creamy Layer (optional but beautiful and tasty):

    • 1/2 cup sweetened condensed milk or coconut milk (for dairy-free)

    • Ice cubes

    Garnishes:

    • Lemon slices

    • Fresh strawberries

    • Mint leaves (optional)


    Instructions:

    1. Make the Strawberry Puree:

      • In a small saucepan over medium heat, combine strawberries, sugar, and water.

      • Simmer until strawberries are soft (about 5–7 minutes).

      • Blend until smooth and let it cool completely.

    2. Make the Lemonade:

      • In a large pitcher, stir together lemon juice, sugar, and cold water until sugar is dissolved.

      • Taste and adjust sweetness as needed.

    3. Assemble the Drink:

      • Fill glasses with ice.

      • Pour the lemonade halfway into each glass.

      • Add 2–3 tablespoons of strawberry puree carefully to create the layered effect.

      • Slowly pour a spoonful of sweetened condensed milk or coconut milk on top to create the creamy top layer.

    4. Garnish:

      • Add a slice of lemon, a few strawberry slices, and mint on top.

  • Banana Cucumber Smoothie: How to Make It and Why You Should Drink It

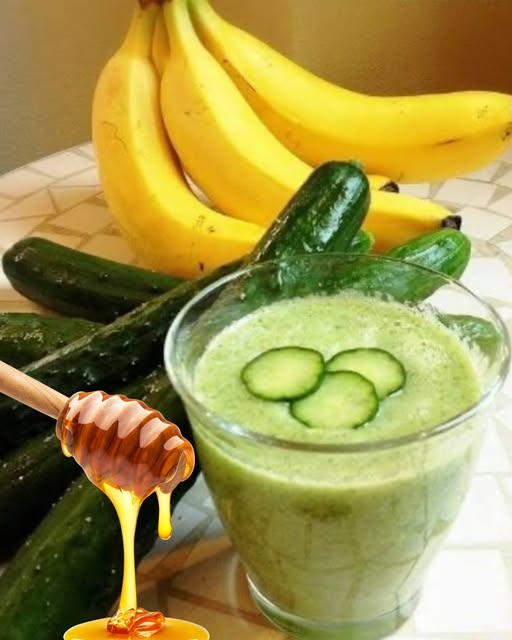
    Banana Cucumber Smoothie: How to Make It and Why You Should Drink It

     Ingredients You’ll Need (Serves 1–2)

    • 1 ripe banana (the riper, the sweeter)

    • 1 cucumber (peeled if preferred)

    • 150ml milk or plant-based milk (e.g. almond, oat, soy)

    • 1 teaspoon honey (optional)

    • A few ice cubes

    • (Optional) 1 teaspoon chia seeds or flax seeds for extra nutrition


     How to Make It

    1. Peel the banana and cut it into slices.

    2. Wash and chop the cucumber into chunks.

    3. Add banana, cucumber, milk, honey, and ice to a blender.

    4. Blend for 30–45 seconds until smooth and creamy.

    5. Pour into a glass and enjoy immediately while chilled.


     Top 6 Health Benefits of Banana Cucumber Smoothie

    Benefit Why It Matters
    Detoxifies and hydrates Cucumber has a high water content and antioxidants that flush out toxins.
    Supports weight loss Low in calories but rich in fiber, helping you feel full longer.
    Improves digestion Banana soothes the stomach; cucumber promotes bowel movement.
    Brightens skin Packed with vitamin C and potassium for glowing, hydrated skin.
    Boosts energy Bananas provide natural carbohydrates for quick energy.
    Regulates blood pressure Cucumber is high in potassium, low in sodium – great for heart health.

     Pro Tips:

    • Add a few mint leaves or a squeeze of lemon for extra freshness.

    • For post-workout recovery, include a scoop of protein powder or Greek yogurt.

    • Want it sweeter? Use a Medjool date instead of honey.


    ✅ Conclusion

    The banana cucumber smoothie is more than just a summer drink — it’s a smart choice for your health. Whether you’re aiming to slim down, glow up, or simply feel better, this smoothie delivers hydration, nutrients, and satisfaction in every sip.

    Start your day with this powerful combo – your body (and taste buds) will thank you!

  • Lemon Chicken & Veggie Orzo Stir Fry

    Lemon Chicken & Veggie Orzo Stir Fry

    Lemon Chicken & Veggie Orzo Stir Fry


    A zesty, colorful one-pan meal that’s bursting with flavor and ready in no time!


    Ingredients:


    • 1 cup orzo
    • 1 lb diced chicken breast
    • 1 zucchini, chopped
    • 1 red bell pepper, chopped
    • 1 cup broccoli florets
    • 2 tbsp lemon juice
    • 1 tsp lemon zest
    • 2 tbsp olive oil
    • ¼ cup grated Parmesan
    • 1 tsp garlic powder
    • ½ tsp salt
    • ¼ tsp black pepper
    • ½ tsp dried oregano
    • ¼ tsp red pepper flakes (optional)
    • Fresh parsley (for garnish)


    Instructions:

    1. *Cook orzo:* According to package instructions.

    2. *Prepare chicken:* Cook diced chicken breast with olive oil, garlic powder, salt, black pepper, and dried oregano.

    3. *Add veggies:* Stir in chopped zucchini, red bell pepper, and broccoli florets.

    4. *Combine:* Mix cooked orzo, chicken, and veggies.

    5. *Add lemon flavor:* Stir in lemon juice, lemon zest, and grated Parmesan.

    6. *Garnish:* Fresh parsley and red pepper flakes (optional).