Blog

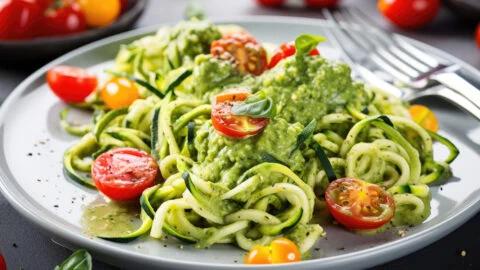
  • Zucchini Noodles with Pesto and Cherry Tomatoes

    Zucchini Noodles with Pesto and Cherry Tomatoes

    Zucchini Noodles with Pesto and Cherry Tomatoes

    Prep time: 15 min
    Serves: 2

    Ingredients:

    • 2 medium zucchinis, spiralized

    • 2 tbsp pesto (store-bought or homemade)

    • 1 cup halved cherry tomatoes

    • 1 tsp olive oil

    • Salt and pepper

    Instructions:

    1. Heat olive oil in a pan, sauté zucchini noodles for 2-3 min.

    2. Toss in pesto and tomatoes, season to taste, and serve.

    Why it works: Low calorie, high in fiber, quick to make.

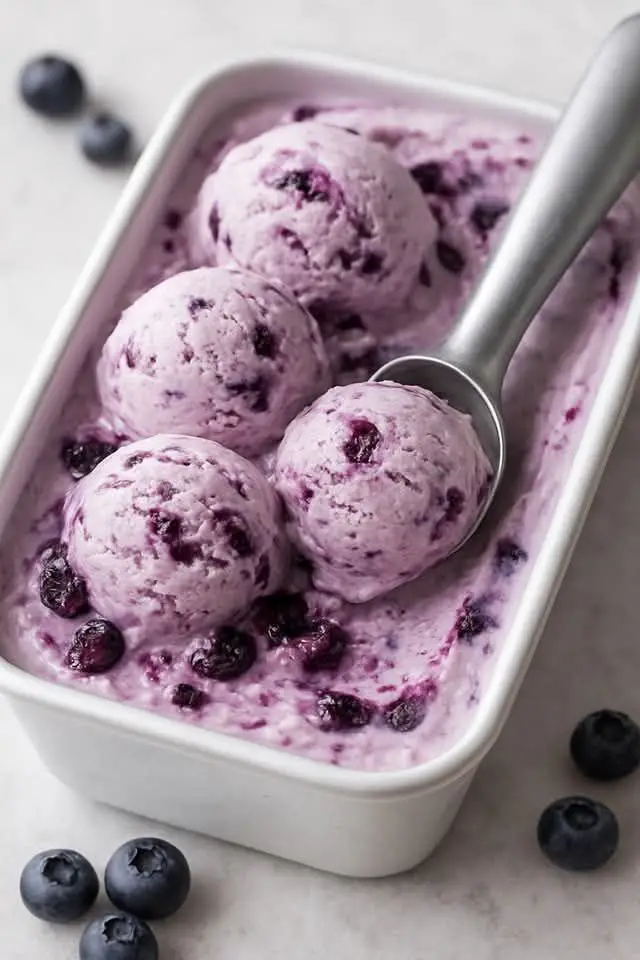
  • Homemade Blueberry Swirl Ice Cream

    Homemade Blueberry Swirl Ice Cream

    Homemade Blueberry Swirl Ice Cream

    This recipe yields a creamy, vibrant blueberry ice cream with a delicious swirl of blueberry compote.

    Yields: Approximately 1 quart (4 cups) Prep time: 30 minutes (plus chilling time for base) Churning time: 20-30 minutes Freezing time: 4-6 hours (or overnight)

    Equipment:

    • Ice cream maker
    • Medium saucepan
    • Large bowl (for ice bath)
    • Fine-mesh sieve (optional, for smoother compote)
    • Airtight freezer-safe container (e.g., loaf pan or plastic container)

    Ingredients:

    For the Blueberry Compote:

    • 1 ½ cups (about 225g) fresh or frozen blueberries (if frozen, no need to thaw)
    • ¼ cup (50g) granulated sugar
    • 1 tablespoon fresh lemon juice
    • ½ teaspoon vanilla extract (optional, but enhances flavor)
    • Pinch of salt

    For the Ice Cream Base:

    • 2 cups (480ml) heavy cream
    • 1 cup (240ml) whole milk
    • ¾ cup (150g) granulated sugar
    • ¼ teaspoon salt
    • 1 vanilla bean, split and scraped (or 1 teaspoon vanilla extract)
    • 5 large egg yolks

    Instructions:

    Part 1: Make the Blueberry Compote

    1. Combine ingredients: In a medium saucepan, combine the blueberries, ¼ cup granulated sugar, and lemon juice.
    2. Cook down: Place the saucepan over medium heat. Bring the mixture to a gentle simmer, stirring occasionally.
    3. Simmer and thicken: Continue to simmer for 8-12 minutes, mashing some of the blueberries with the back of a spoon as they soften. The compote should thicken slightly and become syrupy.
    4. Finish: Remove from heat. Stir in the vanilla extract (if using) and a pinch of salt.
    5. Cool: Transfer the compote to a separate bowl and let it cool completely. You can place it in the refrigerator to speed up the cooling process.
      • Optional: For a smoother swirl, you can press the cooled compote through a fine-mesh sieve to remove some of the skins, but leaving them in adds texture and fiber.

    Part 2: Prepare the Ice Cream Base (Custard)

    1. Warm dairy: In a medium saucepan, combine the heavy cream, whole milk, ¾ cup granulated sugar, and salt. If using a vanilla bean, add the scraped seeds and the pod to the mixture. Heat over medium-low heat, stirring occasionally, until the sugar dissolves and the mixture is warm but not boiling (steam will begin to rise).
    2. Temper egg yolks: In a separate medium bowl, whisk the egg yolks until smooth.
    3. Combine: Slowly ladle about ½ cup of the warm cream mixture into the whisked egg yolks, whisking constantly to temper the yolks. This prevents the eggs from scrambling.
    4. Return to saucepan: Gradually pour the tempered egg yolk mixture back into the saucepan with the remaining cream mixture, whisking constantly.
    5. Cook custard: Return the saucepan to medium-low heat. Cook, stirring constantly with a wooden spoon or heat-proof spatula, until the custard thickens enough to coat the back of the spoon (it should reach about 175-180°F / 80-82°C on an instant-read thermometer). Do not boil.
    6. Strain (optional): Remove from heat. If using a vanilla bean pod, remove it. For an extra smooth ice cream, you can strain the custard through a fine-mesh sieve into a clean bowl.
    7. Chill thoroughly: Place the bowl with the custard over a larger bowl filled with ice and water (an ice bath). Stir occasionally until the custard is completely cool. Once cool, cover the bowl with plastic wrap and refrigerate for at least 4 hours, or preferably overnight, until thoroughly chilled (this is crucial for proper churning).

    Part 3: Churn and Freeze

    1. Churn: Once the ice cream base is thoroughly chilled, pour it into your ice cream maker bowl and churn according to the manufacturer’s instructions (typically 20-30 minutes), until it reaches the consistency of soft-serve ice cream.
    2. Swirl: During the last 5 minutes of churning, or just as the ice cream finishes, gradually add about half of the cooled blueberry compote to the ice cream maker. The machine will gently swirl it in. Alternatively, you can add it in layers during the transfer to the freezer container.
    3. Transfer and layer: Transfer about half of the churned ice cream to your freezer-safe container. Drizzle generously with some of the remaining blueberry compote. Top with the rest of the ice cream and drizzle with the remaining compote. Use a knife or skewer to gently swirl the compote through the ice cream for a beautiful marble effect.
    4. Freeze: Cover the container tightly with plastic wrap or a lid and freeze for at least 4-6 hours, or until firm, before serving. For best results, freeze overnight.

    Tips for Success:

    • Chill everything: Ensure your ice cream base is very cold before churning. The colder it is, the creamier your ice cream will be.
    • Don’t overcook the custard: Overcooked custard will curdle. Cook it gently until it just coats the back of a spoon.
    • Quality ingredients: Use good quality heavy cream, whole milk, and fresh blueberries for the best flavor.
    • Ripening: If your blueberries aren’t super sweet, you can add a tiny bit more sugar to the compote.
    • Storage: Store homemade ice cream in an airtight container in the coldest part of your freezer. It’s best consumed within 1-2 weeks for optimal freshness and texture. It will get harder the longer it’s stored.
    • Softening before serving: If your ice cream is very hard, let it sit at room temperature for 5-10 minutes before scooping to soften slightly.
  • Malted Milk Toffee Crunch Ice Cream

    Malted Milk Toffee Crunch Ice Cream

    Malted Milk Toffee Crunch Ice Cream Sundae

    This sundae features creamy malted milk ice cream, rich chocolate fudge sauce, crunchy toffee bits, and crumbled chocolate cookies for an irresistible combination of flavors and textures.

    Yields: 2-4 sundaes Prep time: 20 minutes (plus ice cream freezing time, if making homemade) Cook time: 10 minutes (for fudge sauce)

    Ingredients:

    For the Malted Milk Ice Cream (Homemade – Optional, store-bought is fine):

    • 1 cup whole milk
    • 1 cup heavy cream
    • 1/2 cup granulated sugar
    • 1/4 cup malted milk powder (e.g., Horlicks, Ovaltine, Milo)
    • 1/2 teaspoon vanilla extract
    • Pinch of salt

    For the Chocolate Fudge Sauce:

    • 1/2 cup unsweetened cocoa powder
    • 1 cup granulated sugar
    • 1/2 cup evaporated milk (or whole milk)
    • 1/4 cup unsalted butter
    • 1/2 teaspoon vanilla extract
    • Pinch of salt

    For the Toppings:

    • 1/2 cup chocolate-covered toffee bits (e.g., Heath bar bits, chopped Skor bars) OR plain toffee bits
    • 1/2 cup chocolate cookies (e.g., Oreos, digestive biscuits, chocolate wafers), coarsely crushed or crumbled
    • Optional: Whipped cream for serving
    • Optional: Chocolate shavings or curls for garnish

    Equipment:

    • Ice cream maker (if making homemade ice cream)
    • Saucepan
    • Whisk
    • Ice cream scoop
    • Sundae glasses or bowls

    Instructions:

    1. Prepare the Malted Milk Ice Cream (if making homemade): * In a medium saucepan, combine the whole milk, heavy cream, granulated sugar, malted milk powder, and salt. * Heat over medium-low heat, whisking constantly, until the sugar and malted milk powder are fully dissolved and the mixture is warm but not boiling. * Remove from heat and stir in the vanilla extract. * Pour the mixture into an airtight container and refrigerate for at least 4 hours, or preferably overnight, until thoroughly chilled. * Once chilled, churn the ice cream mixture in your ice cream maker according to the manufacturer’s instructions. * Transfer the churned ice cream to a freezer-safe container and freeze for at least 2-4 hours, or until firm, before serving.

    2. Prepare the Chocolate Fudge Sauce: * In a medium saucepan, whisk together the cocoa powder and granulated sugar. * Gradually whisk in the evaporated milk (or whole milk) until smooth. * Add the butter to the saucepan. * Place the saucepan over medium heat and bring the mixture to a gentle simmer, whisking constantly. * Reduce heat to low and continue to simmer for 5-7 minutes, whisking occasionally, until the sauce thickens to your desired consistency. It should coat the back of a spoon. * Remove from heat and stir in the vanilla extract and a pinch of salt. * Let the fudge sauce cool slightly before serving. It will thicken further as it cools. (You can make this ahead of time and gently reheat it in a microwave or on the stovetop if needed).

    3. Assemble the Sundaes: * Take your sundae glasses or bowls. * If desired, drizzle a little chocolate fudge sauce on the bottom of the glass. * Place 1-2 scoops of Malted Milk Ice Cream into each glass. * Generously drizzle more chocolate fudge sauce over the ice cream. * Sprinkle a good amount of the crushed chocolate cookies over the fudge sauce. * Add 1-2 more scoops of Malted Milk Ice Cream. * Drizzle more chocolate fudge sauce over the top. * Sprinkle the chocolate-covered toffee bits and more crushed chocolate cookies on top, creating a delightful crunch and visual appeal. * Optional: Top with a dollop of whipped cream and a few chocolate shavings or curls for an extra touch of indulgence.

    4. Serve Immediately: * Enjoy your decadent Malted Milk Toffee Crunch Ice Cream Sundae right away!

    Tips for Success:

    • Quality Ingredients: Using good quality ice cream, cocoa powder, and toppings will make a noticeable difference in the flavor of your sundae.
    • Adjust Sweetness: You can adjust the amount of sugar in the fudge sauce to your preference.
    • Toffee Variations: If you can’t find chocolate-covered toffee bits, you can use plain toffee bits and add extra chocolate chunks or shavings.
    • Cookie Choice: Any crunchy chocolate cookie will work well for the crumbles. Experiment with your favorites!
    • Make Ahead: The fudge sauce can be made several days in advance and stored in the refrigerator. Gently reheat it before serving.
    • Get Creative: Feel free to add other toppings like nuts, mini marshmallows, or even a different flavored ice cream if you’re feeling adventurous!

    Enjoy your homemade Malted Milk Toffee Crunch Ice Cream Sundae!

  • Royal Mango Falooda

    Royal Mango Falooda

    Royal Mango Falooda: A Detailed Recipe

    This recipe aims to recreate the vibrant, layered Mango Falooda shown in the image, featuring rich mango flavors, refreshing basil seeds, soft vermicelli, and creamy ice cream.

    Yields: 2-3 servings Prep time: 30 minutes (plus chilling time for mango puree and milk) Cook time: 15 minutes

    Ingredients:

    For the Mango Puree (Base):

    • 2 large, ripe mangoes (e.g., Alphonso, Kesar, Sindhri), peeled, pitted, and roughly chopped
    • 2-3 tablespoons granulated sugar (adjust to mango sweetness)
    • 1/4 cup cold milk (full-fat for creaminess)
    • Pinch of saffron strands (optional, for color and aroma)

    For the Mango Chunks:

    • 1 large, ripe mango, peeled and diced into 1/2-inch cubes

    For the Rose Syrup Layer (Optional, for color like in image):

    • 2-3 tablespoons rose syrup (store-bought, like Rooh Afza or similar)

    For the Basil Seeds (Sabja/Tukmaria):

    • 2 tablespoons basil seeds
    • 1 cup water for soaking

    For the Falooda Sev (Vermicelli):

    • 1/4 cup cornstarch (cornflour)
    • 1/2 cup cold water
    • 1 tablespoon sugar
    • 1 cup boiling water

    For the Milk Mixture:

    • 1 cup full-fat milk
    • 2-3 tablespoons condensed milk (adjust to sweetness preference)
    • 1/4 teaspoon cardamom powder (optional)

    For Topping:

    • 2 scoops vanilla ice cream
    • 2 scoops mango ice cream
    • 1 tablespoon chopped pistachios (for garnish)
    • Few strands of saffron (for garnish, optional)

    Equipment:

    • Blender or food processor
    • Small saucepan
    • Large bowl
    • Sieve or strainer
    • Falooda press/sev maker (or a piping bag with a small round nozzle)
    • Tall glasses for serving (like wine glasses as shown in image)

    Instructions:

    1. Prepare the Mango Puree: * In a blender, combine the chopped mangoes, granulated sugar, cold milk, and saffron (if using). * Blend until completely smooth and creamy. Taste and adjust sugar if needed. * Transfer the mango puree to a bowl, cover, and refrigerate for at least 30 minutes to chill thoroughly. This is crucial for a thick base.

    2. Prepare the Mango Chunks: * Dice the remaining mango into neat 1/2-inch cubes. Keep them separate and chilled.

    3. Prepare the Basil Seeds: * In a small bowl, combine the basil seeds with 1 cup of water. * Stir well and let them soak for at least 15-20 minutes, or until they swell up and become gelatinous. * Once soaked, drain any excess water using a fine-mesh sieve. Keep aside.

    4. Prepare the Falooda Sev (Vermicelli): * In a small saucepan, combine the cornstarch, cold water, and sugar. Mix well until there are no lumps. * Place the saucepan over medium heat and stir continuously. * Slowly pour in the boiling water while whisking vigorously to prevent lumps. * Continue stirring constantly until the mixture thickens and becomes transparent, resembling a thick gel. This should take about 5-7 minutes. * Immediately transfer the hot mixture into a falooda press or a piping bag with a small round nozzle. * Prepare a large bowl of ice-cold water. * Carefully press the mixture directly into the ice-cold water, forming thin strands of sev. The cold water will set the sev immediately. * Let the sev sit in the cold water for a few minutes, then drain using a sieve. Keep aside.

    5. Prepare the Milk Mixture: * In a bowl, whisk together the full-fat milk, condensed milk, and cardamom powder (if using). * Taste and adjust sweetness as desired. * Refrigerate until ready to assemble.

    6. Assemble the Mango Falooda (Layer by Layer): * Take your tall serving glasses. * Layer 1 (Rose Syrup – Optional): Drizzle 1-2 tablespoons of rose syrup at the bottom of each glass, allowing it to coat the sides slightly as shown in the image. * Layer 2 (Basil Seeds): Add 2-3 tablespoons of soaked basil seeds over the rose syrup (or directly at the bottom if omitting rose syrup). * Layer 3 (Mango Puree): Carefully spoon a generous layer of the chilled mango puree over the basil seeds. * Layer 4 (Falooda Sev): Add a layer of the prepared falooda sev on top of the mango puree. * Layer 5 (Mango Chunks): Arrange a good portion of the diced mango chunks on top of the sev. * Layer 6 (Milk Mixture): Gently pour a few tablespoons of the chilled milk mixture over the mango chunks. * Repeat (Optional): If your glass is tall enough, you can repeat the layers of mango puree, sev, and mango chunks for a more substantial falooda. * Top generously: Finally, add a scoop of vanilla ice cream and a scoop of mango ice cream on top of each falooda. * Garnish: Sprinkle with chopped pistachios and a few strands of saffron (if using).

    Tips for Success:

    • Ripe Mangoes are Key: Use sweet, non-fibrous, and ripe mangoes for the best flavor and smooth puree.
    • Chill Everything: Chilling all the components (mango puree, milk mixture, even the glasses) before assembly is crucial for a refreshing falooda.
    • Adjust Sweetness: Taste and adjust the sugar/condensed milk according to your preference and the sweetness of your mangoes.
    • Rose Syrup for Color: The vibrant red layer in the image is likely from rose syrup. You can omit it if you prefer a pure mango flavor profile.
    • Homemade Sev: Making your own falooda sev is highly recommended for freshness and the right texture, though store-bought can be used in a pinch.
    • Serve Immediately: Falooda is best enjoyed immediately after assembly to prevent the ice cream from melting too much and the sev from becoming too soft.

    Enjoy your homemade Royal Mango Falooda!

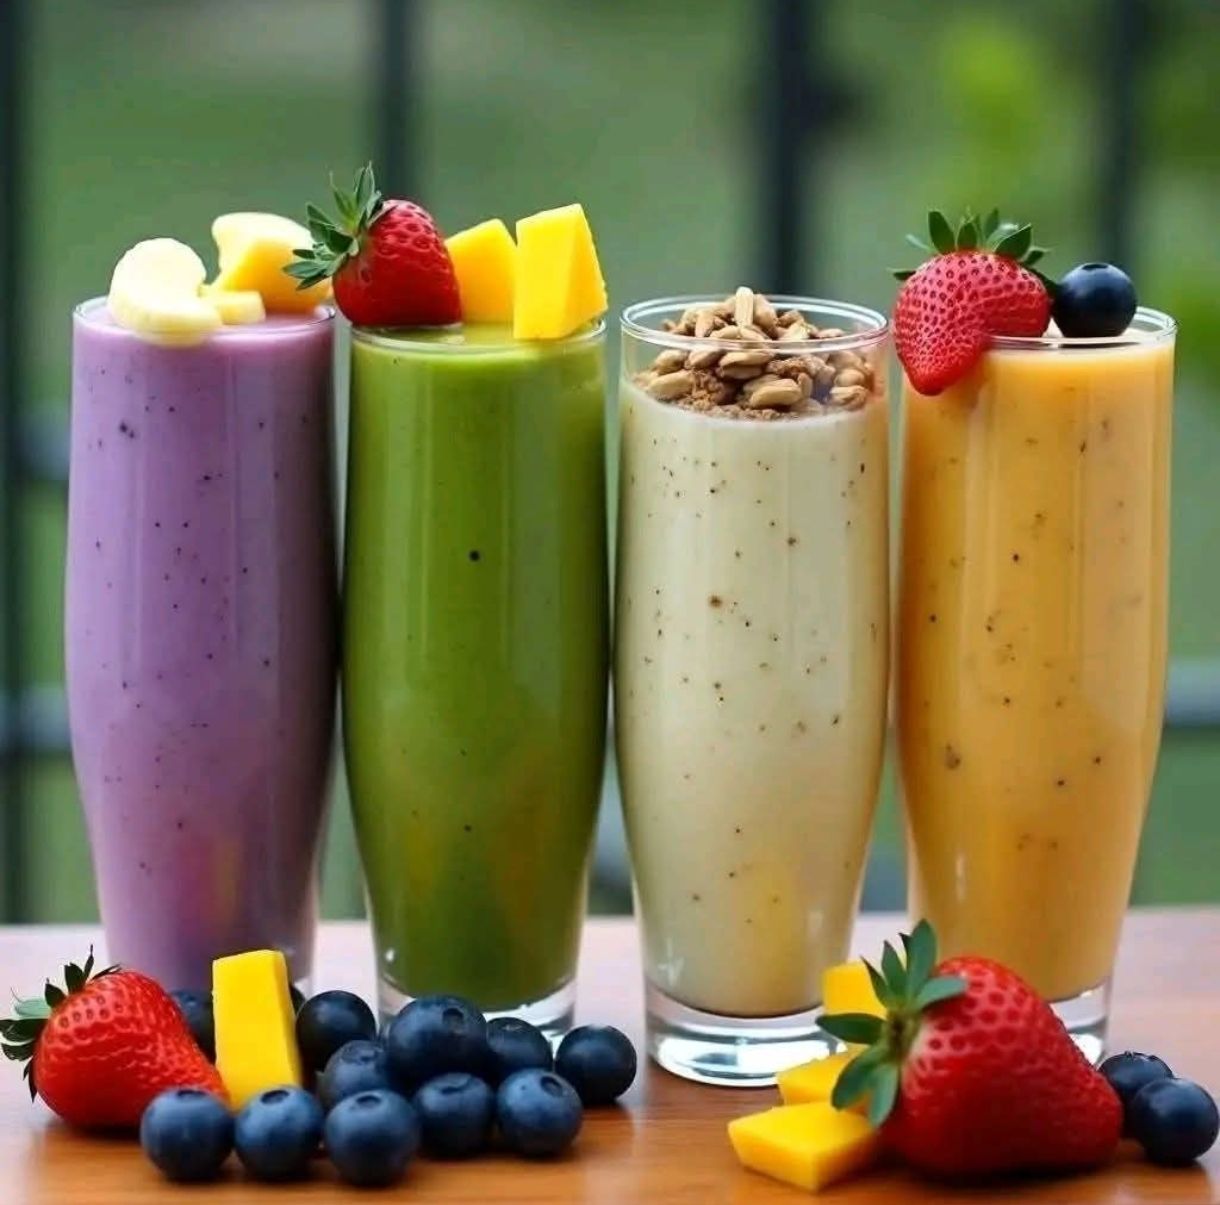
  • 4 Smoothies recipes ❤

    4 Smoothies recipes ❤

    1. Purple Smoothie (Blueberry Banana Smoothie)

    Ingredients:

    • 1 banana (frozen or fresh)

    • 1/2 cup blueberries (fresh or frozen)

    • 1/2 cup Greek yogurt or plant-based yogurt

    • 1/2 cup almond milk (or any milk of choice)

    • 1 tsp honey or maple syrup (optional)

    • Ice cubes (optional)

    Toppings:

    • Banana slices

    • Mango cubes

    Instructions:

    1. Blend all smoothie ingredients until smooth.

    2. Pour into a glass and top with banana slices and mango cubes.


    2. Green Smoothie (Mango Spinach Smoothie)

    Ingredients:

    • 1 cup fresh spinach

    • 1/2 cup mango chunks (fresh or frozen)

    • 1 banana

    • 1/2 cup Greek yogurt

    • 1/2 cup coconut water or water

    • 1 tbsp chia seeds (optional)

    Toppings:

    • Strawberry

    • Mango chunks

    Instructions:

    1. Blend spinach and liquid first for a smooth texture.

    2. Add remaining ingredients and blend again until creamy.

    3. Pour into a glass and top with mango cubes and a strawberry.


    3. Creamy Oat Smoothie (Banana Oatmeal Smoothie)

    Ingredients:

    • 1 ripe banana

    • 1/4 cup rolled oats

    • 1/2 cup milk (dairy or non-dairy)

    • 1/2 cup Greek yogurt

    • 1/2 tsp cinnamon

    • 1 tsp honey or date syrup (optional)

    Toppings:

    • Granola

    • Strawberry

    Instructions:

    1. Blend all ingredients until smooth.

    2. Pour into a glass and top with granola and a halved strawberry.


    4. Tropical Smoothie (Mango Pineapple Smoothie)

    Ingredients:

    • 1/2 cup mango chunks

    • 1/2 cup pineapple chunks

    • 1/2 banana

    • 1/2 cup orange juice

    • 1/2 cup Greek yogurt or coconut milk

    Toppings:

    • Strawberry

    • Blueberry

    Instructions:

    1. Blend all ingredients until smooth and creamy.

    2. Pour into a glass and garnish with strawberry and blueberry.

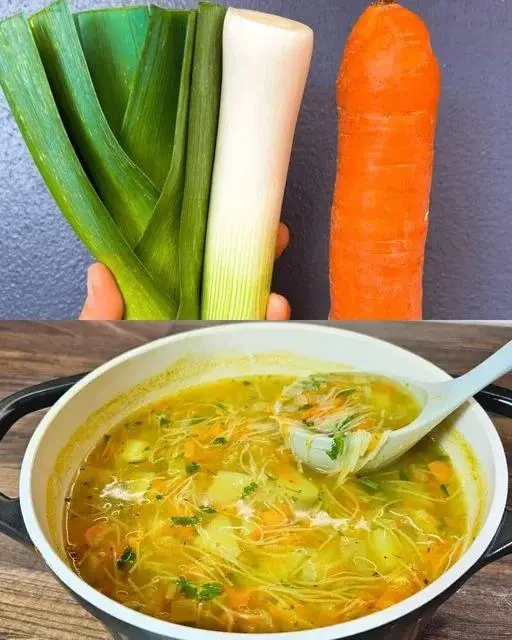
  • Cabbage Soup

    Cabbage Soup


    Cabbage Soup


    **Ingredients:**


    3 tablespoons olive oil
    1/2 a medium yellow onion, finely chopped
    2 garlic cloves, minced
    8 cups of low-sodium chicken broth (you can also use vegetable broth)
    1 teaspoon kosher salt
    1/2 teaspoon dried thyme
    1/2 teaspoon black pepper (adjust to your liking)
    1/2 of a cabbage, chopped into roughly 1 1/2″ pieces
    4 carrots, peeled and diced
    2 celery stalks, thinly sliced
    One 14.5-ounce can of stewed tomatoes


    **Instructions:**


    In a sizable pot, warm the olive oil over a medium flame. Stir in the onions and garlic and sauté until the onions turn translucent, typically taking around 3-5 minutes.
    Introduce the chicken broth, season with salt and pepper, then toss in the cabbage, carrots, celery, and stewed tomatoes. Allow the mixture to simmer gently for about 30 minutes

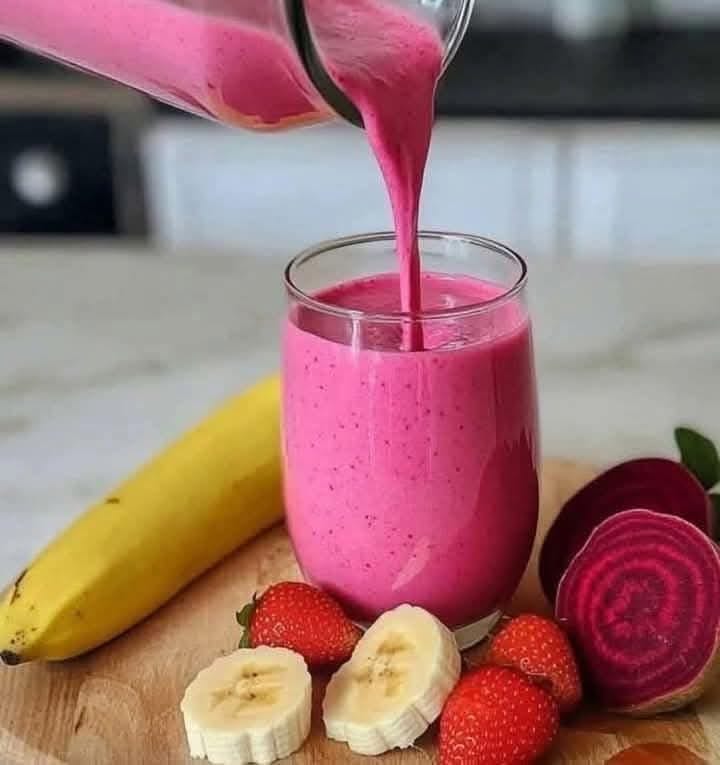
  • Beetroot Strawberry Banana Smoothie Recipe

    Beetroot Strawberry Banana Smoothie Recipe

    Beetroot Strawberry Banana Smoothie Recipe

    Ingredients:

    • 1 medium banana (peeled and sliced)

    • 4-5 fresh strawberries (hulled)

    • ½ small beetroot (peeled and chopped or grated; raw or lightly steamed)

    • 1 cup yogurt or plant-based milk (almond, oat, soy, etc.)

    • ½ cup water (optional, for desired consistency)

    • 1-2 tsp honey or maple syrup (optional, to taste)

    • A few ice cubes (optional)

    Instructions:

    1. Prep the Ingredients:

      • Peel and slice the banana.

      • Wash and hull the strawberries.

      • Peel and chop the beetroot into small pieces (steaming lightly is optional if you prefer a milder flavor).

    2. Blend:

      • In a blender, add the banana, strawberries, and beetroot.

      • Pour in the yogurt or milk.

      • Add sweetener (if using), and ice cubes.

    3. Blend Until Smooth:

      • Blend everything on high speed until creamy and smooth.

      • If it’s too thick, add water or more milk to adjust the consistency.

    4. Serve:

      • Pour into a glass and enjoy immediately for the best flavor and nutrition!


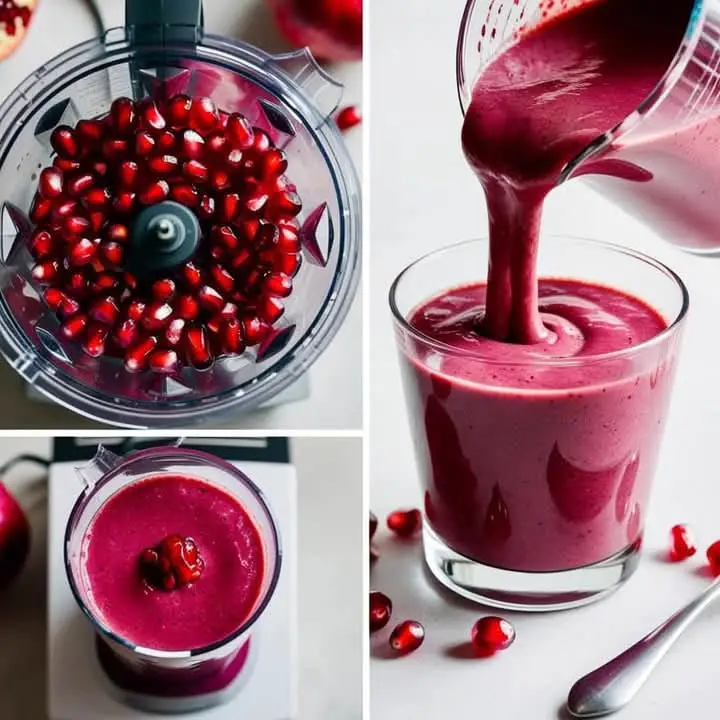
  • Pomegranate Smoothie Recipe

    Pomegranate Smoothie Recipe

    Pomegranate Smoothie Recipe

    Ingredients:

    • 1 cup fresh pomegranate seeds (about 1 large pomegranate)

    • 1 ripe banana (for creaminess)

    • 1/2 cup Greek yogurt (plain or vanilla)

    • 1/2 cup almond milk (or any milk of choice)

    • 1/2 cup frozen mixed berries (optional, for extra flavor and color)

    • 1–2 teaspoons honey or maple syrup (optional, for added sweetness)

    • A few ice cubes (optional, for a chilled smoothie)


    Instructions:

    1. Prepare the Pomegranate Seeds:

      • Cut the pomegranate and remove the seeds (arils).

      • Remove any white membrane to avoid bitterness.

    2. Blend the Seeds:

      • Add the pomegranate seeds to a blender.

      • Pulse a few times until the seeds release juice.

      • (Optional but recommended): Strain the mixture through a fine mesh sieve to remove the hard seed pulp for a smoother texture.

    3. Add the Remaining Ingredients:

      • To the pomegranate juice, add banana, yogurt, milk, berries (if using), honey/maple syrup, and ice cubes.

    4. Blend Until Smooth:

      • Blend on high until the mixture is smooth and creamy.

    5. Serve:

      • Pour into a glass.

      • Garnish with a few pomegranate seeds on top (optional).

      • Serve immediately!


    Tips:

    • Use frozen banana for a thicker and colder smoothie.

    • Substitute Greek yogurt with dairy-free yogurt for a vegan version.

    • If you want more protein, add a scoop of your favorite protein powder.

  • Banana Split Milkshakes

    Banana Split Milkshakes

    Banana Split Milkshakes

    This recipe makes two large, indulgent milkshakes.

    Yields: 2 servings Prep time: 15 minutes

    Ingredients:

    • For the Milkshake Base:
      • 1 cup (240ml) whole milk (or your preferred milk)
      • 4 scoops (about 1 cup) good quality strawberry ice cream
      • 4 scoops (about 1 cup) good quality vanilla ice cream
      • 1 ripe banana, cut into chunks (plus extra for garnish)
    • For the Toppings & Garnish:
      • 1 cup fresh strawberries, hulled and sliced (plus extra for garnish)
      • 1/2 cup fresh raspberries (plus extra for garnish)
      • 1/2 cup whipped cream (store-bought or homemade)
      • 2-4 tablespoons chocolate syrup (for drizzle)
      • 2 tablespoons chopped roasted peanuts or granola (optional, for crunch)
      • Extra banana slices and whole raspberries for the top
      • Small pieces of milk chocolate for garnish (optional)

    Equipment:

    • Blender
    • Two tall milkshake glasses
    • Measuring cups and spoons
    • Sharp knife and cutting board

    Instructions:

    1. Prepare Your Glasses (Optional but Recommended):

      • Before blending, you can drizzle some chocolate syrup down the inside of your milkshake glasses for an appealing visual effect. Tilt the glass and rotate it as you drizzle to get a nice swirl. Place them in the freezer to chill while you prepare the milkshake.
    2. Make the Milkshake Base:

      • In your blender, combine the milk, strawberry ice cream, vanilla ice cream, and the banana chunks.
      • Blend on high speed until smooth and creamy. If the mixture is too thick, add a tiny bit more milk (1 tablespoon at a time) and blend again until you reach your desired consistency. You want it thick enough to hold toppings but still drinkable.
    3. Layer the Milkshakes (Assembly):

      • Pour about half of the blended milkshake mixture into each of your prepared glasses.
      • Gently push some of the sliced fresh strawberries and a few raspberries against the inside of the glass, letting them stick to the milkshake mixture. You can also drop some into the center of the milkshake.
    4. Add More Milkshake:

      • Pour the remaining milkshake mixture into the glasses, filling them almost to the top.
    5. Decorate and Garnish:

      • Whipped Cream: Generously pipe or spoon a mound of whipped cream on top of each milkshake.
      • Chocolate Drizzle: Drizzle more chocolate syrup generously over the whipped cream.
      • Fruit Toppings: Arrange fresh strawberry slices, banana slices, and whole raspberries artfully on top of the whipped cream.
      • Crunch (Optional): Sprinkle chopped roasted peanuts or granola over the top for added texture.
      • Final Touches: Add a few extra whole raspberries and perhaps a small piece of chocolate on the side for a complete look, mimicking the image.
    6. Serve Immediately:

      • Serve your decadent banana split milkshakes immediately with a straw and a long spoon. Enjoy!

    Tips for Success:

    • Cold Ingredients: Ensure your ice cream is well-frozen and your milk is cold for the best, thickest milkshake.
    • Ripe Bananas: Use ripe (but not overripe) bananas for optimal flavor and sweetness.
    • Adjust Sweetness: Taste the milkshake before adding all the toppings. If you prefer it sweeter, you could add a teaspoon of sugar or a splash of maple syrup to the blender.
    • Customize: Feel free to swap out the fruits for your favorites (e.g., blueberries, kiwi) or add other toppings like mini chocolate chips, sprinkles, or a different syrup (caramel!).
    • Presentation is Key: The visual appeal is a big part of these milkshakes! Take your time with the layering and garnishing.
  • Hearty Vegetable Soup Recipe

    Hearty Vegetable Soup Recipe

    Warm your soul with this Vegan Hearty Vegetable Soup, a bowl full of nutrition and comfort. This recipe combines vibrant vegetables, protein-packed lentils, and warming spices to create a balanced, flavorful dish that is perfect for all seasons. Whether you’re meal prepping or serving a crowd, this soup delivers exceptional taste and nourishment.

    This detailed recipe guide will help you recreate this comforting classic in your kitchen, complete with tips, nutritional information, and storage suggestions.

    by TaboolaSponsored Links
    You May Like
    Trending in in 2025: Local network access control [Click Here]
    Esseps
    Apartment for Sale | Search Ads
    After Her Weight Loss, Celine Dion Confirms What We Knew All Along
    Learn It Wise
    Ingredients (Serves 6-8)
    Base Ingredients
    2 tablespoons olive oil (or vegetable broth for oil-free cooking)
    1 large yellow onion, diced
    3 garlic cloves, minced
    Vegetables
    3 medium carrots, peeled and sliced
    2 celery stalks, diced
    1 medium zucchini, diced
    2 cups green beans, trimmed and cut into 1-inch pieces
    2 medium potatoes, peeled and cubed (Yukon Gold or russet recommended)
    1 cup diced butternut squash
    Broth and Tomatoes
    6 cups low-sodium vegetable broth
    1 can (14.5 oz) diced tomatoes, with juice
    Legumes and Grains
    1 cup dried lentils (brown or green), rinsed
    ½ cup quinoa, rinsed
    Herbs and Spices
    1 teaspoon smoked paprika
    1 teaspoon ground cumin
    2 teaspoons dried thyme
    1 teaspoon dried oregano
    1 bay leaf
    Salt and black pepper, to taste
    Final Additions
    2 cups kale or spinach, chopped
    1 tablespoon fresh lemon juice (optional, for brightness)
    2 tablespoons fresh parsley, chopped (optional garnish)

    Instructions
    Step 1: Prepare Your Ingredients
    Start by gathering and prepping all your ingredients. Dice the vegetables into similar-sized pieces to ensure even cooking. Rinse the lentils and quinoa under cold water to remove any dirt or bitterness.

    Step 2: Sauté the Aromatics
    In a large soup pot, heat olive oil over medium heat. If you prefer an oil-free version, use a few tablespoons of vegetable broth instead. Add the diced onion and cook for about 5 minutes, stirring occasionally until the onion is soft and translucent. Add the minced garlic and sauté for another minute until fragrant.

    Step 3: Add the Vegetables
    Toss in the carrots, celery, zucchini, and green beans. Stir well and cook for 5-7 minutes to allow the vegetables to soften slightly and release their natural flavors.

    Step 4: Season and Add Tomatoes
    Stir in the smoked paprika, ground cumin, thyme, oregano, salt, and black pepper. These spices enhance the depth of the soup. Add the canned diced tomatoes with their juices, stirring to combine.

    Step 5: Incorporate the Broth and Proteins
    Pour in the vegetable broth and bring the mixture to a boil. Add the potatoes, butternut squash, lentils, and quinoa. Stir to distribute the ingredients evenly.

    Step 6: Simmer to Perfection
    Reduce the heat to medium-low, cover the pot with a lid, and let the soup simmer for 30-35 minutes. Stir occasionally to prevent sticking. The lentils and quinoa should cook through, and the vegetables should be tender.

    Step 7: Add the Greens
    Once the soup has simmered, stir in the chopped kale or spinach. Cook for an additional 5 minutes until the greens are wilted and bright in color.

    Step 8: Adjust Seasoning
    Taste the soup and adjust the seasoning as needed. For extra brightness, add a squeeze of fresh lemon juice.

    Step 9: Serve and Garnish
    Remove the bay leaf before serving. Ladle the soup into bowls and garnish with freshly chopped parsley if desired.

    Step 10: Enjoy the Comfort
    Serve warm with crusty bread, a side salad, or enjoy it on its own as a wholesome, satisfying meal.

    Tips for the Best Soup
    Customizations: Use any seasonal vegetables you have on hand. Sweet potatoes, parsnips, or peas make great additions.
    Texture Tip: For a creamier texture, blend a portion of the soup with an immersion blender.
    Batch Cooking: This soup freezes exceptionally well, making it perfect for meal prep.
    Flavor Boost: Add a teaspoon of nutritional yeast for a cheesy flavor or a dash of red pepper flakes for some heat.
    Nutritional Information (Per Serving)
    Calories: 240
    Protein: 10g
    Carbohydrates: 42g
    Fiber: 10g
    Fat: 4g
    Sodium: 520mg
    Weight Watchers SmartPoints
    This Vegan Hearty Vegetable Soup is approximately 3 SmartPoints per serving, depending on the specific brands and ingredients used.

    Storage Instructions
    Refrigeration: Store in an airtight container in the refrigerator for up to 5 days.
    Freezing: Portion the soup into freezer-safe containers or bags. Freeze for up to 3 months.
    Reheating: Reheat on the stovetop over medium heat, adding a splash of vegetable broth or water to thin the consistency if needed.
    Why This Recipe Stands Out
    Nutrient-Dense: Packed with fiber, vitamins, and plant-based protein.
    Easy to Make: Minimal prep time and one-pot cooking make it simple and convenient.
    Family-Friendly: A meal that satisfies vegans and non-vegans alike.
    Perfect for Any Season: Light enough for spring but hearty enough for winter.
    Serving Suggestions
    Serve alongside whole-grain bread or crackers for a complete meal.
    Pair with a fresh side salad with a tangy vinaigrette.
    Top with avocado slices or a dollop of vegan yogurt for added richness.
    This Vegan Hearty Vegetable Soup is a deliciously comforting dish that brings together the goodness of nature in every spoonful. Try this recipe today and enjoy a warm, nourishing bowl of soup that’s perfect for any occasion!
  • Mini Chicken Pot Pie Muffins: A Quick, Comforting Meal for Busy Nights

    Mini Chicken Pot Pie Muffins: A Quick, Comforting Meal for Busy Nights

    Ingredients

    • – 2 cups cooked chicken, diced
    • – 1 cup frozen mixed vegetables (peas, carrots, corn)
    • – 1 can (10.5 oz) cream of chicken soup
    • – 1 cup shredded cheddar cheese
    • – 1/2 teaspoon garlic powder
    • – 1/2 teaspoon onion powder
    • – Salt and pepper to taste
    • – 1 can (16.3 oz) refrigerated biscuit dough

    Instructions

    • 1. Preheat the oven to 375°F (190°C). Grease a muffin tin with non-stick cooking spray.
    • 2. In a large bowl, combine the cooked chicken, frozen mixed vegetables, cream of chicken soup, shredded cheddar cheese, garlic powder, onion powder, salt, and pepper. Mix until well combined.
    • 3. Open the can of biscuit dough and separate the biscuits. Flatten each biscuit into a 4-inch round.
    • 4. Press each flattened biscuit into a muffin cup, making sure to cover the bottom and sides.
    • 5. Spoon the chicken mixture into each biscuit-lined muffin cup, filling them to the top.
    • 6. Bake for 15-18 minutes, or until the biscuits are golden brown and the filling is hot and bubbly.
    • 7. Allow the mini pot pies to cool in the muffin tin for a few minutes before removing and serving.
    • Prep Time: 15 minutes
    • Cook Time: 18 minutes

    Nutrition

    • Serving Size: 8 servings
    • Calories: 250 kcal per serving
  • Lemon Pecorino Crusted Chicken with Creamy Lemon Sauce

    Lemon Pecorino Crusted Chicken with Creamy Lemon Sauce

    Ingredients

    Ingredients for the Chicken:
    8 (2-ounce) chicken tenderloins
    ½ cup all-purpose flour
    2 large eggs, beaten
    1 cup panko breadcrumbs
    Zest from 1 lemon
    ¼ cup grated Pecorino Romano cheese
    ¼ cup extra virgin olive oil
    2 tablespoons butter
    Ingredients for the Sauce:
    1 tablespoon extra virgin olive oil
    1 tablespoon minced garlic
    1 tablespoon all-purpose flour
    ¼ cup milk
    ¾ cup heavy cream
    ¼ cup chicken broth
    2 tablespoons lemon juice
    1 tablespoon butter

    Instructions

    Prepare the Chicken: Flatten the tenderloins to even thickness using a meat mallet. Set up three dredging stations: one with flour, one with beaten eggs, and one with a mixture of breadcrumbs, lemon zest, and Pecorino cheese.
    Cook the Chicken: In a large nonstick sauté pan, heat olive oil and butter over medium heat. Fry the chicken until golden and cooked through, about 3-5 minutes per side. Drain on paper towels.
    Make the Sauce: In a medium saucepan, heat olive oil and sauté garlic until fragrant. Whisk in flour, then gradually add milk, cream, and chicken broth. Bring to a boil and simmer until thickened, about 3-5 minutes. Remove from heat and stir in lemon juice and butter.
    Serve: Drizzle the creamy lemon sauce over the crispy chicken before serving.
    • Prep Time: 15 minutes
    • Cook Time: 25 minutes

    Nutrition

    • Serving Size: 4 servings
    • Calories: 420 kcal per serving
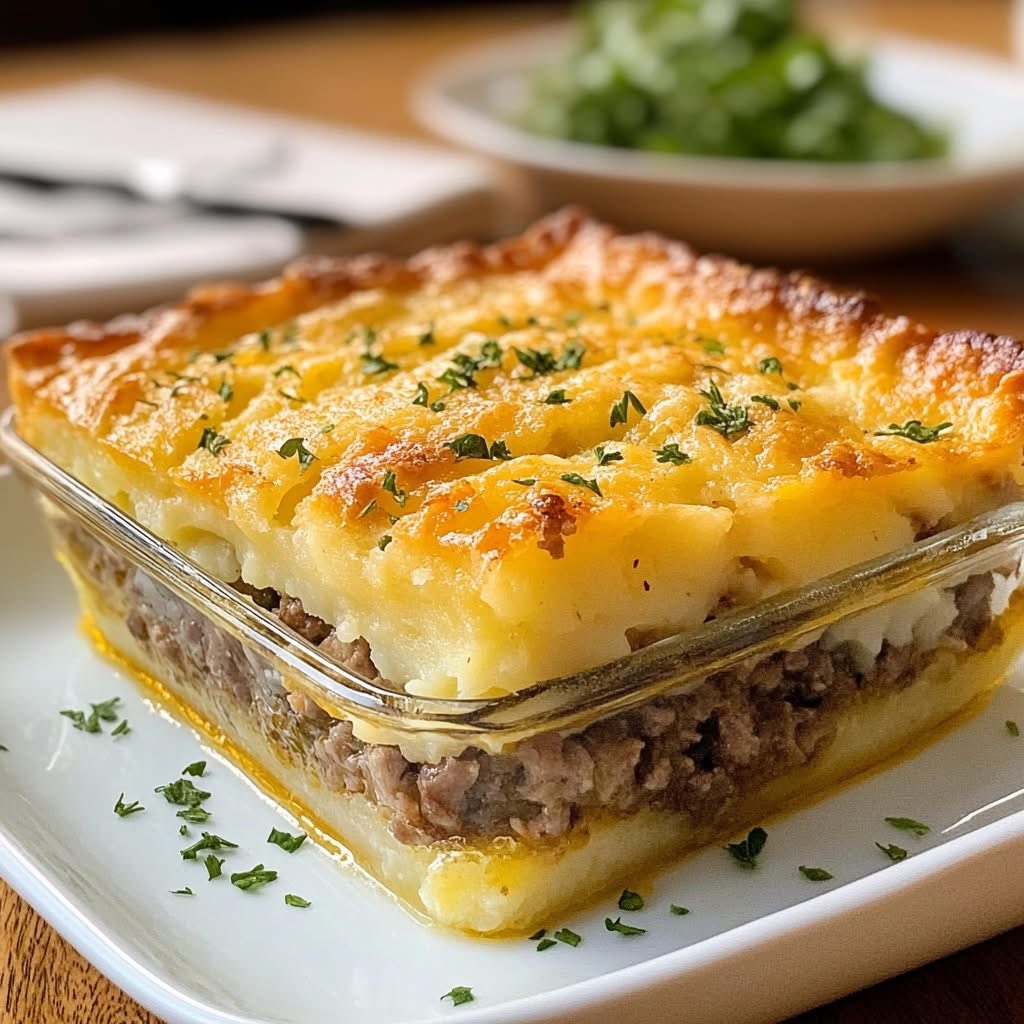
  • Sweet Mustard Cottage Pie

    Sweet Mustard Cottage Pie

    Sweet Mustard Cottage Pie

    ‍‍‍ Serves: 4 to 6
    ⏱ Preparation time: 25 min
    ⏱ Cooking time: 30 min

    1f6d2 Ingredients:
    Potatoes: 1 kg

    Milk: 150 ml

    Butter: 50 g

    Mustard (old-fashioned or sweet): 2 tbsp

    Ground beef: 500 g

    Onion: 1

    Garlic: 1 clove

    Olive oil: 1 tbsp

    Salt and pepper: to taste

    Grated cheese (Emmental, Comté, etc.): 50 g

    Freshly chopped parsley: 1 tbsp (for topping)

    ‍ Detailed preparation steps:
    Prepare the mash 1f954

    Peel the potatoes and cut them into chunks.

    Cook them in boiling salted water for about 20 minutes, until tender.

    Drain, mash them with a potato masher, then add the hot milk, butter, salt, and pepper.

    Mix well to obtain a smooth mash.

    Prepare the meat 1f356

    Finely chop the onion and garlic, then brown them in a pan with olive oil.

    Add the ground beef and cook over medium heat, breaking it up well.

    Add salt and pepper, then add the mustard off the heat. Mix well.

    Assemble the mince ️

    In a gratin dish, spread a thin layer of mashed potatoes on the bottom (optional but useful for consistency).

    Then pour in the mustard-coated meat.

    Cover with the remaining mashed potatoes, smooth the top, and sprinkle with grated cheese.

    Baking and Finishing 1f525

    Bake at 200°C for 25 to 30 minutes, until golden brown.

    Sprinkle with fresh parsley just before serving.

    1f4a1 Tip to make this recipe easier:
    You can use homemade mashed potatoes prepared the day before to save time, or even leftover ground roast instead of raw meat.

    1f504 Ingredient swap:
    Replace the beef with ground poultry or a vegetable-lentil mix for a vegetarian version.

    1f525 Cooking tip:
    Finish under the grill for 3 to 4 minutes for an ultra-crispy gratin without drying out the mashed potatoes

  • Carrot Apple Zucchini Muffins with Cream Cheese Frosting

    Carrot Apple Zucchini Muffins with Cream Cheese Frosting

    Carrot Apple Zucchini Muffins with Cream Cheese Frosting
    Ingredients:
    For the Muffins:
    1 cup all-purpose flour
    1 cup whole wheat flour
    1 teaspoon baking soda
    1/2 teaspoon baking powder
    1/2 teaspoon salt
    1 teaspoon ground cinnamon
    1/2 teaspoon ground nutmeg
    1/2 teaspoon ground ginger
    1/2 cup granulated sugar
    1/2 cup brown sugar
    1/2 cup vegetable oil
    1/4 cup applesauce
    3 large eggs
    1 teaspoon vanilla extract
    1 cup grated carrots
    1 cup grated zucchini
    1 cup grated apple (peeled and cored)
    For the Cream Cheese Frosting:
    8 oz cream cheese, softened
    1/4 cup unsalted butter, softened
    1/2 cup powdered sugar
    1 teaspoon vanilla extract
    Instructions:
    Prepare the Muffins:
    Preheat your oven to 350°F (175°C). Line a muffin tin with paper liners or lightly grease it.
    In a large bowl, whisk together the flours, baking soda, baking powder, salt, cinnamon, nutmeg, and ginger.
    In another bowl, combine the granulated sugar, brown sugar, vegetable oil, applesauce, eggs, and vanilla extract until well mixed.
    Gradually add the dry ingredients to the wet ingredients, stirring until just combined.
    Fold in the grated carrots, zucchini, and apple.
    Divide the batter evenly among the muffin cups, filling each about 2/3 full.
    Bake for 20-25 minutes, or until a toothpick inserted into the center comes out clean.
    Allow the muffins to cool in the tin for 5 minutes, then transfer to a wire rack to cool completely.
    Prepare the Cream Cheese Frosting:
    In a medium bowl, beat the softened cream cheese and butter until creamy and smooth.
    Gradually add the powdered sugar and vanilla extract, beating until smooth and well combined.
    Assemble the Muffins:
    Once the muffins are completely cool, spread or pipe the cream cheese frosting over the top of each muffin.
    Optionally, garnish with additional grated carrots, zucchini, and apple for a decorative touch.

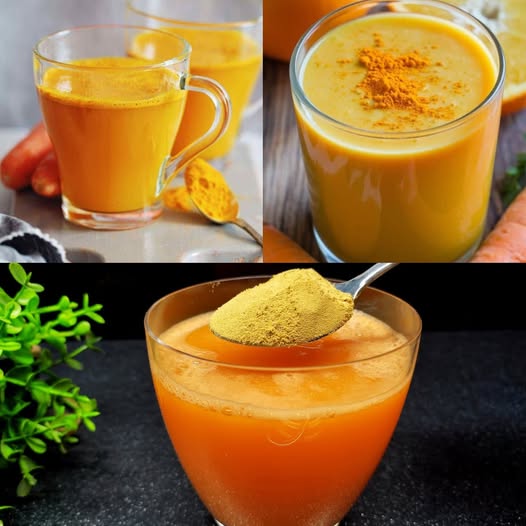
  • A Simple Drink for Natural Weight Loss

    A Simple Drink for Natural Weight Loss

    Losing weight can often feel like a daunting task, but it doesn’t have to be that way, especially as we grow older. Contrary to popular belief, you don’t always need to follow strict diets or intense workout routines to see significant results. Sometimes, incorporating small and simple changes into your routine can lead to remarkable weight loss. I recently discovered a natural drink that not only helped me shed 10 kg in just one month but also made the entire process enjoyable and sustainable.

    The Magic Ingredients: Carrot and Turmeric

    Carrots are not just for Bugs Bunny; they are incredibly beneficial for promoting weight loss in adults too. Packed with fiber and essential nutrients, carrots can help you feel full for longer periods, reducing unnecessary cravings and preventing overeating. Moreover, they aid in digestion and support gut health, which are vital aspects of effective weight management.

    On the other hand, turmeric, a popular anti-inflammatory spice, is a powerful addition to this drink. Turmeric helps in boosting metabolism, enabling your body to burn fat more efficiently. It also aids in digestion, reduces bloating, and leaves you feeling more energized and lighter.

    Crafting Your Weight Loss Elixir

    You don’t have to be a master chef to make this simple and effective weight loss drink. With minimal ingredients and little effort, you can whip up this miracle potion in minutes, ready to be savored at any time of the day.

    Ingredients Required:

    • 2 medium-sized carrots
    • 1/2 teaspoon of turmeric powder (or a small piece of fresh turmeric)
    • 1 cup of warm water
    • Juice of half a lemon
    • 1 teaspoon of honey (optional)

    Instructions:

    • Begin by peeling and chopping the carrots, then blend them with warm water until you achieve a smooth consistency.
    • For a lighter texture, consider straining the juice.
    • Add the turmeric, lemon juice, and honey to the blend and mix well.
    • Enjoy your drink in the morning before breakfast and once more in the evening before bedtime.

    Why This Drink Works Wonders

    This natural drink works wonders by supporting your digestion, reducing inflammation, and enhancing your metabolism. Additionally, it ensures that you stay hydrated and provides your body with essential vitamins and minerals. Unlike extreme diets that may leave you feeling drained, this method is gentle and sustainable. It allows you to shed excess weight naturally while still relishing your favorite foods in moderation.

    If you are on the lookout for a straightforward and efficient way to lose weight without any added stress, I highly recommend giving this drink a shot. Remember, consistency is key. Keep yourself active daily, and embrace the journey towards a healthier version of you.