Blog

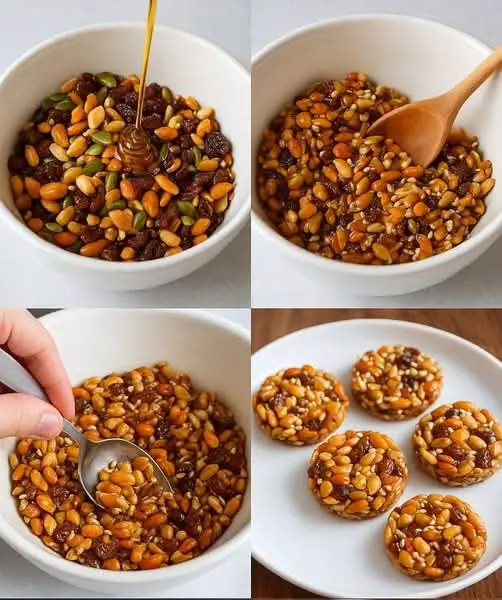
  • Chewy Coconut Dark Chocolate Energy Cookies (No Refined Sugar

    Chewy Coconut Dark Chocolate Energy Cookies (No Refined Sugar

    Chewy Coconut Dark Chocolate Energy Cookies (No Refined Sugar

    Ingredients

    Dry Ingredients:

    • 1 cup rolled oats (100g / 3.5 oz)
    • ¼ cup unsweetened shredded coconut (20g / 0.7 oz)
    • ⅓ cup dark chocolate chips (60g / 2.1 oz)
    • 2 tablespoons chia seeds (24g / 0.85 oz)
    • Pinch of sea salt

    Wet Ingredients:

    • ¼ cup almond butter (60g / 2.1 oz)
    • ¼ cup honey or maple syrup (60ml / 2 fl oz)
    • 1 teaspoon vanilla extract

    Equipment Needed

    • Baking sheet
    • Parchment paper
    • Mixing bowls
    • Measuring cups and spoons
    • Cookie scoop (optional)

    Detailed Instructions

    Preparation Phase (5 minutes)

    1. Preheat your oven to 350°F (175°C)
    2. Line a large baking sheet with parchment paper
    3. Ensure all ingredients are at room temperature for best binding

    Mixing the Ingredients (10 minutes)

    1. Combine Dry Ingredients:
    • In a large mixing bowl, combine rolled oats, shredded coconut, and chia seeds
    • Add a pinch of salt to enhance flavors
    • Stir well to distribute ingredients evenly
    1. Mix Wet Ingredients:
    • In a separate bowl, combine almond butter and honey/maple syrup
    • Add vanilla extract
    • Whisk until smooth and well combined
    • Pro tip: Warm slightly if almond butter is too stiff
    1. Combine Mixtures:
    • Pour wet ingredients over dry ingredients
    • Mix thoroughly until everything is well coated
    • Fold in dark chocolate chips last to prevent melting

    Forming and Baking (20 minutes)

    1. Shape Cookies:
    • Use a tablespoon measure or small cookie scoop
    • Place 2-tablespoon portions onto prepared baking sheet
    • Gently press down to form cookies about ½-inch thick
    • Leave space between cookies for slight spreading
    1. Baking:
    • Place in preheated oven
    • Bake for 12-15 minutes until edges are golden brown
    • Center should still be slightly soft
    • Watch carefully after 10 minutes to prevent over-browning

    Cooling and Storage (15 minutes)

    1. Let cookies cool on baking sheet for 5 minutes
    2. Transfer to wire rack for complete cooling
    3. Store in airtight container

    Storage Tips

    • Room temperature: 5 days in airtight container
    • Refrigerator: Up to 2 weeks
    • Freezer: Up to 3 months

    Nutrition Information

    Per cookie (recipe makes 12 cookies):

    • Calories: 145
    • Protein: 3g
    • Healthy Fats: 8g
    • Carbohydrates: 16g
    • Fiber: 3g
    • Natural Sugars: 7g
    • Iron: 1.2mg
    • Omega-3 Fatty Acids: 0.5g

    Pro Tips for Perfect Results

    1. Use old-fashioned rolled oats, not quick oats, for better texture
    2. Choose runny almond butter for easier mixing
    3. Don’t overbake – cookies should be slightly soft when removed from oven
    4. Let cool completely before storing to maintain texture
    5. For extra crunch, toast coconut before adding to mixture

    These nutrient-rich cookies prove that healthy snacking can be delicious! They’re perfect for meal prep, on-the-go energy, or satisfying that sweet craving with wholesome ingredients. The combination of complex carbs, healthy fats, and natural sweeteners makes them an ideal pre-workout snack or afternoon energy boost.

  • Decadent Dark Chocolate Zucchini Bread: A Guilt-Free Chocolate Lover’s Dream

    Decadent Dark Chocolate Zucchini Bread: A Guilt-Free Chocolate Lover’s Dream

    Decadent Dark Chocolate Zucchini Bread: A Guilt-Free Chocolate Lover’s Dream

    Ingredients

    Fresh Produce

    • 350g (1½ cups) grated zucchini, excess moisture removed
    • Tip: Choose medium-sized, firm zucchini for best results

    Wet Ingredients

    • 80ml (⅓ cup) coconut oil, melted and cooled
    • 120ml (½ cup) pure maple syrup or honey
    • 2 large eggs, room temperature
    • 5ml (1 tsp) pure vanilla extract

    Dry Ingredients

    • 40g (⅓ cup) unsweetened cocoa powder
    • 120g (1 cup) whole wheat flour
    • 5g (1 tsp) baking soda
    • 2.5g (½ tsp) baking powder
    • 1.25g (¼ tsp) fine sea salt
    • 45g (¼ cup) dark chocolate chips (70% cocoa or higher)

    Detailed Instructions

    Preparation Phase

    1. Position your oven rack in the center and preheat to 350°F (175°C). Grease a 9×5-inch (23x13cm) loaf pan thoroughly with coconut oil, then line with parchment paper, leaving overhang for easy removal.

    Preparing the Zucchini

    1. Grate the zucchini using the large holes of a box grater. Place in a clean kitchen towel and squeeze firmly to remove excess moisture. This step is crucial for proper texture.

    Mixing Wet Ingredients

    1. In a large mixing bowl, whisk together the melted coconut oil and maple syrup until fully combined. The maple syrup adds natural sweetness while keeping the glycemic index lower than refined sugar.
    2. Add the eggs one at a time, whisking well after each addition. The eggs provide structure and richness to the bread.
    3. Stir in the vanilla extract, then fold in the prepared zucchini. The zucchini will provide moisture and nutrients while remaining virtually undetectable in the final product.

    Combining Dry Ingredients

    1. In a separate bowl, sift together the cocoa powder, whole wheat flour, baking soda, baking powder, and salt. Sifting prevents lumps and ensures even distribution of the leavening agents.
    2. Gradually add the dry ingredients to the wet mixture, folding gently until just combined. Do not overmix, as this can lead to a tough texture.
    3. Fold in the dark chocolate chips, reserving a few for topping if desired.

    Baking Process

    1. Transfer the batter to your prepared loaf pan, smoothing the top with a spatula. Sprinkle with reserved chocolate chips if using.
    2. Bake for 45-50 minutes, or until a wooden skewer inserted into the center comes out clean or with just a few moist crumbs.

    Cooling and Storage

    1. Allow the bread to cool in the pan for exactly 10 minutes. This timing allows the structure to set while preventing the bottom from becoming soggy.
    2. Using the parchment overhang, lift the bread out of the pan and transfer to a wire rack to cool completely.

    Storage Tips

    • Room temperature: Up to 3 days, wrapped in parchment paper
    • Refrigerated: Up to 1 week in an airtight container
    • Frozen: Up to 3 months, wrapped well in plastic wrap and foil

    Nutrition Information

    Per slice (1/12 of loaf):

    • Calories: 185
    • Total Fat: 9.5g
    • Saturated Fat: 6.8g
    • Cholesterol: 31mg
    • Sodium: 208mg
    • Total Carbohydrates: 23.4g
    • Dietary Fiber: 2.8g
    • Sugar: 11.2g
    • Protein: 4.2g

    This bread is packed with nutrients from the zucchini, including vitamin C, potassium, and fiber. The dark chocolate and cocoa powder provide antioxidants, while the whole wheat flour adds additional fiber and nutrients. Perfect for breakfast, snacking, or a wholesome dessert.

    Serving Suggestions

    • Warm slightly and spread with almond butter
    • Top with Greek yogurt and fresh berries
    • Enjoy as is with your morning coffee or tea
    • Toast lightly and drizzle with extra honey for dessert

    This Dark Chocolate Zucchini Bread proves that healthy ingredients can create truly decadent results!

  • Strawberry Cheesecake Banana Pudding:

    Strawberry Cheesecake Banana Pudding:

    Strawberry Cheesecake Banana Pudding: The Ultimate Dessert Fusion – A Dreamy, Decadent Treat for All Occasions!

    Summary: Looking for the perfect dessert that combines the rich, creamy indulgence of cheesecake with the classic comfort of banana pudding and the sweet, fresh brightness of strawberries? Strawberry Cheesecake Banana Pudding is the ultimate fusion of three beloved desserts, creating a luscious, layered masterpiece that will leave everyone asking for seconds. This dessert blends the tangy goodness of cheesecake with the smooth, velvety texture of banana pudding and the fruity punch of strawberries, creating a layered treat that’s perfect for any special occasion. Whether it’s a family gathering, a potluck, or simply a way to indulge your sweet tooth, this dessert will wow everyone!

    Prep Time: 45 minutes
    Chill Time: 4 hours (or overnight)
    Total Time: 4 hours 45 minutes
    Servings: 12 servings
    Calories: 450 per serving

    Courses: Dessert, Sweet Treat
    Cuisines: American, Comfort Food, Southern-Inspired

    Ingredients:

    For the Cheesecake Layer:

    • 8 oz cream cheese, softened
    • ½ cup powdered sugar
    • 1 tsp vanilla extract
    • 1 cup heavy whipping cream
    • 2 tbsp powdered sugar

    For the Banana Pudding Layer:

    • 3 cups whole milk
    • 1 (3.4 oz) package instant vanilla pudding mix
    • 1 tsp vanilla extract
    • 1 ripe banana, sliced
    • 1 cup Nilla wafer cookies, crushed (or any vanilla cookies you prefer)

    For the Strawberry Layer:

    • 1 pound fresh strawberries, hulled and sliced
    • 2 tbsp granulated sugar
    • 1 tbsp lemon juice

    For the Assembly:

    • 1 box Nilla wafers (or any vanilla cookies of your choice)
    • 2 ripe bananas, sliced

    Equipment:

    • Hand mixer or stand mixer
    • Mixing bowls
    • 9×13-inch trifle dish or any large serving dish
    • Whisk
    • Knife for slicing strawberries and bananas
    • Spoon or spatula for layering
    • Plastic wrap (for covering)

    Instructions:

    1. Prepare the Strawberry Layer:

    • In a medium bowl, combine the sliced strawberries, granulated sugar, and lemon juice. Toss everything together and let it sit for 15-20 minutes, allowing the strawberries to release their natural juices and create a slightly syrupy consistency.
    • After 20 minutes, give them another stir. You can lightly mash some of the strawberries for a more jammy texture or leave them whole for a chunkier, fresh feel. Set aside.

    2. Make the Cheesecake Layer:

    • Using a hand mixer or stand mixer, beat the softened cream cheese on medium speed for about 2 minutes until smooth and creamy.
    • Add the powdered sugar and vanilla extract, mixing until combined.
    • In a separate bowl, whip the heavy whipping cream and powdered sugar until stiff peaks form (this will take about 2-3 minutes on medium speed).
    • Gently fold the whipped cream into the cream cheese mixture until smooth and well incorporated. Set aside.

    3. Prepare the Banana Pudding Layer:

    • In a large bowl, whisk together the whole milk and instant vanilla pudding mix. Continue whisking for about 2 minutes until the pudding thickens and reaches a custard-like consistency.
    • Stir in the vanilla extract for added flavor. Set the pudding mixture aside to firm up a little more.

    4. Assemble the Layers:

    • In a large trifle dish (or a 9×13-inch serving dish), begin by adding a layer of Nilla wafers at the bottom.
    • Place a layer of banana slices over the cookies, followed by a layer of the banana pudding mixture.
    • Add a layer of the cheesecake mixture on top of the pudding, smoothing it out evenly with a spatula.
    • Follow with a layer of strawberries, spreading them evenly across the cheesecake layer.
    • Repeat the layers—cookies, bananas, pudding, cheesecake, and strawberries—until the dish is filled or all layers are used up. Make sure to end with a layer of the cheesecake mixture on top.
    • For a final touch, decorate the top with additional sliced bananas, strawberries, and crushed Nilla wafers for crunch.

    5. Chill the Dessert:

    • Cover the assembled dessert with plastic wrap and refrigerate for at least 4 hours, or preferably overnight. This allows all the flavors to meld together and ensures the layers set nicely.
    • If you’re making this in advance, feel free to make it the night before so the dessert is ready to serve when you need it.

    6. Serve and Enjoy:

    • Once chilled, remove from the refrigerator and give the dessert a gentle stir to loosen the layers slightly before serving.
    • Scoop out generous portions into individual bowls, and enjoy the perfect fusion of strawberry cheesecake, banana pudding, and vanilla wafer goodness!

    Recipe Variations:

    • Chocolate Cheesecake Banana Pudding: Swap the cheesecake layer with a chocolate cheesecake filling. Add cocoa powder to the cream cheese mixture to give it a rich, chocolatey flavor.
    • Lemon Banana Pudding: For a citrus twist, add lemon zest to the banana pudding layer and top the dessert with fresh lemon slices or a dollop of lemon curd.
    • Vegan Version: Use coconut milk, vegan cream cheese, and dairy-free whipped cream for a completely plant-based version of this dessert.
    • Boozy Banana Pudding: For an adult version, add a splash of rum, bourbon, or amaretto to the strawberry layer to give it a rich, aromatic flavor.

    Frequently Asked Questions (FAQs):

    Q: Can I make this dessert ahead of time?
    A: Yes, this dessert is perfect for making ahead! In fact, it tastes even better after chilling overnight, as the flavors have time to meld together.

    Q: Can I use frozen strawberries instead of fresh?
    A: While fresh strawberries work best for this dessert, you can use frozen strawberries if fresh ones aren’t available. Just be sure to thaw them and drain off excess liquid before using.

    Q: How do I store the leftovers?
    A: Leftovers can be stored in an airtight container in the refrigerator for up to 3 days. The dessert will continue to soften, but the flavors will still be delicious.

    Q: Can I substitute the Nilla wafers with other cookies?
    A: Absolutely! You can use any vanilla-flavored cookies, graham crackers, or even shortbread cookies for the crust. Just be sure they are sturdy enough to hold up the layers of pudding and cheesecake.

    Q: Is there a non-dairy option for the cheesecake layer?
    A: Yes! You can make the cheesecake layer using dairy-free cream cheese and coconut cream for a rich and creamy alternative. Use your favorite dairy-free whipped topping to make the whipped cream substitute.

    Notes:

    • If you prefer a thicker cheesecake layer, simply double the amount of cream cheese in the recipe and reduce the amount of heavy cream.
    • For extra flavor, you can toast the Nilla wafers before layering them to give the dessert a warm, nutty undertone.

    Nutritional Info (per serving):

    • Calories: 450
    • Total Fat: 22g
    • Saturated Fat: 12g
    • Cholesterol: 45mg
    • Sodium: 150mg
    • Carbohydrates: 60g
    • Fiber: 3g
    • Sugars: 38g
    • Protein: 4g

    Conclusion:

    Strawberry Cheesecake Banana Pudding: The Ultimate Dessert Fusion is a dreamy, decadent dessert that combines the best of three world-famous treats into one unforgettable dessert. With its creamy, cheesecake-like filling, the familiar taste of banana pudding, and the fresh, fruity burst of strawberries, this fusion dessert is sure to impress at any gathering or special occasion. Whether you’re a fan of classic banana pudding, cheesecake, or strawberry desserts, this layered masterpiece is a sweet escape that everyone will adore. Try it out, and prepare to indulge in the ultimate dessert experience!

  • Sweet and Spicy Mango

    Sweet and Spicy Mango

    Sweet and Spicy Mango Salad Dressing: A Flavorful Twist for Your Greens!

    Summary:
    This Sweet and Spicy Mango Salad Dressing is the perfect combination of tropical sweetness and a spicy kick, making it a delicious addition to any salad. With the natural sweetness of ripe mangoes, a touch of honey, and the heat from red chili flakes, this dressing balances flavors beautifully. Drizzle it over mixed greens, grilled chicken salads, or even use it as a dipping sauce for veggies. This quick and easy homemade dressing will elevate your salads to the next level!

    Prep Time: 10 minutes
    Cook Time: 0 minutes
    Total Time: 10 minutes
    Servings: 6 (2 tablespoons per serving)
    Calories per serving: ~75 kcal
    Courses: Dressings, Sauces
    Cuisine: Fusion, Tropical
    Ingredients:
    1 large ripe mango, peeled and diced
    2 tablespoons olive oil
    1 tablespoon apple cider vinegar
    1 tablespoon honey (or maple syrup for a vegan option)
    1 teaspoon Dijon mustard
    1/2 teaspoon red chili flakes (adjust to taste)
    1/4 teaspoon salt
    1/4 teaspoon black pepper
    2 tablespoons fresh lime juice
    1-2 tablespoons water (to thin, if needed)

    Instructions:

    1. Prepare the Mango: Peel and dice the ripe mango, ensuring it’s fully ripe for optimal sweetness.
    2. Blend the Ingredients: In a blender or food processor, combine mango, olive oil, apple cider vinegar, honey, Dijon mustard, chili flakes, salt, black pepper, and lime juice.
    3. Adjust the Consistency: Blend until smooth. If the dressing is too thick, add 1-2 tablespoons of water and blend again until desired consistency is achieved.
    1. Taste and Adjust: Taste the dressing and adjust the seasoning as needed. If you want more heat, add extra chili flakes.
    2. Serve or Store: Pour the dressing into a jar or bottle. Store in the refrigerator for up to 5 days. Shake well before use.

    Equipment Needed:

    • Blender or food processor
    • Measuring spoons
    • Cutting board and knife
    • Jar or bottle for storage

    Recipe Variations:

    • Creamy Version: Add 1-2 tablespoons of Greek yogurt or coconut milk for a creamier consistency.
    • Extra Heat: Add a small chopped fresh chili pepper instead of red chili flakes.
    • Herbal Infusion: Blend in fresh cilantro or mint for an herby twist.
    • Citrus Boost: Replace apple cider vinegar with orange juice for a zestier dressing.

    Frequently Asked Questions (FAQs):

    Q: Can I use frozen mango instead of fresh?

    A: Yes! Just thaw the frozen mango before blending for the best texture.

    Q: How long does this dressing last in the fridge?

    A: It stays fresh for up to 5 days in an airtight container.

    Q: Can I make this dressing without a blender?

    A: Yes, but you’ll need to mash the mango very well and whisk everything together.

    Q: Is this dressing suitable for vegans?

    A: Yes! Just replace honey with maple syrup or agave nectar.

    Notes:

    • For a thinner consistency, add more water or olive oil.
    • Shake well before using, as ingredients may separate.
    • Adjust spice level to your preference by adding more or less chili flakes.

    Nutritional Info (per serving):

    • Calories: ~75 kcal
    • Carbohydrates: 10g
    • Fat: 3.5g
    • Protein: 0.5g
    • Sugar: 7g
    • Fiber: 1g

    Conclusion:

    This Sweet and Spicy Mango Salad Dressing brings a bold burst of tropical flavor to any dish. Whether drizzled over salads, grilled proteins, or used as a dip, it’s a must-try for those who love sweet, tangy, and spicy flavors in one bite. Try it today and enjoy a zesty new way to enjoy your greens!

  • Make This Guilt-Free Dessert: Flourless and Sugar-Free, Yet Totally Delicious!

    Make This Guilt-Free Dessert: Flourless and Sugar-Free, Yet Totally Delicious!

    Craving a comforting and warm dessert but want to avoid refined sugar and flour? Look no further! This recipe combines the natural sweetness of fruit with the satisfying texture of oats to create a healthy baked treat. Packed with grated apples, carrots, and a touch of stevia, this wholesome dessert is sure to become your new favorite.

    Ingredients

    • 2 cups (200 g) rolled oats, finely chopped in a blender
    • 1 teaspoon baking powder
    • 1 cup (240 ml) milk of your choice (dairy or plant-based)
    • 1 grated carrot
    • 9 dried apricots, rinsed in warm water and chopped
    • 4 tablespoons raisins, rinsed in warm water
    • 1 grated apple
    • 1 teaspoon cinnamon
    • 3 eggs
    • 4 tablespoons stevia or your preferred sweetener
    • 1 teaspoon vanilla extract
    • 2 tablespoons olive oil
    • 1 18-cm (7-inch) baking dish

    Instructions

    1. Preheat and Prepare

    • Preheat your oven to 180°C (350°F).
    • Lightly grease your baking dish with olive oil to prevent sticking.

    2. Mix Dry Ingredients

    • In a large bowl, combine the finely chopped oats and baking powder. This will form the base of your healthy dessert.

    3. Add the Fruits and Vegetables

    • Add the grated carrot, chopped dried apricots, rinsed raisins, and grated apple to the oat mixture. Mix well to evenly distribute the ingredients.

    4. Whisk the Wet Ingredients

    • In a separate bowl, beat the eggs until they’re light and fluffy.
    • Add the stevia (or your chosen sweetener), vanilla extract, and olive oil. Continue whisking until everything is well combined.

    5. Combine Wet and Dry Mixtures

    • Pour the wet mixture into the dry ingredients and gently fold with a spatula until fully incorporated. The batter should be smooth and uniform.

    6. Bake to Perfection

    • Pour the batter into the prepared baking dish and spread it evenly.
    • Bake in the preheated oven for 45–50 minutes. Keep an eye on it—the top should turn golden brown, and a toothpick inserted in the center should come out clean.

    7. Cool and Serve

    • Remove the baking dish from the oven and let it cool for a few minutes. This allows the dessert to set and makes it easier to slice. Serve warm or at room temperature.

    Recipe Tips

      • Customize It: Feel free to experiment by adding chopped nuts or substituting dried apricots with other dried fruits like dates or cranberries.
      • Alternative Oils: Swap olive oil with melted coconut oil for a different flavor profile.
      • Optional Add-Ins: Add a sprinkle of shredded coconut or dark chocolate chips for an extra treat.

    Why You’ll Love This Recipe

    This flourless and sugar-free dessert is not only healthy but also incredibly satisfying. The natural sweetness from the fruits, paired with the hearty texture of oats, makes it a guilt-free indulgence. Perfect for an afternoon snack, breakfast, or even a light dessert after dinner.

    Start baking today and enjoy this wholesome treat!

  • Oatmeal Drink Recipe: A Delicious Bedtime Beverage

    Oatmeal Drink Recipe: A Delicious Bedtime Beverage

    Are you looking for a comforting and soothing drink to enjoy before hitting the hay? Look no further! Transform your oatmeal into a delicious bedtime beverage that is not only nutritious but also incredibly tasty. Packed with fiber and naturally calming, this oatmeal drink is the perfect addition to your nighttime routine. Let’s dive into the easy recipe!

    Health Benefits of an Oatmeal Drink

    Oats are so much more than just a breakfast option. They are rich in nutrients, including carbs, fiber, protein, fat, vitamins, minerals, and antioxidant plant compounds

    Did you know that oats can also help promote relaxation? They contain amino acids and other nutrients that stimulate the production of melatonin, the sleep hormone. By enjoying this oatmeal drink, you’ll be preparing your body for a restful night’s sleep.

    Additionally, the fiber in oats supports digestive health, helping to prevent nighttime indigestion that might disrupt your sleep.

    Ingredients

    To make this soothing oatmeal drink, you’ll need the following ingredients:

    • 1 cup of milk (dairy or plant-based like almond, soy, or oat milk)
    • 2 tablespoons of rolled oats
    • 1 tablespoon of honey or maple syrup (optional, for sweetness)
    • 1/4 teaspoon of cinnamon (optional, for added flavor)
    • A pinch of nutmeg (optional, for added flavor)

    Instructions

    Follow these simple steps to create your very own oatmeal drink:

    1. Blend the Oats: Start by grinding the rolled oats in a blender until they turn into a fine powder. This helps them integrate smoothly into the drink.
    2. Heat the Milk: In a small saucepan, heat the milk over medium heat until it is just about to boil.
    3. Add the Oats: Stir the powdered oats into the warm milk. Reduce the heat to low and continue to stir as the mixture simmers gently. Allow it to cook for about 3-5 minutes, or until the milk thickens slightly.
    4. Flavor the Drink: Add honey (or maple syrup) for sweetness and sprinkle in cinnamon and nutmeg for flavor. These spices not only enhance the taste but also possess their own sleep-promoting properties.
    5. Simmer: Continue to simmer the mixture for another minute, stirring frequently to ensure it doesn’t stick to the bottom of the pan.
    6. Serve Warm: Pour the warm oatmeal drink into a mug. You might want to strain it if there are lumps, but this is optional. Drink it warm for a soothing effect.

    Tips and Variations

    Here are some tips and variations to enhance your oatmeal drink experience:

    • Fruit Add-Ins: For a fruitier flavor, blend in a banana or some berries with the oats. This adds natural sweetness and enriches the drink’s nutritional profile.
    • Make It Vegan: Use plant-based milk and sweeteners like maple syrup to keep this drink vegan-friendly.
    • Cold Version: If you prefer a cold drink, especially in warm weather, let the oatmeal drink cool down and then refrigerate it. Serve it chilled for a refreshing treat.

    Conclusion

    Indulging in a warm, comforting, and customizable oatmeal drink before bedtime is a wonderful way to unwind and enjoy a restful night’s sleep. Whether you’re looking to improve your sleep quality or simply want a tasty and soothing beverage, this oatmeal drink is definitely worth trying. So go ahead, grab your ingredients, and treat yourself to a delicious nighttime ritual. Sweet dreams!

  • Quick & Healthy Gluten-Free Oatmeal Bread (No Flour, No Butter!)

    Quick & Healthy Gluten-Free Oatmeal Bread (No Flour, No Butter!)

    Quick & Healthy Gluten-Free Oatmeal Bread (No Flour, No Butter!)

    I’ve perfected this game-changing oatmeal bread recipe that’s revolutionizing healthy breakfasts. Drawing inspiration from traditional Irish oat bread while keeping modern dietary needs in mind, this recipe transforms simple oats into a hearty, nutritious loaf that’s both gluten-free and protein-rich. The combination of oats and yogurt creates a perfectly moist texture while providing sustained energy throughout your morning.

    Why You’ll Love This Bread

    This bread isn’t just quick and easy – it’s a nutritional powerhouse. Oats are rich in beta-glucans, which help maintain healthy cholesterol levels and promote gut health. Combined with protein-rich yogurt and eggs, this bread provides sustained energy release and keeps you feeling satisfied longer than traditional wheat bread.

    Ingredients

    Base Ingredients:

    • 280g (3¼ cups) old-fashioned oat flakes
    • 250g (1 cup) plain yogurt
    • 2 large eggs
    • 2 tablespoons baking powder

    Add-ins:

    • 1 tablespoon sesame seeds
    • 1 handful (about 30g) chopped walnuts
    • 1 pinch salt
    • 1 pinch black pepper (optional)

    Equipment Needed

    • Loaf pan (plumcake mold)
    • Parchment paper
    • Mixing bowl
    • Measuring cups and spoons
    • Spatula
    • Wire cooling rack

    Step-by-Step Instructions

    Preparation (10 minutes)

    1. Preheat the Oven:
    • Set temperature to 356°F (180°C)
    • Position rack in middle of oven
    1. Prepare Your Pan:
    • Line loaf pan with parchment paper
    • Leave overhang for easy removal
    • Lightly grease exposed sides

    Making the Batter (15 minutes)

    1. Mix Wet Ingredients:
    • In a large bowl, combine yogurt and eggs
    • Whisk until smooth and well integrated
    • Ensure no egg streaks remain
    1. Combine Dry Ingredients:
    • Add oat flakes gradually while stirring
    • Incorporate baking powder
    • Add salt and pepper if using
    • Mix until well combined
    1. Add Texture Elements:
    • Fold in chopped walnuts
    • Incorporate sesame seeds
    • Reserve some for topping if desired

    Baking Process (30-35 minutes)

    1. Transfer to Pan:
    • Pour batter into prepared loaf pan
    • Smooth top with spatula
    • Sprinkle with reserved seeds if using
    1. Baking:
    • Place in preheated oven
    • Bake for 30-35 minutes
    • Check at 25 minutes with toothpick test
    • Look for golden-brown top

    Cooling & Storage (15 minutes)

    1. Initial Cooling:
    • Remove from oven
    • Let rest in pan for 10 minutes
    • Lift out using parchment overhang
    1. Complete Cooling:
    • Transfer to wire rack
    • Cool completely before slicing
    • Wait at least 1 hour for best texture

    Storage Tips

    • Room temperature: 2-3 days in airtight container
    • Refrigerator: Up to 1 week
    • Freezer: Up to 3 months (slice before freezing)
    • Toast slices before serving for best results

    Nutrition Information

    Per slice (8 slices per loaf):

    • Calories: 180
    • Protein: 8g
    • Carbohydrates: 24g
    • Dietary Fiber: 4g
    • Healthy Fats: 7g
    • Iron: 2mg
    • Calcium: 150mg

    Pro Tips for Perfect Results

    1. Use old-fashioned oats rather than quick oats for better texture
    2. Room temperature eggs and yogurt blend better
    3. Don’t overmix the batter to maintain lightness
    4. Allow bread to cool completely before slicing
    5. Toast slices for a crispy exterior

    Serving Suggestions

    • Top with avocado and eggs for a protein-rich breakfast
    • Spread with almond butter and banana for pre-workout fuel
    • Toast and top with hummus for a savory snack
    • Use as a base for open-faced sandwiches

    This versatile bread proves that gluten-free baking can be both simple and delicious. Perfect for meal prep, it’s an excellent option for busy mornings or as a healthy snack throughout the day. Its high protein and fiber content makes it especially satisfying, while the nuts and seeds add wonderful texture and essential nutrients.

  • Maple & Lentil Vegan Sausage Breakfast Bliss

    Maple & Lentil Vegan Sausage Breakfast Bliss

    Ingredients:
    • 1 cup cooked lentils (200 g)
    • 1 medium apple, grated (approx. 1 cup, 150 g)
    • 1/2 cup rolled oats (45 g)
    • 1/4 cup chickpea flour (30 g)
    • 1 small onion, finely diced (70 g)
    • 2 cloves garlic, minced
    • 2 tbsp maple syrup (30 ml)
    • 1 tsp dried sage
    • 1/2 tsp dried thyme
    • 1/2 tsp smoked paprika
    • Salt and pepper to taste
    • 1 tbsp olive oil (15 ml)

    Directions:

    1. In a food processor, pulse the lentils, grated apple, and rolled oats until slightly chunky.
    2. Transfer the mixture to a bowl and stir in chickpea flour, diced onion, garlic, maple syrup, and spices.
    3. Season with salt and pepper; mix until well combined.
    4. Form the mixture into small sausage patties.
    5. Heat olive oil in a skillet over medium heat.
    6. Fry the patties for about 4–5 minutes on each side until golden.
    7. Serve hot with toast or as part of a breakfast platter.

    Recipe Information: Preparation Time: 15 mins | Cooking Time: 15 mins | Total Time: 30 mins | Calories per Serving: 180 kcal | Number of Servings: 4

  • super simple 3-ingredient ice cream

    super simple 3-ingredient ice cream

    super simple 3-ingredient ice cream

    Ingredients
    – 2 cups heavy cream
    – 1 can (14 oz) sweetened condensed milk
    – 1 tsp vanilla extract
    Instructions
    In a large bowl, whip the heavy cream until stiff peaks form. You can use a hand mixer or a stand mixer for this.
    Gently fold in the sweetened condensed milk and vanilla extract until well combined.
    Pour the mixture into a loaf pan or a freezer-safe container. Cover with plastic wrap and freeze for at least 6 hours, or until firm.
    There you have it! Simple, creamy, and delicious ice cream. Enjoy! 1f366
  • The Ultimate Guide to Making Perfect Deviled Eggs: A Luxurious Twist on a Classic Appetizer

    The Ultimate Guide to Making Perfect Deviled Eggs: A Luxurious Twist on a Classic Appetizer

    The Ingredients You’ll Need

    Eggs: 8
    Mayonnaise: 6 tablespoons
    Mustard sauce: 2 tablespoons
    Hot sauce: 1 tablespoon (or adjust to taste)
    Chives: 2 stalks
    Paprika powder: 2 tablespoons
    Pepper: 1 pinch
    Salt to taste

    Recipe Overview

    . Prep Time: 15 minutes
    . Cook Time: 15 minutes
    . Total Time: 30 minutes
    . Servings: 16 halves

    Step-by-Step Recipe Instructions

    1. Boil the Eggs
    Place the eggs in a saucepan and cover them with water. Bring to a boil, then cover and remove from heat. Let stand for 12 minutes. Then, transfer the eggs to a bowl of ice water to cool.

    2. Prepare the Filling
    Peel the eggs and cut them in half lengthwise. Remove the yolks and place them in a mixing bowl. Add mayonnaise, mustard sauce, hot sauce, salt, and pepper. Mix until smooth.

    3. Fill the Egg Whites
    Pipe or spoon the yolk mixture into the egg white halves.

    4. Garnish
    Sprinkle each egg half with paprika powder and finely chopped chives.

    5. Serve
    Chill the Deviled Eggs in the refrigerator for at least an hour before serving.

    This Deviled Eggs recipe is the perfect blend of taste, elegance, and simplicity. It’s an appetizer that never goes out of style and is always appreciated by guests. Try this recipe for your next gathering and watch as these delightful bites become the talk of the event!

  • Tangy Sweet and Sour Meatballs

    Tangy Sweet and Sour Meatballs

    Ingredients:

    1 pound ground beef
    1/2 cup breadcrumbs
    1/4 cup milk
    1 egg
    1/4 cup finely chopped onion
    1/4 teaspoon garlic powder
    1/2 teaspoon salt
    1/4 teaspoon black pepper
    1 tablespoon vegetable oil
    Sauce:

    1 cup ketchup
    1/2 cup brown sugar
    1/4 cup white vinegar
    1 tablespoon soy sauce
    1 teaspoon cornstarch (optional, for thickening)

    Instructions:

    In a large bowl, combine the ground beef, breadcrumbs, milk, egg, chopped onion, garlic powder, salt, and black pepper. Mix until well combined.
    Shape the mixture into small meatballs, about 1 inch in diameter.
    Heat the vegetable oil in a large skillet over medium heat. Add the meatballs and cook, turning occasionally, until browned on all sides and cooked through, about 10-12 minutes.
    In a separate bowl, whisk together the ketchup, brown sugar, white vinegar, and soy sauce. If desired, add cornstarch to thicken the sauce.
    Pour the sauce over the meatballs in the skillet. Stir gently to coat the meatballs evenly with the sauce.
    Reduce the heat to low and simmer for 10 minutes, allowing the flavors to meld and the sauce to thicken.

  • Rotel Beef & Cheese Crescents

    Rotel Beef & Cheese Crescents

    Ingredients:
    – 1 lb ground beef
    – 1 can Rotel diced tomatoes and green chilies, drained
    – 1 package crescent roll dough
    – 1 cup shredded cheddar cheese
    – 4 oz cream cheese
    – 1 tsp garlic powder
    – Salt and pepper to taste
    Instructions:

    1. Preheat the oven to 375°F (190°C) and line a baking sheet with parchment paper.
    2. In a skillet, brown the ground beef over medium heat. Drain any excess fat.
    3. Add the Rotel tomatoes, cream cheese, garlic powder, salt, and pepper to the beef. Stir until the cream cheese is melted and the mixture is well combined.
    4. Unroll the crescent roll dough and separate into triangles.
    5. Place a spoonful of the beef mixture onto each crescent roll triangle. Sprinkle with cheddar cheese.

  • Crispy Sweet Potato and Zucchini Bites

    Crispy Sweet Potato and Zucchini Bites

    These crispy sweet potato and zucchini bites are a healthier alternative to fried potatoes, offering a delightful blend of flavors and textures. Perfect as a side dish or a standalone snack, they are easy to make and incredibly satisfying.

    WANT TO SAVE THIS RECIPE?
    Just drop your email here and I’ll send it right away! Plus you’ll get new recipes from me every week. Yes please!

    Ingredients:

    1 medium sweet potato (about 1.1 lb | 500 g)
    1 medium zucchini (about 0.5 lb | 200 g)
    1 onion
    Coating:

    3 oz (80 g | 1 cup) almond meal
    1 oz (30 g | 1/3 cup) plant-based parmesan cheese
    3 oz (50 g | 1/3 cup) breadcrumbs or chickpea crumbs
    1 tsp dried herbs
    1 tsp garlic powder
    1 tsp Korean chili flakes (adjust to taste)
    Salt, to taste
    Instructions:

    Preheat your oven to 400°F (200°C) and line a baking sheet with parchment paper.
    Prepare the sweet potato and zucchini by washing them thoroughly. Peel the sweet potato and cut both the sweet potato and zucchini into thin slices or sticks, similar to French fries.
    Slice the onion thinly into rings.
    In a bowl, combine almond meal, plant-based parmesan cheese, breadcrumbs (or chickpea crumbs), dried herbs, garlic powder, Korean chili flakes, and salt. Mix well.
    Coat each sweet potato slice, zucchini slice, and onion ring thoroughly with the almond meal mixture, ensuring all sides are covered evenly.
    Arrange the coated slices and rings on the prepared baking sheet in a single layer.
    Bake in the preheated oven for about 20-25 minutes, flipping halfway through, until they are golden brown and crispy.

    Remove from the oven and let cool slightly before serving.
    More Information About the Recipe: These crispy sweet potato and zucchini bites are not only delicious but also packed with nutrients. They make a great alternative to traditional fried potatoes, providing a crunchy texture without the excess oil.

    Why You’ll Love This Recipe:

    Healthier Option: Baked, not fried, reducing excess oil intake.
    Versatile: Serve as a side dish, appetizer, or snack.
    Flavorful: The combination of sweet potato, zucchini, and spices creates a satisfying flavor profile.

    WANT TO SAVE THIS RECIPE?
    Just drop your email here and I’ll send it right away! Plus you’ll get new recipes from me every week. Yes please!

    Nutritional Benefits:

    Sweet potatoes are rich in vitamins A and C, fiber, and antioxidants.
    Zucchini adds additional vitamins and minerals, including potassium and vitamin B6.
    Almond meal provides healthy fats and protein, while plant-based parmesan cheese adds a cheesy flavor without dairy.
    Conclusion: Enjoy these crispy sweet potato and zucchini bites as a guilt-free indulgence that satisfies your craving for something crispy and flavorful. Whether you serve them as a side dish or a snack, they’re sure to be a hit!

  • DRY FRUIT CAKE

    DRY FRUIT CAKE

    DRY FRUIT CAKE

    Prep: 15 minutes

    Cooking time: 35-40 minutes
    Servings: 6 People


    Ingredients :
    200g of oatmeal
    1 teaspoon of the chemical yeast
    1 pinch of salt
    1/2 teaspoon ground cinnamon
    240 ml of milk
    6 dried apricots
    6 dried plums
    50 g of raisins
    1 carrot
    2 apples
    3 eggs
    3 tablespoons of vegetable oil
    1 teaspoon of vanilla extract


    Preparation:


    Preparing the nuts
    Soak apricots, plums and raisins in a bowl of warm water for 10 minutes to rehydrate. Drain them and cut the apricots and plums into small pieces.

    Prepare the dry ingredients
    In a large salad bowl, mix oatmeal, chemical yeast, salt and cinnamon.

    Preparing the fresh fruits
    Grate the carrot and the apples and then add them to the oatmeal mix.

    Preparing the liquid ingredients
    In another bowl, beat eggs with oil and vanilla extract until you get a homogeneous mixture. Add milk and mix well.

    Assembling the dough
    Pour the liquid mixture into the salad bowl containing the dry ingredients and mix until you get a homogeneous batter. Then add the rehydrated nuts and gently mix.

    Baking
    Preheat the oven to 180°C. Pour the batter into a 15 cm diameter mold with baking paper. Bake for 35-40 minutes, or until a toothpaste inserted in the center comes out clean.

    Tasting
    Let it cool before you thaw and enjoy this moist and naturally sweet cake, ideal for a healthy and gourmet breakfast.

    Tips for Making a Perfect Dry Fruit Cake

    1. Choose Quality Ingredients – Use fresh, high-quality dry fruits like raisins, almonds, cashews, walnuts, dates, and figs for the best flavor.

    2. Soak the Dry Fruits – Soak them in fruit juice (like orange juice) or alcohol (like rum or brandy) for at least a few hours, preferably overnight, to enhance the taste and texture.

    3. Use the Right Flour – All-purpose flour or a mix of all-purpose and whole wheat flour works well for a rich texture.

    4. Proper Mixing – Fold in the dry fruits gently into the batter to avoid sinking to the bottom. Tossing them in a bit of flour helps distribute them evenly.

    5. Right Sweetener – Use brown sugar, honey, or jaggery for a deep, caramel-like sweetness.

    6. Spices for Flavor – Add cinnamon, nutmeg, or cardamom to enhance the cake’s aroma and taste.

    7. Low and Slow Baking – Bake at a lower temperature (around 160°C or 320°F) for a longer time to ensure even cooking without burning.

    8. Let It Rest – Allow the cake to cool completely before slicing. It tastes even better after a day as the flavors blend.

    Benefits of Dry Fruit Cake

    1. Rich in Nutrients – Packed with vitamins, minerals, and healthy fats from nuts and dry fruits.

    2. Good for Digestion – Ingredients like dates, figs, and raisins help improve digestion due to their fiber content.

    3. Energy Boosting – Provides a quick source of energy, making it great for breakfast or snacks.

    4. No Preservatives – Homemade dry fruit cakes are free from artificial additives and preservatives.

    5. Heart-Friendly – Nuts like almonds and walnuts help lower bad cholesterol and promote heart health.

    6. Natural Sweetness – When made with less refined sugar, it’s a healthier dessert option.

    Would you like a simple recipe for dry fruit cake? 

  • Tropical Dream Smoothie

    Tropical Dream Smoothie

    Ingredients:
    1/2 cup frozen mango 1f96d
    1/2 cup frozen pineapple 1f34d
    1/2 banana 1f34c
    1/2 cup coconut milk 1f965
    1 tsp honey 1f36f (optional)
    Instructions:
    Place frozen mango 1f96d, pineapple 1f34d, banana 1f34c, and coconut milk 1f965 into the blender.
    Add honey 1f36f for extra sweetness if desired.
    Blend until smooth and creamy. Serve chilled and enjoy this tropical delight!